
Skip to content

CI

4 posts with the tag “CI”

Setup MooseCI on your repository with GitHub Actions

Setup MooseCI on your repository with GitHub Actions

Section titled “Setup MooseCI on your repository with GitHub Actions”

MooseCI is a tool that runs automatic analyses on your code. It looks for code quality problems and writes a report for you.

MooseCI is built on top of Moose. It can run in headless mode, so you can use it on a CI server.

You can use MooseCI in two ways:

  • as a command line tool, with Docker
  • inside a CI, with its GitHub Action for example

For now, MooseCI supports Java and Python.

MooseCI runs its analyses on the Famix model of your project, not on the FAST model.

The easiest way to try MooseCI is with Docker.

First, pull the image for your language. For Java, use the latest image, and for Python, use the python image:

Terminal window
docker pull ghcr.io/moosetechnology/moose-ci:latest
docker pull ghcr.io/moosetechnology/moose-ci:python

Go to the folder you want to analyze, and create a configuration file with the init command:

Terminal window
docker run -v "$(pwd):/src" ghcr.io/moosetechnology/moose-ci:latest init

This creates a moose-ci.ston file. You can edit it to choose the rules and the metrics.

Then run the analysis:

Terminal window
docker run -v "$(pwd):/src" ghcr.io/moosetechnology/moose-ci:latest analyze

MooseCI prints the report in the console and writes a JSON report in .moose-ci/report.

MooseCI is also available as a GitHub Action. Add it to a repository, and it runs on every pull request.

The Action:

  • runs MooseCI on your project
  • uploads the report as an artifact
  • comments on the pull request with a download link and a short summary of the analysis

Let’s take VerveineJ as an example. VerveineJ is a Java project that parses Java code and exports it to JSON/MSE for Moose.

We added MooseCI to VerveineJ. You can see the result in this pull request.

First, create the configuration file. Go to the folder you want to analyze, and run init:

Terminal window
cd app/src/main/java/fr
docker run -v "$(pwd):/src" ghcr.io/moosetechnology/moose-ci:latest init

This creates app/src/main/java/fr/moose-ci.ston. The file looks like this:

MooseCIConfig {
#projectLanguage : #java,
#metrics : [
#packages,
#classes
],
#rules : [
#too_many_parameters : 10,
#large_class : 20,
#unused_local_variable,
#unused_parameter
],
#outputFormats : [
#json
],
#outputPath : '.moose-ci/report',
#visualizations : [ ],
#isRemote : false
}

In this file, you can:

  • set the language with #projectLanguage
  • choose the metrics to compute with #metrics
  • choose the quality rules with #rules, and give a threshold to some rules (for example #too_many_parameters : 10)
  • choose the report format and location with #outputFormats and #outputPath

Then add the workflow. Create .github/workflows/moose-ci.yml:

name: MooseCI
on: pull_request
permissions:
contents: read
actions: write
pull-requests: write
jobs:
analyze:
runs-on: ubuntu-latest
steps:
- uses: actions/checkout@v4
- uses: moosetechnology/setup-MooseCI@v1.0.0
with:
project-path: ./app/src/main/java/fr
project-language: java

Some details:

  • on: pull_request runs the workflow on every pull request.
  • actions: write is needed to upload the report.
  • pull-requests: write is needed to write the comment.
  • project-path is the folder to analyze. It must contain moose-ci.ston.
  • project-language selects the image. Use java or python.

On each pull request, MooseCI comments with the analysis. For VerveineJ, the summary looks like this:
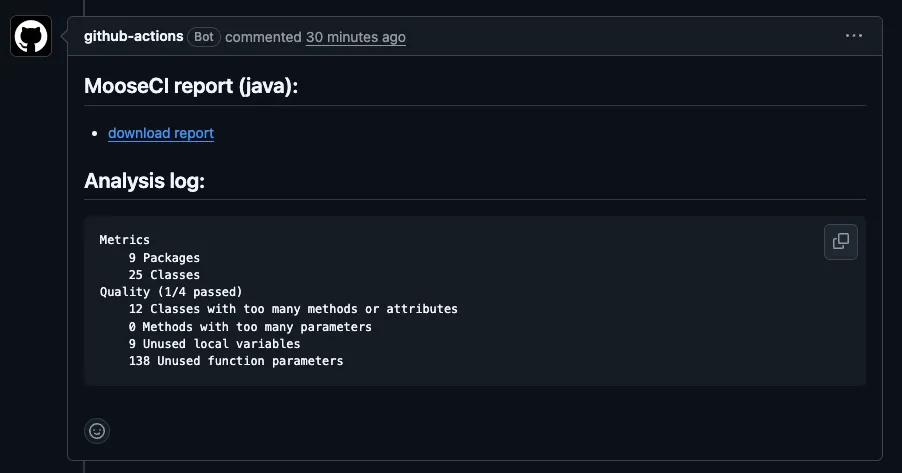
MooseCI comment on a pull request

The report also contains the list of rule violations, with the location of each problem in the source code.
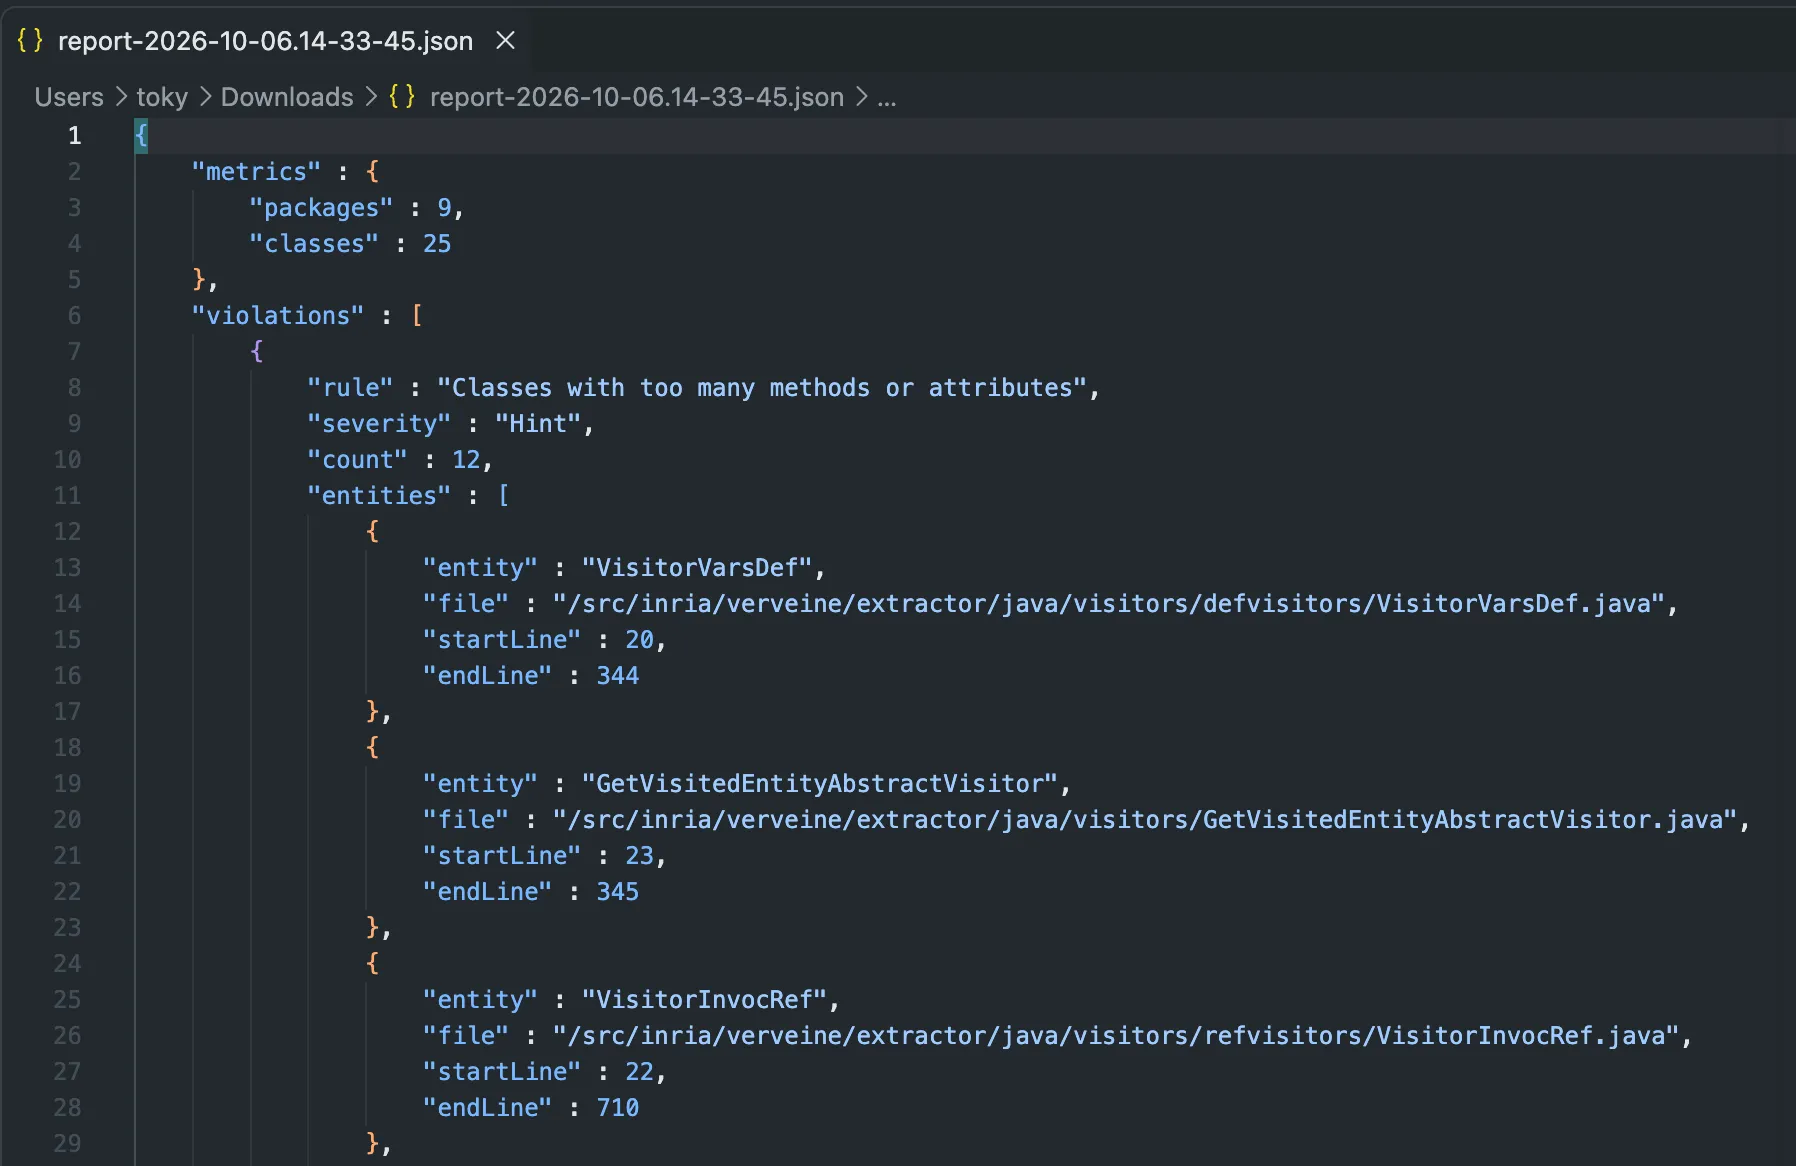
Content of the downloaded JSON report

MooseCI is not limited to GitHub. In any other CI, you can run the same Docker image and the same commands as the CLI, for example:

Terminal window
docker run -v "$(pwd):/src" ghcr.io/moosetechnology/moose-ci:latest analyze

The report is written in the MooseCI report folder (.moose-ci/report). Your CI can then publish it as an artifact.

MooseCI is easy to use. You can run it locally with Docker, or on every pull request with the GitHub Action. You only need a configuration file and a small workflow.

Testing your algo on a java project

When developping algorithm on top of the Moose platform, we can easily hurt a wall during testing.

To do functional (and sometimes unit) testing, we need to work on a Moose model. Most of the time we are getting this model in two ways:

  • We produce a model and save the .json to recreate this model in the tests
  • We create a model by hand

But those 2 solutions have drawbacks:

  • Keeping a JSON will not follow the evolutions of Famix and the model produce will not be representative of the last version of Famix
  • Creating a model by hand has the drawback of taking the risk that this model will not be representative of what we could manipulate in reality. For example, we might not think about setting the stubs or the source anchors

In order to avoid those drawbacks I will describe my way of managing such testing cases in this article. In order to do this, I will explain how I set up the tests of a project to build CallGraph of Java projects.

The idea I had for testing callgraphs is to implement real java projects in a resources folder in the git of the project. Then, we can parse them when launching the tests and manipulate the produced model. This would ensure that we always have a model up to date with the latest version of Famix. If tests breaks, this means that our famix model evolved and that our project does not work anymore for this language.

Parse the project
Parse the project
Create java project
Create java project
Import the model
Import the model
Run tests on the model
Text is not SVG - cannot display

The first step to build tests is to write some example java code.

I will start with a minimal example:

public class Main {
public static void main(String[] args) {
System.out.println("Hello World!");
}
}

I’ll save this file in the git repository of my project under Famix-CallGraph/resources/sources/example1/Main.java.

Now that we have the source code, we need a way to access it in our project.

In order to access our resources, we will use GitBrigde.

You can install it by executing:

Metacello new
githubUser: 'jecisc' project: 'GitBridge' commitish: 'v1.x.x' path: 'src';
baseline: 'GitBridge';
load

But we should add it to our baseline:

BaselineOfFamixCallGraph >> #gitBridge: spec
spec baseline: 'GitBridge' with: [ spec repository: 'github://jecisc/GitBridge:v1.x.x/src' ]
BaselineOfFamixCallGraph >> #baseline: spec
<baseline>
spec for: #common do: [
"Dependencies"
self gitBridge: spec.
"Packages"
spec
package: 'Famix-CallGraph';
package: 'Famix-CallGraph-Tests' with: [ spec requires: #( 'Famix-CallGraph' 'GitBridge' ) ]. "<== WE ADD GITBRIDGE HERE!"
].
spec for: #NeedsFamix do: [
self famix: spec.
spec package: 'Famix-CallGraph' with: [ spec requires: #( Famix ) ] ]

Now that we have the dependency running, we can use this project. We will explain the minimal steps here but you can find the full documantation here.

The usage of GitBridge begins with the definition of our FamixCallGraphBridge:

GitBridge << #FamixCallGraphBridge
slots: {};
package: 'Famix-CallGraph-Tests'

Now that this class exists we can access our git folder using FamixCallGraphBridge current root.

Let’s add some syntactic suggar:

FamixCallGraphBridge class >> #resources
^ self root / 'resources'
FamixCallGraphBridge class >> #sources
^ self resources / 'sources'

We can now access our java projects doing FamixCallGraphBridge current sources.

This step is almost done, but in order for our tests to work in a github action (for example), we need two little tweaks.

In our smalltalk.ston file, we need to register our project in Iceberg (because GitBridge uses Iceberg to access the root folder).

SmalltalkCISpec {
#loading : [
SCIMetacelloLoadSpec {
#baseline : 'FamixCallGraph',
#directory : 'src',
#registerInIceberg : true "<== This line"
}
]
}

Also, in our github action we need to be sure that the checkout action will get enough info for git bridge to run and not the minimal ammount (which is the default) adding a fetch-depth: option.

steps:
- uses: actions/checkout@v4
with:
fetch-depth: '0'

Now we need to be able to parse our project. For this, we will use a Java utility thaht is directly in Moose: FamixJavaFoldersImporter.

We can parse and receive a model doing:

model := (FamixJavaFoldersImporter importFolders: { FamixCallGraphBridge sources / 'example1' }) anyOne.

Now that we can access the model it is possible to implement our tests.

I’m starting by an abstract class:

TestCase << #FamixAbstractJavaCallGraphBuilderTestCase
slots: { #model . #graph };
package: 'Famix-CallGraph-Tests'

Now I will create a TestCase that needs my java model

FamixAbstractJavaCallGraphBuilderTestCase << #FamixJavaCHAExample1Test
slots: {};
package: 'Famix-CallGraph-Tests'

And now I will create a setup importing the model and creating a call graph:

FamixAbstractJavaCallGraphBuilderTestCase >> #setUp
super setUp.
model := (FamixJavaFoldersImporter importFolders: { self javaSourcesFolder }) anyOne.
graph := (FamixJavaCHABuilder entryPoints: self entryPoints) build
FamixJavaCHAExample1Test >> #javaSourcesFolder
"Return the java folder containing the sources to parse for those tests"
| folder |
folder := FamixCallGraphBridge sources / 'example1'.
folder ifAbsent: [ self error: 'Folder does not exists ' , folder pathString ].
^ folder

And now you have your model available for the testing!

I am using this technic to tests multiple projects such as parsers or call graph builders. In those projects I do touch my model and the setup can take time. So I optimize this setup in order to build a model only once for all the test case using a TestResource.

In order to do this we can remove the slots we added to FamixAbstractJavaCallGraphBuilderTestCase and create a test resource that will hold them

TestResource << #FamixAbstractJavaCallGraphBuilderTestResource
slots: { #model . #graph };
package: 'Famix-CallGraph-Tests'

Then we can move the setup to this class

FamixAbstractJavaCallGraphBuilderTestResource >> #setUp
super setUp.
model := (FamixJavaFoldersImporter importFolders: { self javaSourcesFolder }) anyOne.
graph := (FamixJavaCHABuilder entryPoints: self entryPoints) build

Personally I’m also adding a tearDown cleaning the vars because TestResources are singletons and I do not want to hold a model in memory all the time.

Then I’m creating my test resource for the example1 project.

FamixAbstractJavaCallGraphBuilderTestResource << #FamixJavaCHAExample1Resource
slots: {};
package: 'Famix-CallGraph-Tests'
FamixJavaCHAExample1Resource >> #javaSourcesFolder
"Return the java folder containing the sources to parse for those tests"
| folder |
folder := FamixCallGraphBridge sources / 'example1'.
folder ifAbsent: [ self error: 'Folder does not exists ' , folder pathString ].
^ folder

And now we can declare that the TestCase will use this resource:

FamixJavaCHAExample1Test class >> #resources
^ { FamixJavaCHAExample1Resource }

The model then become accessible like this:

FamixJavaCHAExample1Resource >> #model
^ self resources anyOne current model

Here is a few tricks I use to simplify even better the setting of my tests cases

The first one is to make automatic the detection of the java source folder by using the name of the test cases:

FamixAbstractJavaCallGraphBuilderTestResource >> #javaSourcesFolder
^ self class javaSourcesFolder
FamixAbstractJavaCallGraphBuilderTestResource class >> #javaSourcesFolder
"Return the java folder containing the sources to parse for those tests"
| folder |
folder := FamixCallGraphBridge sources / ((self name withoutPrefix: 'FamixJavaCHA') withoutSuffix: 'Resource') uncapitalized.
folder ifAbsent: [ self error: 'Folder does not exists ' , folder pathString ].
^ folder

We can now remove this method from all subclasses! But makes sure the name of your source folder matches the name of the tests ressource ;)

Automatic test resource detection and access

Section titled “Automatic test resource detection and access”

We can do the same with the detection of the test resource in the test case.

FamixAbstractJavaCallGraphBuilderTestCase class >> #resources
^ self environment
at: ((self name withoutSuffix: 'Test') , 'Resource') asSymbol
ifPresent: [ :class | { class } ]
ifAbsent: [ { } ]
FamixAbstractJavaCallGraphBuilderTestCase class >> #sourceResource
^ self resources anyOne current
FamixAbstractJavaCallGraphBuilderTestCase >> #sourceResource
"I return the instance of the test resource I'm using to build the sources of a java project"
^ self class sourceResource
FamixAbstractJavaCallGraphBuilderTestCase >> #model
^ self sourceResource model

Et voila ! Now adding a test case ready to use on a new java project is equivalent to create a test case:

FamixAbstractJavaCallGraphBuilderTestCase << #FamixJavaCHAExample2Test
slots: {};
package: 'Famix-CallGraph-Tests'

And the resource associated!

FamixAbstractJavaCallGraphBuilderTestResource << #FamixJavaCHAExample2Resource
slots: {};
package: 'Famix-CallGraph-Tests'

Nothing much.

Easily find the sources of the tested project

Section titled “Easily find the sources of the tested project”

A last thing I am doing to simplify thing is to implement a method to access easily the sources.

FamixJavaCHAExample1Test >> #openSources
<script: 'self new openSources'>
self resources anyOne javaSourcesFolder openInOSFileBrowser

It is possible to do the same thing for other languages than java but maybe not exactly in the same way than in this blogpost for the section “Parse and import your model”. But this article is meant to be an inspiration!

I hope this helps improve the robustness of our projects :)

Test your Moose code using CIs

You have to test your code!

I mean, really.

But sometimes, testing is hard, because you do not know how to start (often because it was hard to start with TDD or better XtremTDD 😄).

One challenging situation is the creation of mocks to represent real cases and use them as test resources. This situation is common when dealing with code modeling and meta-modeling.

Writing a model manually to test features on it is hard. Today, I’ll show you how to use GitHub Actions as well as GitLab CI to create tests for the Moose platform based on real resources.


First of all, let’s describe a simple process when working on modeling and meta-modeling.

Source Code

Parse

Model File

Import

Model in Memory

Use

When analyzing a software system using MDE, everything starts with parsing the source code of the application to produce a model. This model can then be stored in a file. Then, we import the file into our analysis environment, and we use the concrete model.

All these steps are performed before using the model. However, when we create tests for the Use step, we do not perform all the steps before. We likely just create a mock model. Even if this situation is acceptable, it is troublesome because it disconnects the test from the tools (which can have bugs) that create the model.

One solution is thus not to create a mock model, but to create mock source code files.

Using mock source code files, we can reproduce the process for each test (or better, a group of tests 😉)

Mock Source Code

Parse with Docker

Model File

Import with script

Model in Memory

Test

In the following, I describe the implementation and set-up of the approach for analyzing Java code, using Pharo with Moose. It consists of the following steps:

  • Create mock resources
  • Create a bridge from your Pharo image to your resources using PharoBridge
  • Create a GitLab CI or a GitHub Action
  • Test ❤️

The first step is to create mock resources. To do so, the easiest way is to include them in your git repository.

You should have the following:

> ci // Code executed by the CI
> src // Source code files
> tests // Tests ressources

Inside the tests folder, it is possible to add several subfolders for different test resources.

To easily use the folder of the test resource repository from Pharo, we will use the GitBridge project.

The project can be added to your Pharo Baseline with the following code fragment:

spec
baseline: 'GitBridge'
with: [ spec repository: 'github://jecisc/GitBridge:v1.x.x/src' ].

Then, to connect our Pharo project to the test resources, we create a class in one of our packages, a subclass of `GitBridge“.

A full example would be as follows:

Class {
#name : #MyBridge,
#superclass : #GitBridge,
#category : #'MyPackage-Bridge'
}
{ #category : #initialization }
MyBridge class >> initialize [
SessionManager default registerSystemClassNamed: self name
]
{ #category : #'accessing' }
MyBridge class >> testsResources [
^ self root / 'tests'
]

The method testsResources can then be used to access the local folder with the test resources.

Warning: this setup only works locally. To use it with GitHub and GitLab, we first have to set up our CI files.

To set up our CI files, we first create in the ci folder of our repository a pretesting.st file that will execute Pharo code.

(IceRepositoryCreator new
location: '.' asFileReference;
subdirectory: 'src';
createRepository) register

This code will be run by the CI and register the Pharo project inside the Iceberg tool of Pharo. This registration is then used by GitBridge to retrieve the location of the test resources folder.

Then, we have to update the .smalltalk.ston file (used by every Smalltalk CI process) and add a reference to our pretesting.st file.

SmalltalkCISpec {
#preTesting : SCICustomScript {
#path : 'ci/pretesting.st'
}
...
}

The last step for GitLab is the creation of the .gitlab-ci.yml file.

This CI can include several steps. We now present the steps dedicated to testing the Java model, but the same steps apply to other programming languages.

First, we have to parse the tests-resources using the docker version of VerveineJ

stages:
- parse
- tests
parse:
stage: parse
image:
name: badetitou/verveinej:v3.0.0
entrypoint: [""]
needs:
- job: install
artifacts: true
script:
- /VerveineJ-3.0.0/verveinej.sh -Xmx8g -Xms8g -- -format json -o output.json -alllocals -anchor assoc -autocp ./tests/lib ./tests/src
artifacts:
paths:
- output.json

The parse stage uses the v3 of VerveineJ, parses the code, and produces an output.json file including the produced model.

Then, we add the common tests stage of Smalltalk ci.

tests:
stage: tests
image: hpiswa/smalltalkci
needs:
- job: parse
artifacts: true
script:
- smalltalkci -s "Moose64-10"

This stage creates a new Moose64-10 image and performs the CI based on the .smalltalk.ston configuration file.

The last step for GitLab is the creation of the .github/workflows/test.yml file.

In addition to a common smalltalk-ci workflow, we have to configure differently the checkout step, and add a step that parses the code.

For the checkout step, GitBridge (and more specifically Iceberg) needs the history of commits. Thus, we need to configure the checkout actions to fetch the all history.

- uses: actions/checkout@v3
with:
fetch-depth: '0'

Then, we can add a step that runs VerveineJ using its docker version.

- uses: addnab/docker-run-action@v3
with:
registry: hub.docker.io
image: badetitou/verveinej:v3.0.0
options: -v ${{ github.workspace }}:/src
run: |
cd tests
/VerveineJ-3.0.0/verveinej.sh -format json -o output.json -alllocals -anchor assoc .
cd ..

Note that before running VerveineJ, we change the working directory to the tests folder to better deal with source anchors of Moose.

You can find a full example in the FamixJavaModelUpdater repository

The last step is to adapt your tests to use the model produced from the mock source. To do so, it is possible to remove the creation of the mock model by loading the model.

Here’s an example:

externalFamixClass := FamixJavaClass new
name: 'ExternalFamixJavaClass';
yourself.
externalFamixMethod := FamixJavaMethod new
name: 'externalFamixJavaMethod';
yourself.
externalFamixClass addMethod: externalFamixMethod.
myClass := FamixJavaClass new
name: 'MyClass';
yourself.
externalFamixMethod declaredType: myClass.
famixModel addAll: {
externalFamixClass.
externalFamixMethod.
myClass }.

The above can be converted into the following:

FJMUBridge testsResources / 'output.json' readStreamDo: [ :stream |
famixModel importFromJSONStream: stream ].
famixModel rootFolder: FJMUBridge testsResources pathString.
externalFamixClass := famixModel allModelClasses detect: [ :c | c name = 'ExternalFamixJavaClass' ].
myClass := famixModel allModelClasses detect: [ :c | c name = 'MyClass' ].
externalFamixMethod := famixModel allModelMethods detect: [ :c | c name = 'externalFamixJavaMethod' ].

You can now test your code on a model generated as a real-world model!

It is clear that this solution slows down tests performance, however. But it ensures that your mock model is well created, because it is created by the parser tool (importer).

A good test practice is thus a mix of both solutions, classic tests in the analysis code, and full scenario tests based on real resources.

Have fun testing your code now!

Thanks C. Fuhrman for the typos fixes. 🍌