Skip to content

Blog

Building an ownership cartography of a system

When managing a software system, it is important to know who is responsible for which part of the system. This information can be useful for various reasons, such as identifying potential bottlenecks, understanding the impact of changes, and improving collaboration among team members.

One major threat could, for example, come from a developer leaving the team. This is often referred to as the “bus factor” or “truck factor”. But how to detect such a situation?

Research have shown that the ownership of a system can be inferred from its version control history. To do so, one approach is to first investigate the ownership of each file.

Two nice papers, not from the Moose community, are:

Looking at the research paper, we can find a formula that can help build a first version of ownership. It consists for each file of a git repository to compute a degree of authorship for each potential author using this formula.

Given a file ff with path fpf_p, the degree-of-authorship of a developer dd whose Git user has been mapped to mdm_d is given by.

DOA(md,fp)=3.293+1.098×FA(md,fp)+0.164×DL(md,fp)−0.321×ln(1+AC(md,fp))DOA(m_d, f_p) = 3.293 + 1.098 × FA(m_d, f_p) + 0.164× DL(m_d, f_p)−0.321 ×ln(1 + AC (m_d, f_p))

With the following definitions:

DOA depends on three factors: (i) first authorship (FAFA): if mdm_d originally created ff, FAFA is 1; otherwise it is 0; (ii) number of deliveries (DLDL): number of changes in ff made by mdm_d; and (iii) number of acceptances (ACAC): number of changes in ff made by any developer, except mdm_d.

Looking at the source code of the Truck-Factor tool, we can see thet DLDL corresponds to a commit that modifies a file. The file can be added, modified, and renamed.

AC(md,fp)AC (m_d, f_p) is computed by the total number of modifications of a file minus the number of modifications made by the developer mdm_d.

Moose comes with the GitProject Health project to represent a Git repository and analyze its history. So, I wanted to implement the DOA formula in Moose.

One concern is that GitProject Health is firstly made to analyze Git Social Platform and not only git repository with the truck factor in mind. Thus, it is not optimized for this use case.

The major concern comes when loading the model that rely on several calls to the Git Platform API. In order to avoid this, I decided to implement a companion importer named GitLocalModelImporter that can load a model from a local git repository.

To go faster, it relies on the FFI LibGit2. This project includes a LGitRevwalk, a walker that can iterate over the commits of a git repository. Thus, we can iterate over the commits and retrieve the files, the diffs, the commits, and the authors in a repository.

This version is still not optimized to compute truck factor, but it can be used to do lot more than just computing truck factor. It comes as a new classic importer for GitProject Health and so can be used side by side with other importers for optimization.

To implement the DOA formula, I created a simple but effective class named GLPDegreeOfAuthorshipAnalyzer. This class is now part of the GitProject Health project set of metrics. It reuses the exact same algorithm as the Truck-Factor tool to compute the degree of authorship for each file in a git repository.

We note several additionnal considerations to compute the DOA formula. These considerations are mention because they enable analysis of a project without considering the history of the project, which is long to consider.

  • The first authorship (FAFA) is computed by looking at the first commit that added or modified a file to the repository.
  • GitProject Health does not consider renaming of files yet, so it does not consider file renaming.

Even though not considering rename can create issues, this work has been performed on an industrial project and considering renaming would not drastically change the results of the analysis.

The last step I wanted to investigate is to visualize the ownership of a system. I did not create a vizualization dedicated to this point yet. But let’s investigate a running example for the pharo project.

After cloning the project, I create a Moose image with the GitProject Health project installed. Then, I load the pharo project.

glhModel := GLHModel new.
repository := GLHRepository new
cacheAt: #localImporterReference
put: '/path/to/MSR/pharo' asFileReference;
yourself.
glhModel add: repository.
localImporter := GitLocalModelImporter new.
localImporter withFiles: true.
localImporter glhModel: glhModel.
"I will import the last two years"
localImporter withCommitsSince: 2 years.
localImporter importRepository: repository.

After a possibly long execution, we get the repository loaded. It is thus possible to investigate it using our tools.

We want to build a cartography of the application to identify the coverage of files with an author. To do so, I decided to build a TreeMap using the Roassal framework.

First, I need to load the Roassal TreeMap support

Metacello new
baseline: 'Roassal';
repository: 'github://pharo-graphics/Roassal:Pharo13';
onConflictUseIncoming;
load: #( Full )

Then, start the fun.

We build a dictionary with the degree of authorship for everyfile.

filesAuthorShip := ((glhModel allWithSubTypesOf: GLHFile)
select: [ :file | file diffs size ~= 0 ])
collect: [ :file |
"This uses our analyser behind the scene"
file -> file degreeOfAuthorshipAuthors ]
as: Dictionary.

We look for the folder that is the root of the tree map, and we compute the max number of authorship that will be used for coloring the vizualisation.

appsFolder := (glhModel allWithSubTypesOf: GLHFileDirectory)
detect: [ :fi | fi path = 'src' ].
max := (filesAuthorShip collect: #sum) max.

Finally, we build the tree map.

palette := RSQualitativeColorPalette qualitative set39.
b := RSTreeMap new.
b inset: 2 asPoint.
b boxShape borderColor: Color black.
b boxShape borderWidth: 0.05.
color := NSScale linear domain: { 0. max };
range: #( white red ).
b
leafWeight: [ :f | 1 ];
explore: appsFolder nesting: [ :directory |
directory files select: [ :f | (f isKindOf: GLHFileDirectory) ] ]
leaves: [ :directory | directory files reject: [ :f | f isKindOf: GLHFileDirectory ] ].
b shapes
do: [ :box |
box borderWidth: 1.
box isSLeaf
ifTrue: [ box color: (color scale: (filesAuthorShip at: box model ifPresent: [ :dic | dic sum ] ifAbsent: [ 0 ])) ]
ifFalse: [
| path |
path := (box model path splitOn: '/').
path size > 1 ifTrue: [
box color: (palette scale: (box model path splitOn: '/') second) ] ] ].
b shapes @ (RSPopup text: [:f | f path, String crlf, ((filesAuthorShip at: f ifPresent: [ :dic | dic sum ] ifAbsent: [ 0 ]) printString) ]).
b build

Using this script, we built a vizualisation with different color for each package, and a red scale for know packages. It ouput the following image

"Result"

Looking at the image we see that some package have author from the 2 last year modification whereas other were not modified at all.

More than showing the Truck Factor, this vizualization highlights the code that have been updated by people that gain or conserve knowledge on the codebase.

One improvment could be to highlight the core contributors.

To highlight the core contributors, we first create a color palette for them.

coreContributors := (filesAuthorShip values flatCollect: #keys) asSet.
paletteContributor := RSQualitativeColorPalette qualitative flatui120.

Then, we update the first b shapes statements by:

b shapes
do: [ :box |
box borderWidth: 1.
box isSLeaf
ifTrue: [
filesAuthorShip at: box model ifPresent: [ :dic |
| author |
author := (dic associations sorted: [ :a :b | a value > b value ]) first key.
box color: (paletteContributor scale: author) ] ]
ifFalse: [
| path |
path := (box model path splitOn: '/').
box color: Color white ] ] ].

This attributes the color of the core contributors to each box. We present below a final computed visualization that highlight one contributor who seems to became the expert of the Refactoring package.
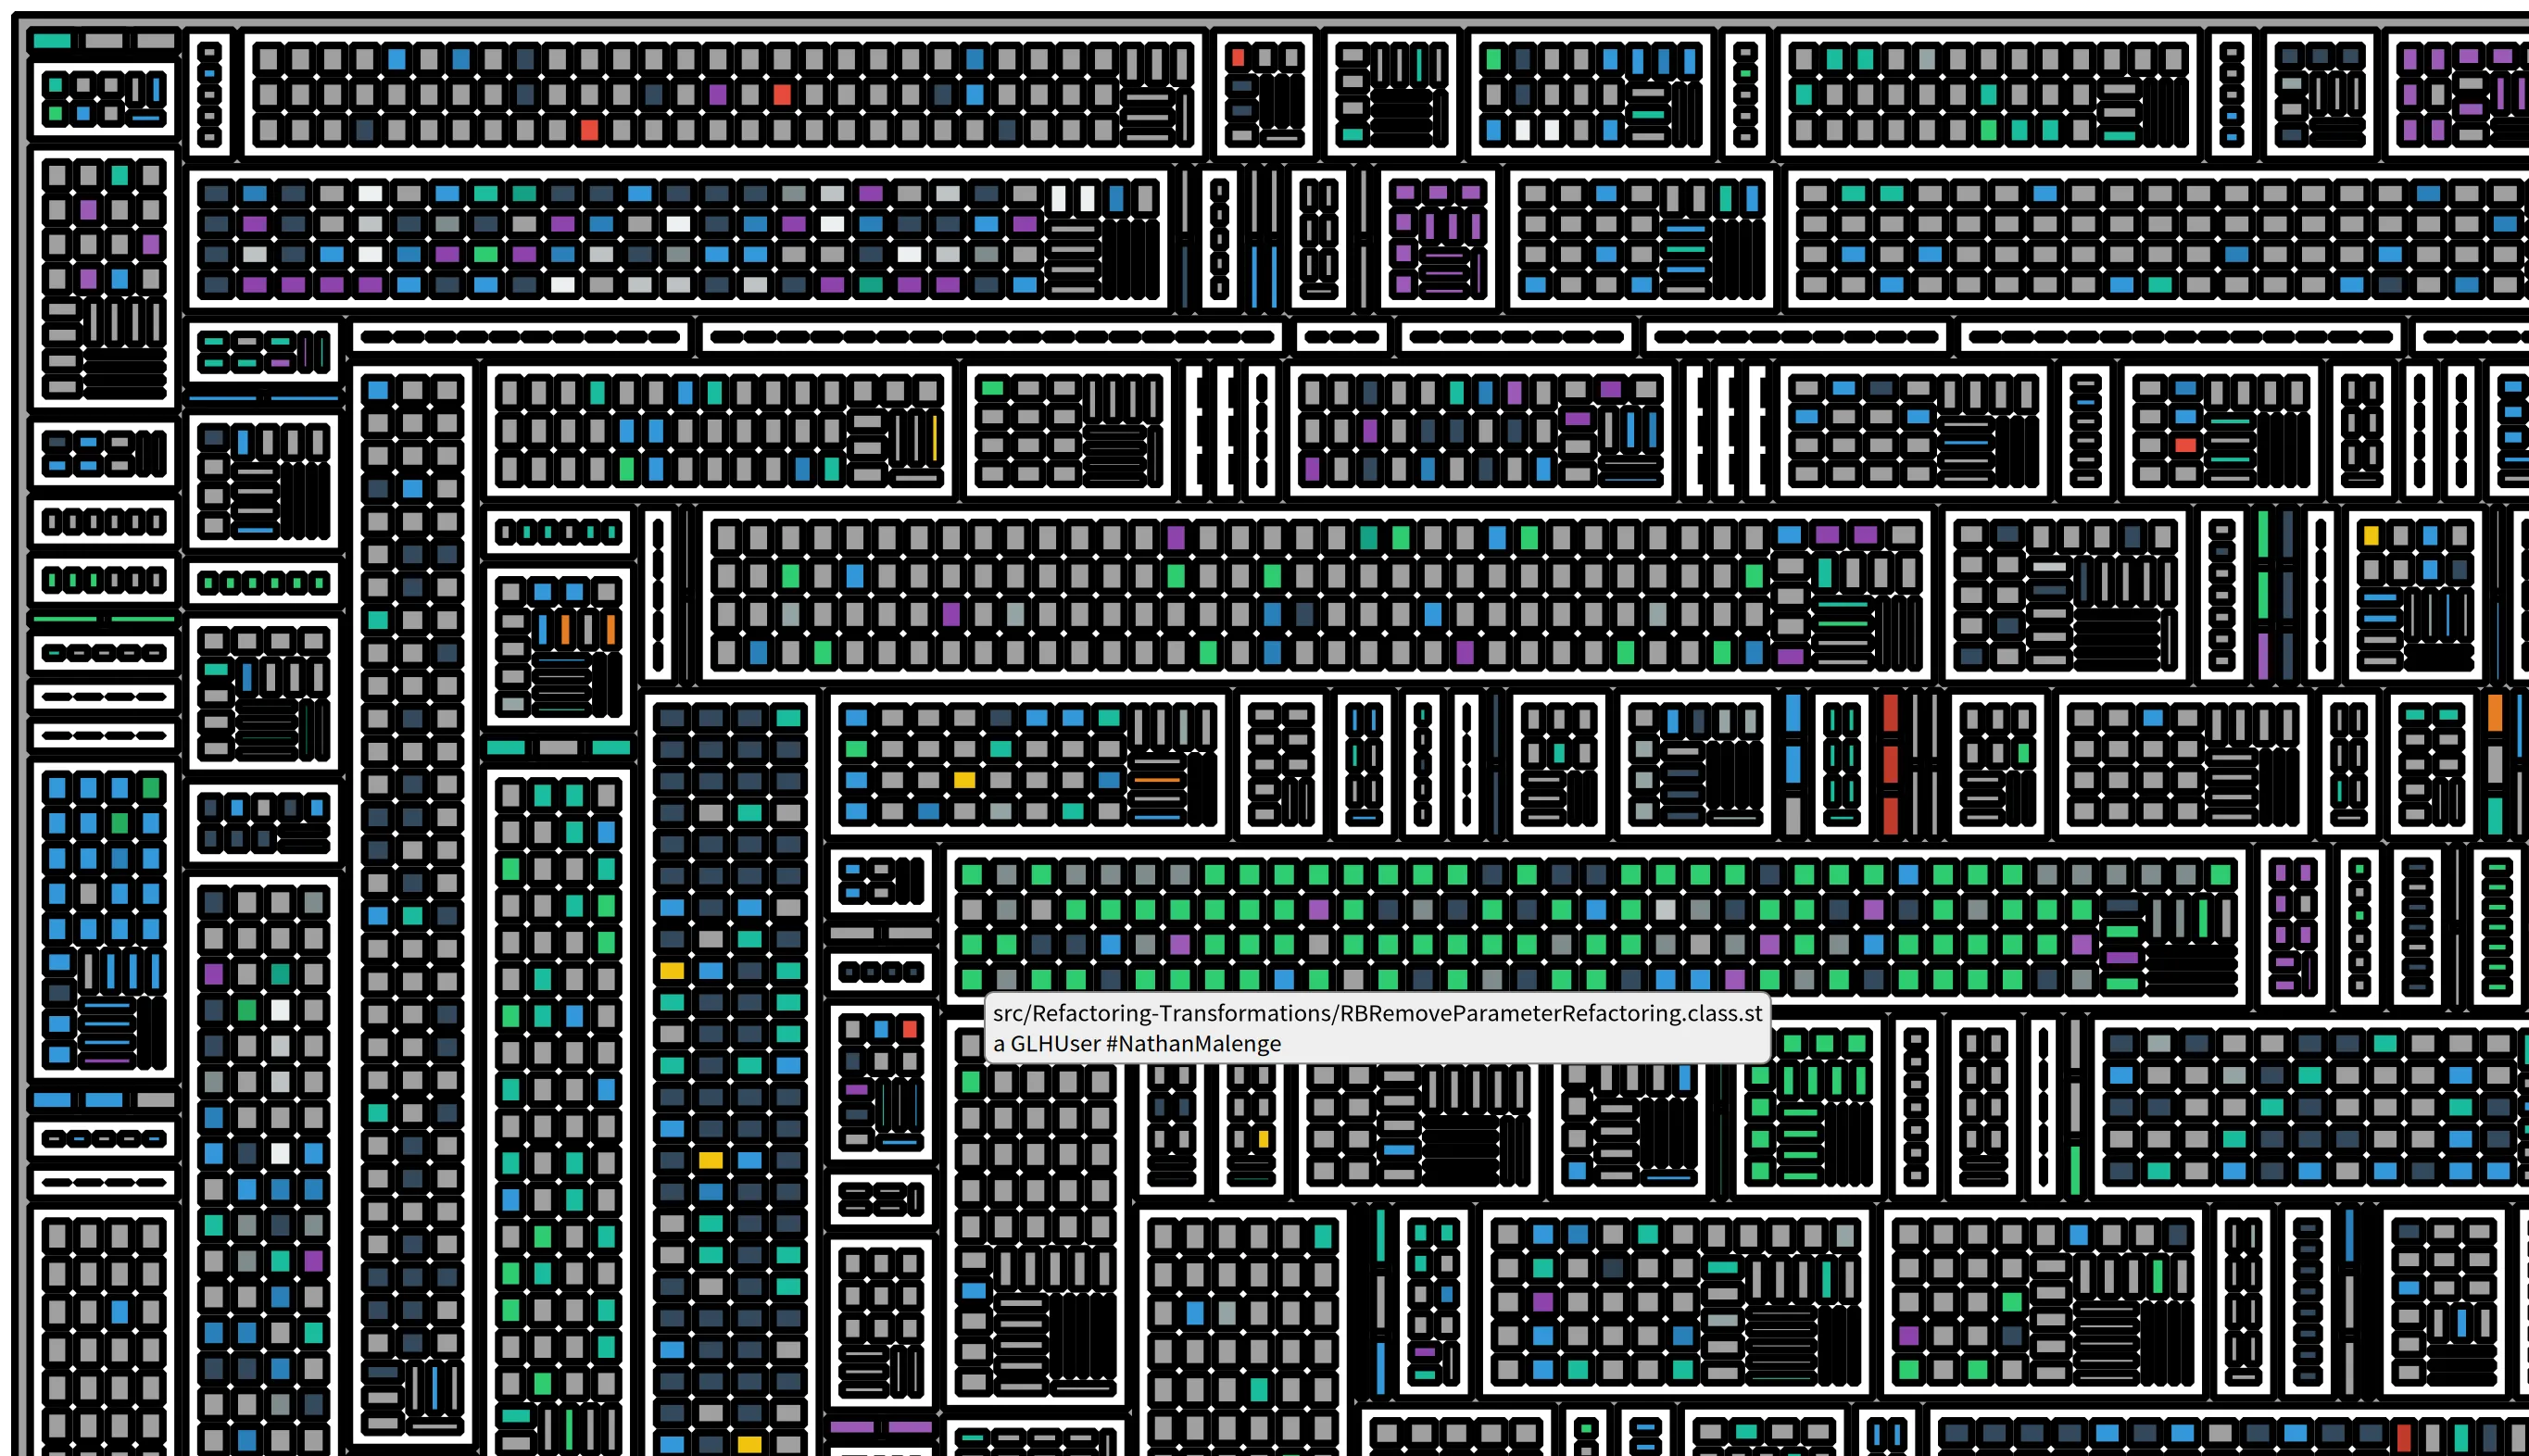
Core Contributor

Improving the generation of visitors

Recently, I needed to implement a feature in FAST-Python requiring a visitor for my metamodel. People knowing me knows that I if I can automatize a task to save time and to keep the code coherant with the model, I’ll go for it. Nicolas Anquetil and Clotilde Toullec recently started to implement a visitor generator, so I tried it. Since it was a POC, I encountered some problems.

I’ll explain in this blog post how to use this visitor generator, what problems I encountered and the solutions I proposed.

Once my changes will be integrated, using the visitor generator is as simple as adding one method on the class side of your generator. For example, in FAST-Python:

FASTPythonMetamodelGenerator class>>metamodelToolGenerators
^ { FamixVisitorGenerator }

This will tell the generator to also generate a visitor trait.

It is possible to also customize the package in which the visitor is generated by overridin #packageNameForVisitor:

FASTPythonMetamodelGenerator class>>packageNameForVisitor
^ #'FAST-Python-Visitor'

While using this visitor generator I faced a few problems.

The first one I encountered is that FAST-Python is depending on FAST that is depending on Famix that is depending on MooseQuery.

In order to have the FAST-Python visitor working, all dependencies needed to have a visitor themselves which was not the case. So I had to generate a FAST visitor for example. I could do it since I am part of the moosetechnology organization, but this is a hassle.

The solution I found was to generate standalone visitors. Instead of using the visitors of the sub metamodels, now we generate a visitor containing the visit of all entities of the model and the visit of the remote trait used in the model.

This can seems like a lot of useless code at first, but it has two advantages:

  • Visitors and now standalone
  • This allow to customize the visit of remote traits for the language we are currently working on. This will be important for one of the other problems I encountered.

The second problem I faced was that the generated visitor had infinit loops while I tried to use it. The reason is simple, when visiting an entity, we were visiting all its relations, but Moose is a cyclic graph since we have relations to the contained entities and relations to the containers of the entity.

Since most analysis that we are doing are “top down” (meaning that we start by the top level entities of our project and we visit their children) and we do not often need a “bottom up” visitor (for this we can just iterate on parents), I decided to exclude the visit of parent entities from the visit.

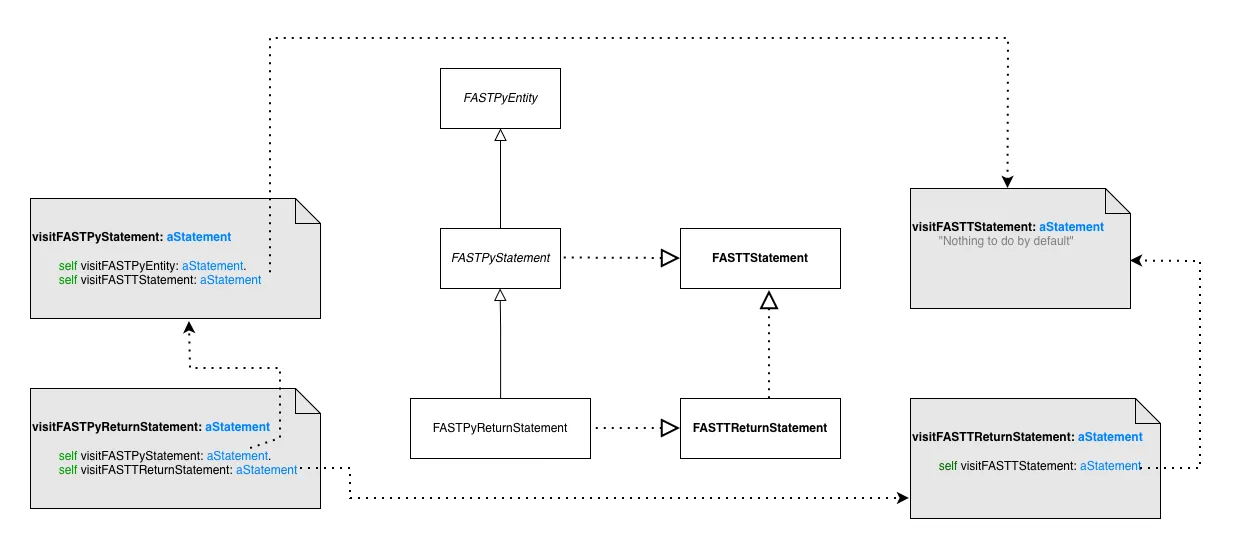
In some cases I noticed the we visited two times the same nodes. This is due to the fact that Famix model mix the usage of superclasses and traits. Here is a simple case to understant what is happening:

Double visit example

Here we see that a FASTPyReturnStatement inherits from FASTPyStatement. This class is using FASTTStatement. FASTPyReturnStatement also uses the trait FASTPyReturnStatement, but this trait also uses FASTTStatement.

Now when we visit FASTPyReturnStatement, we end up visiting two times FASTTStatement. Once via its superclass and once via its trait composition.

The solution I proposed is that when we visit a trait composition, we check the users of the trait and if some of them already visit the trait in their superclasses, we skip the visit of this relation.

With this, #visitFASTPyReturnStatement in the context of FAST-Python become:

visitFASTTReturnStatement: aTReturnStatement
<generated>
"We should visit FASTTStatement but all its users in this language already visit it in their superclasses so we skip the call here.".
self visitEntity: aTReturnStatement expression

In some cases, we need to skip the visit for some entities, but not all of them. For example, with conditional statements. In that case we generate a method like this:

visitFASTTConditionalStatement: aTConditionalStatement
<generated>
"We do not visit all behaviorals because some classes already visit it in their superclasses in this language implementation. Visiting them here also would cause a double visit of this trait."
({ FASTPyIfStatement . FASTPyWhileStatement } includes: aTConditionalStatement class)
ifFalse: [ self visitFASTTStatement: aTConditionalStatement ].
self visitFASTTWithCondition: aTConditionalStatement

This is possible only because we generate standalone visitors now.

With those changes I’m hoping it will be easier to generate and use visitors with Famix. The big advantage is that if we do not need to touch the visitor by hand, it will follow all the evolutions of the metamodel.

Have fun with this :)

Introducing Java initializers

In Java, we can define behavior that is executed exclusively at the initialization of an instance. For now, our metamodel represented these behaviors as methods. This evolution represents them as Initializers.

We consider as initializers the following elements:

  • Constructors: they are called when creating a new instance. When a constructor is called, if no explicit call is defined, it implicitly calls the default no-argument constructor, that calls the no-argument constructor in the superclass. We do not represent implicit constructors and these invocations.
  • Initialization blocks: blocks that are executed when a new instance is created. They are copied by the Java compiler into each constructor and avoid code duplication. We do not represent this implicit invocation.
  • In Famix: the <Initializer> method: we create a method to hold all attribute definitions in a type.

The main motivation for this change is to adapt the metamodel to the needs of building call graphs. Call graphs must be able to create the implicit invocations described above and to distinguish between the 3 types of initializers.

Another motivation is to differentiate between initializers and actual methods. In analyses, we often need to focus on methods and initializers can add noise when treated as actual methods, especially the <Initializer> method.

We introduce FamixJavaInitializer, a subclass of FamixJavaMethod. An Initiliazer has 2 properties:

  • #isInitializationBlock: boolean, false by default.
  • #isConstructor: boolean, derived. In java, a constructor is an initializer with the same name as its parent type, with no declared type (or void as declared type).

We do not merge all initializers as we did before, but we still merge similar initializers, that will always be called together. In a Java model, a type (TWithMethods) can define a maximum of 4 initializers (besides constructors):

  • An instance initialization block, that is the merge of all instance initialization blocks.
  • An instance-side <Initializer> method, similar to the one we created before.
  • A static initialization block, merge of all static initialization blocks (isClassSideis true).
  • A static <Initializer>method (isClassSideis true) for static attributes definition.

When inspecting a Java model, initializers can now be found under Initializers and Model initializers.

Speed up models creation: application to JSON/MSE parsing

In order to be able to work with Moose there is a prerequisite we cannot avoid: we need a model to analyze. This can be archieved in 2 principal ways:

  • Importing an existing JSON/MSE file containing a model
  • Importing a model via a Moose importer such as the Pharo importer or Python importer

While doing this, we create a lot of entities and set a lot of relations. But this can take some time. I found out that this time was even bigger than I anticipated while profiling a JSON import.

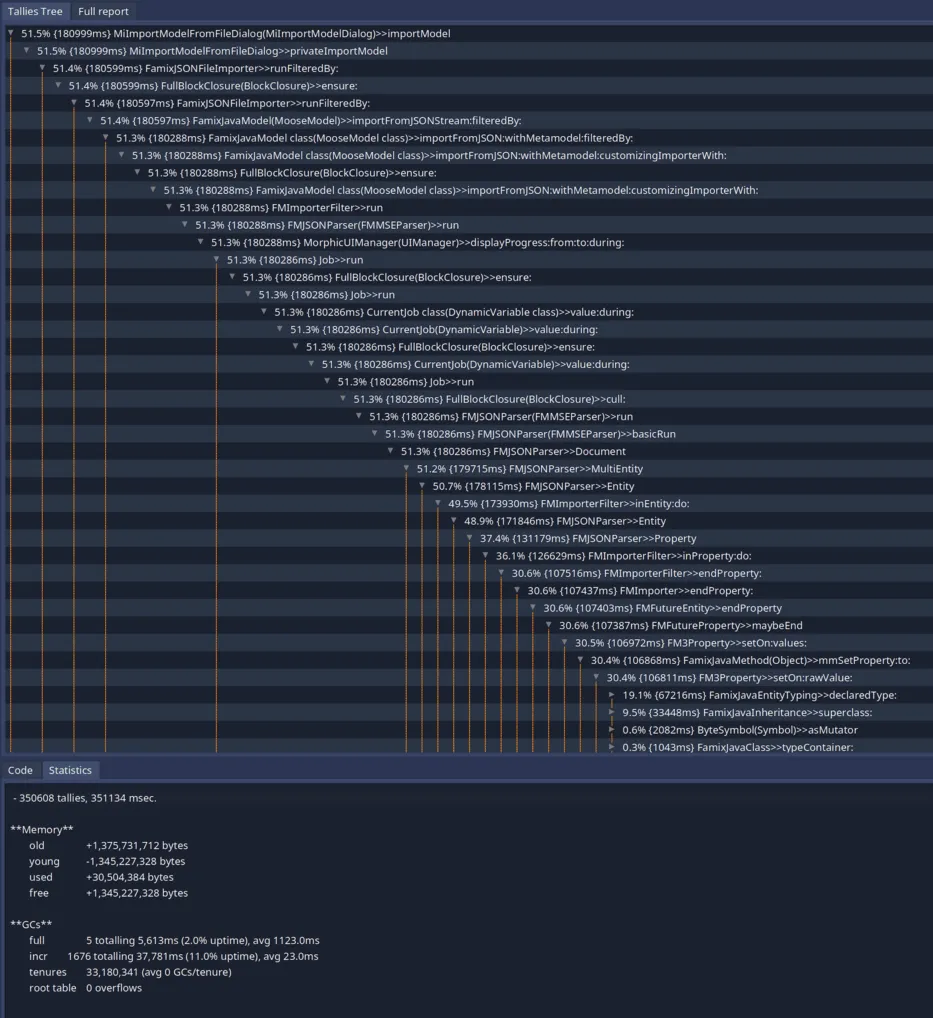
Here is the result of the profiling of a JSON of 330MB on a Macbook pro M1 from 2023:

Image of a profiling

Form this profiling we can see that we spend 351sec for this import. We can find more information in this report:

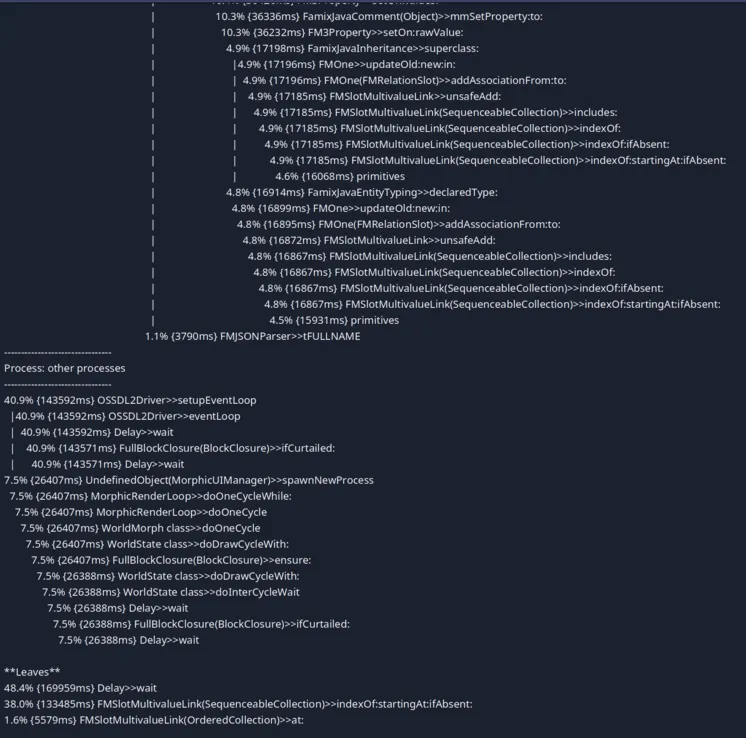
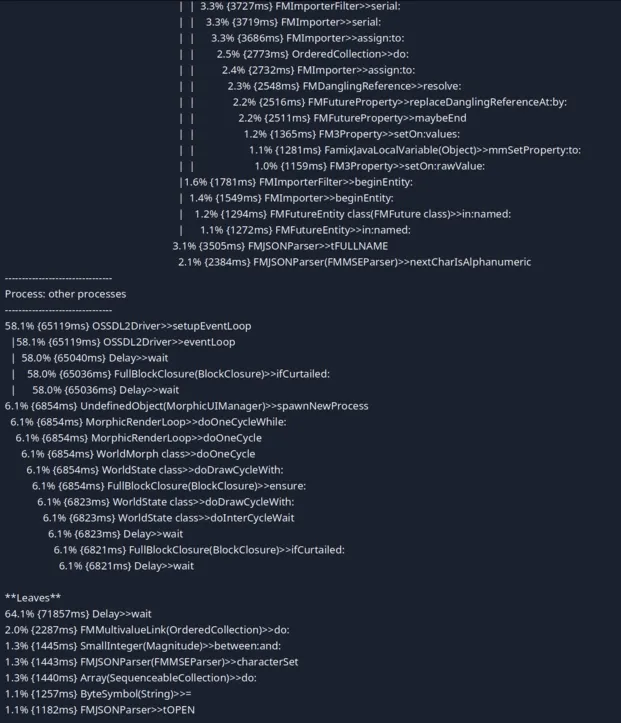
Image of a profiling 2

On this screenshot we can see some noise due to the fact that the profiler was not adapted to the new event listening loop of Pharo. But in the leaves we can also see that most of the time is spent in FMSlotMultivaluedLink>>#indexOf:startingAt:ifAbsent:.

This is used by a mecanism of all instance variables that are FMMany because those we do not want duplicated elements. Thus, we check if the collection contains the element before adding it.

But during the import of a JSON file, we should have no duplicates making this check useless. This also explains why we spend so much time in this method: we always are in the worst case scenario: there is no element matching.

In order to optimize the creation of a model when we know we will not create any duplicates, we can disable the check.

For this, we can use a dynamic variable declaring that we should check for duplicated elements by default, but allowing to disable the check during the execution of some code.

DynamicVariable << #FMShouldCheckForDuplicatedEntitiesInMultivalueLinks
slots: {};
tag: 'Utilities';
package: 'Fame-Core'
FMShouldCheckForDuplicatedEntitiesInMultivalueLinks>>#default
^ true

And now that we have the variable, we can use it:

FMSlotMultivalueLink >> unsafeAdd: element
(self includes: element) ifFalse: [ self uncheckUnsafeAdd: element ]
FMShouldCheckForDuplicatedEntitiesInMultivalueLinks value
ifTrue: [ (self includes: element) ifFalse: [ self uncheckUnsafeAdd: element ] ]
ifFalse: [ self uncheckUnsafeAdd: element ]
FMMultivalueLink >> unsafeAdd: element
(self includes: element) ifFalse: [ self uncheckUnsafeAdd: element ]
FMShouldCheckForDuplicatedEntitiesInMultivalueLinks value
ifTrue: [ (self includes: element) ifFalse: [ self uncheckUnsafeAdd: element ] ]
ifFalse: [ self uncheckUnsafeAdd: element ]

And the last step is to disable the check during the MSE/JSON parsing:

FMMSEParser >> basicRun
self Document.
self atEnd ifFalse: [ ^ self syntaxError ]
FMShouldCheckForDuplicatedEntitiesInMultivalueLinks value: false during: [
self Document.
self atEnd ifFalse: [ ^ self syntaxError ] ]

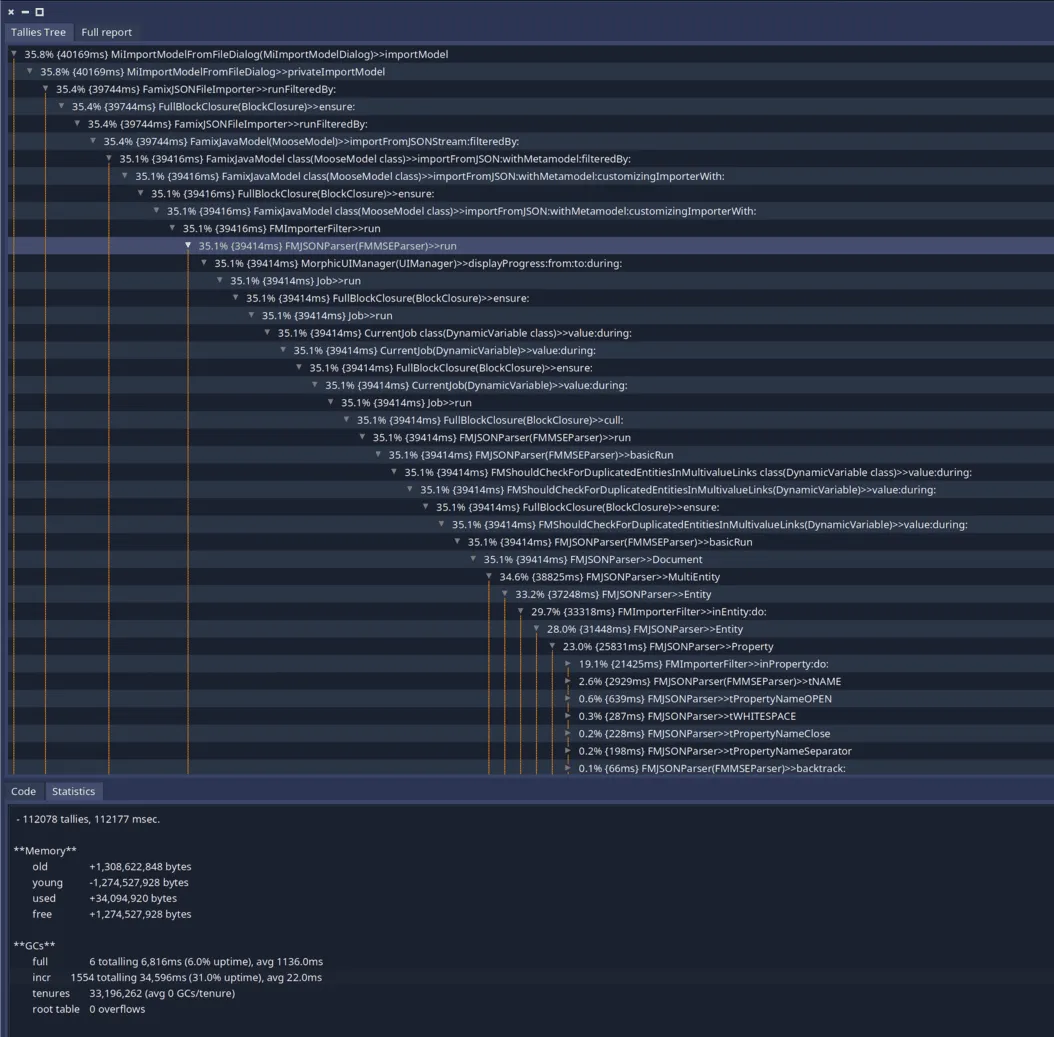
Now let’s try to import the same JSON file with the optiwization enabled:

Image of a profiling

Image of a profiling 2

We can see that the import time went from 351sec to 113sec!

We can also notice that we do not have one bottleneck in our parsing. This means that it will be harder to optimize more this task (even if some people still have some ideas on how to do that).

This optimization has been made for the import of JSON but it can be used in other contexts. For example, in the Moose Python importer, the implementation is sure to never produce a duplicate. Thus, we could use the same trick this way:

FamixPythonImporter >> import
FMShouldCheckForDuplicatedEntitiesInMultivalueLinks value: false during: [ super import ]

Testing your algo on a java project

When developping algorithm on top of the Moose platform, we can easily hurt a wall during testing.

To do functional (and sometimes unit) testing, we need to work on a Moose model. Most of the time we are getting this model in two ways:

  • We produce a model and save the .json to recreate this model in the tests
  • We create a model by hand

But those 2 solutions have drawbacks:

  • Keeping a JSON will not follow the evolutions of Famix and the model produce will not be representative of the last version of Famix
  • Creating a model by hand has the drawback of taking the risk that this model will not be representative of what we could manipulate in reality. For example, we might not think about setting the stubs or the source anchors

In order to avoid those drawbacks I will describe my way of managing such testing cases in this article. In order to do this, I will explain how I set up the tests of a project to build CallGraph of Java projects.

The idea I had for testing callgraphs is to implement real java projects in a resources folder in the git of the project. Then, we can parse them when launching the tests and manipulate the produced model. This would ensure that we always have a model up to date with the latest version of Famix. If tests breaks, this means that our famix model evolved and that our project does not work anymore for this language.

Parse the project
Parse the project
Create java project
Create java project
Import the model
Import the model
Run tests on the model
Text is not SVG - cannot display

The first step to build tests is to write some example java code.

I will start with a minimal example:

public class Main {
public static void main(String[] args) {
System.out.println("Hello World!");
}
}

I’ll save this file in the git repository of my project under Famix-CallGraph/resources/sources/example1/Main.java.

Now that we have the source code, we need a way to access it in our project.

In order to access our resources, we will use GitBrigde.

You can install it by executing:

Metacello new
githubUser: 'jecisc' project: 'GitBridge' commitish: 'v1.x.x' path: 'src';
baseline: 'GitBridge';
load

But we should add it to our baseline:

BaselineOfFamixCallGraph >> #gitBridge: spec
spec baseline: 'GitBridge' with: [ spec repository: 'github://jecisc/GitBridge:v1.x.x/src' ]
BaselineOfFamixCallGraph >> #baseline: spec
<baseline>
spec for: #common do: [
"Dependencies"
self gitBridge: spec.
"Packages"
spec
package: 'Famix-CallGraph';
package: 'Famix-CallGraph-Tests' with: [ spec requires: #( 'Famix-CallGraph' 'GitBridge' ) ]. "<== WE ADD GITBRIDGE HERE!"
].
spec for: #NeedsFamix do: [
self famix: spec.
spec package: 'Famix-CallGraph' with: [ spec requires: #( Famix ) ] ]

Now that we have the dependency running, we can use this project. We will explain the minimal steps here but you can find the full documantation here.

The usage of GitBridge begins with the definition of our FamixCallGraphBridge:

GitBridge << #FamixCallGraphBridge
slots: {};
package: 'Famix-CallGraph-Tests'

Now that this class exists we can access our git folder using FamixCallGraphBridge current root.

Let’s add some syntactic suggar:

FamixCallGraphBridge class >> #resources
^ self root / 'resources'
FamixCallGraphBridge class >> #sources
^ self resources / 'sources'

We can now access our java projects doing FamixCallGraphBridge current sources.

This step is almost done, but in order for our tests to work in a github action (for example), we need two little tweaks.

In our smalltalk.ston file, we need to register our project in Iceberg (because GitBridge uses Iceberg to access the root folder).

SmalltalkCISpec {
#loading : [
SCIMetacelloLoadSpec {
#baseline : 'FamixCallGraph',
#directory : 'src',
#registerInIceberg : true "<== This line"
}
]
}

Also, in our github action we need to be sure that the checkout action will get enough info for git bridge to run and not the minimal ammount (which is the default) adding a fetch-depth: option.

steps:
- uses: actions/checkout@v4
with:
fetch-depth: '0'

Now we need to be able to parse our project. For this, we will use a Java utility thaht is directly in Moose: FamixJavaFoldersImporter.

We can parse and receive a model doing:

model := (FamixJavaFoldersImporter importFolders: { FamixCallGraphBridge sources / 'example1' }) anyOne.

Now that we can access the model it is possible to implement our tests.

I’m starting by an abstract class:

TestCase << #FamixAbstractJavaCallGraphBuilderTestCase
slots: { #model . #graph };
package: 'Famix-CallGraph-Tests'

Now I will create a TestCase that needs my java model

FamixAbstractJavaCallGraphBuilderTestCase << #FamixJavaCHAExample1Test
slots: {};
package: 'Famix-CallGraph-Tests'

And now I will create a setup importing the model and creating a call graph:

FamixAbstractJavaCallGraphBuilderTestCase >> #setUp
super setUp.
model := (FamixJavaFoldersImporter importFolders: { self javaSourcesFolder }) anyOne.
graph := (FamixJavaCHABuilder entryPoints: self entryPoints) build
FamixJavaCHAExample1Test >> #javaSourcesFolder
"Return the java folder containing the sources to parse for those tests"
| folder |
folder := FamixCallGraphBridge sources / 'example1'.
folder ifAbsent: [ self error: 'Folder does not exists ' , folder pathString ].
^ folder

And now you have your model available for the testing!

I am using this technic to tests multiple projects such as parsers or call graph builders. In those projects I do touch my model and the setup can take time. So I optimize this setup in order to build a model only once for all the test case using a TestResource.

In order to do this we can remove the slots we added to FamixAbstractJavaCallGraphBuilderTestCase and create a test resource that will hold them

TestResource << #FamixAbstractJavaCallGraphBuilderTestResource
slots: { #model . #graph };
package: 'Famix-CallGraph-Tests'

Then we can move the setup to this class

FamixAbstractJavaCallGraphBuilderTestResource >> #setUp
super setUp.
model := (FamixJavaFoldersImporter importFolders: { self javaSourcesFolder }) anyOne.
graph := (FamixJavaCHABuilder entryPoints: self entryPoints) build

Personally I’m also adding a tearDown cleaning the vars because TestResources are singletons and I do not want to hold a model in memory all the time.

Then I’m creating my test resource for the example1 project.

FamixAbstractJavaCallGraphBuilderTestResource << #FamixJavaCHAExample1Resource
slots: {};
package: 'Famix-CallGraph-Tests'
FamixJavaCHAExample1Resource >> #javaSourcesFolder
"Return the java folder containing the sources to parse for those tests"
| folder |
folder := FamixCallGraphBridge sources / 'example1'.
folder ifAbsent: [ self error: 'Folder does not exists ' , folder pathString ].
^ folder

And now we can declare that the TestCase will use this resource:

FamixJavaCHAExample1Test class >> #resources
^ { FamixJavaCHAExample1Resource }

The model then become accessible like this:

FamixJavaCHAExample1Resource >> #model
^ self resources anyOne current model

Here is a few tricks I use to simplify even better the setting of my tests cases

The first one is to make automatic the detection of the java source folder by using the name of the test cases:

FamixAbstractJavaCallGraphBuilderTestResource >> #javaSourcesFolder
^ self class javaSourcesFolder
FamixAbstractJavaCallGraphBuilderTestResource class >> #javaSourcesFolder
"Return the java folder containing the sources to parse for those tests"
| folder |
folder := FamixCallGraphBridge sources / ((self name withoutPrefix: 'FamixJavaCHA') withoutSuffix: 'Resource') uncapitalized.
folder ifAbsent: [ self error: 'Folder does not exists ' , folder pathString ].
^ folder

We can now remove this method from all subclasses! But makes sure the name of your source folder matches the name of the tests ressource ;)

Automatic test resource detection and access

Section titled “Automatic test resource detection and access”

We can do the same with the detection of the test resource in the test case.

FamixAbstractJavaCallGraphBuilderTestCase class >> #resources
^ self environment
at: ((self name withoutSuffix: 'Test') , 'Resource') asSymbol
ifPresent: [ :class | { class } ]
ifAbsent: [ { } ]
FamixAbstractJavaCallGraphBuilderTestCase class >> #sourceResource
^ self resources anyOne current
FamixAbstractJavaCallGraphBuilderTestCase >> #sourceResource
"I return the instance of the test resource I'm using to build the sources of a java project"
^ self class sourceResource
FamixAbstractJavaCallGraphBuilderTestCase >> #model
^ self sourceResource model

Et voila ! Now adding a test case ready to use on a new java project is equivalent to create a test case:

FamixAbstractJavaCallGraphBuilderTestCase << #FamixJavaCHAExample2Test
slots: {};
package: 'Famix-CallGraph-Tests'

And the resource associated!

FamixAbstractJavaCallGraphBuilderTestResource << #FamixJavaCHAExample2Resource
slots: {};
package: 'Famix-CallGraph-Tests'

Nothing much.

Easily find the sources of the tested project

Section titled “Easily find the sources of the tested project”

A last thing I am doing to simplify thing is to implement a method to access easily the sources.

FamixJavaCHAExample1Test >> #openSources
<script: 'self new openSources'>
self resources anyOne javaSourcesFolder openInOSFileBrowser

It is possible to do the same thing for other languages than java but maybe not exactly in the same way than in this blogpost for the section “Parse and import your model”. But this article is meant to be an inspiration!

I hope this helps improve the robustness of our projects :)