As an extension to Analyzing Java With Moose, in this post I will show how one can create a Design Structure Matrix (DSM) in Moose, in particular from a model of a Java project.
Roassal (which is a visualization platform that’s part of Moose) has a visualization for DSM called RTDSM.
It’s explained here, but with Pharo classes.
How to use it with Moose on a Java model?
The key is in the dependency: block, which we define using a Moose Query with allClients.
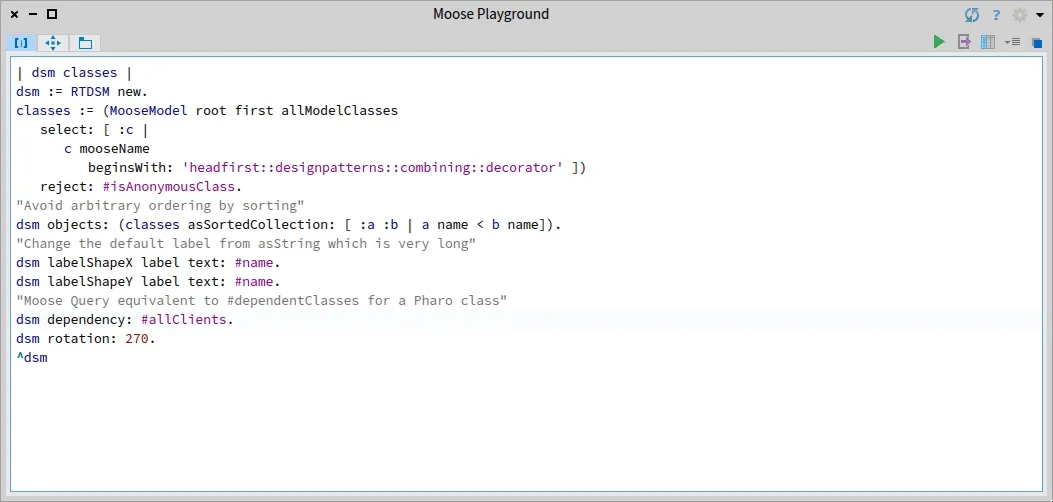
Open a Moose Playground and paste the following Pharo code:
How is our API used? This is the question the Pharo debugging team came to me with. They needed to know if it is used as they intended to or if there are some improvements to do.
To answer that question, we used some of Moose new browsers.
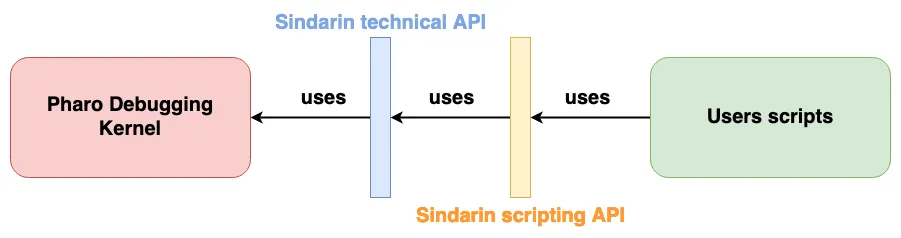
The Pharo debugging team works on Sindarin, an API that eases the expression and automation of debugging tasks.
Sindarin is made of two layers:
The “technical” API is the minimal API needed to interact with a debugging kernel (the Pharo kernel here).
The “scripting” API is here to ease the writing of debugging scripts without having to manipulate low-level concepts.
Now, that’s the theory.
In reality, the debugging team realized that these two layers are not really respected: users bypass the scripting API to use technical methods and the debugging kernel methods directly.
We used Moose to analyze Sindarin API usage, to help understand if, and how, it should be improved.
Moose has recently been upgraded and now offers more modularity.
Users can analyze their model through new specialized browsers that allow users to navigate and visualize their model entities.
Entities are propagated from one browser to the others, dynamically updating their contents.
Helping the debugging team was an opportunity to test some of these browsers under operating conditions.
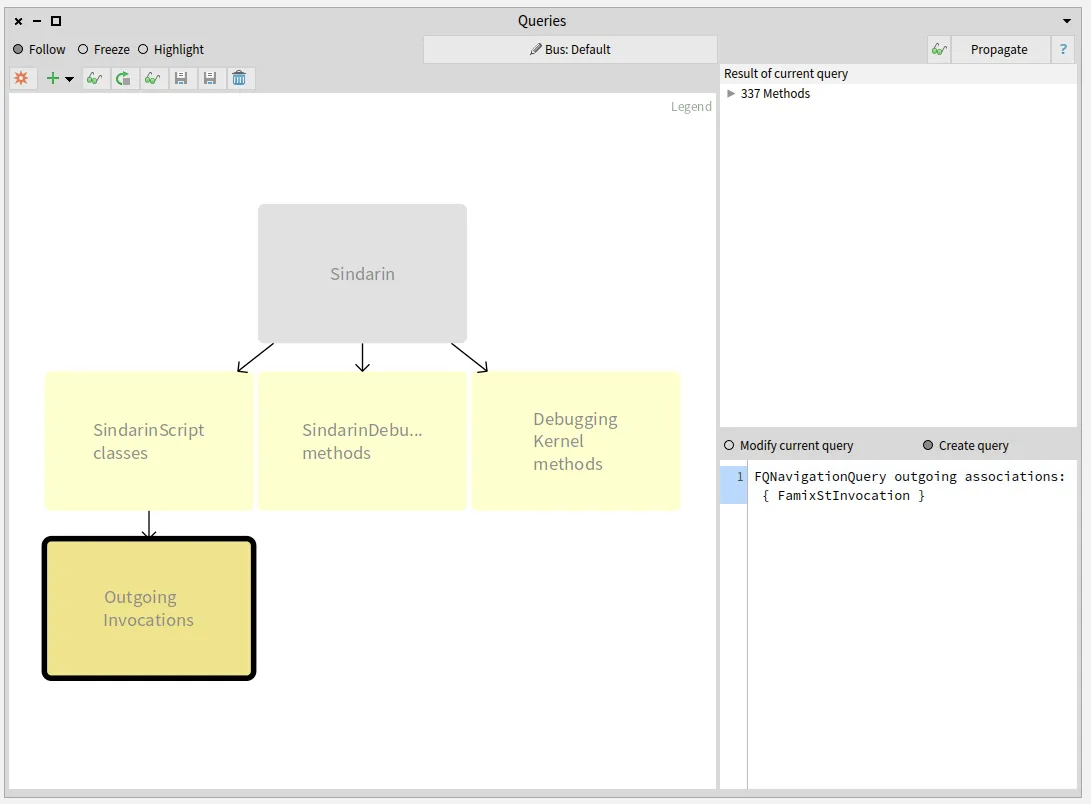
Analysis of the interactions of the users scripts with Sindarin and with the debugging kernel
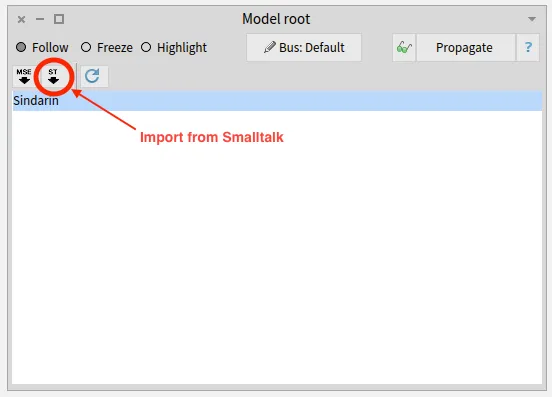
We imported the model directly from Pharo, using the Model Root browser.
This browser is the entry point to modular Moose.
It shows the list of installed models and allows to import new ones from MSE files or from Pharo.
Once the model was imported, it was automatically propagated in modular Moose, to other browsers.
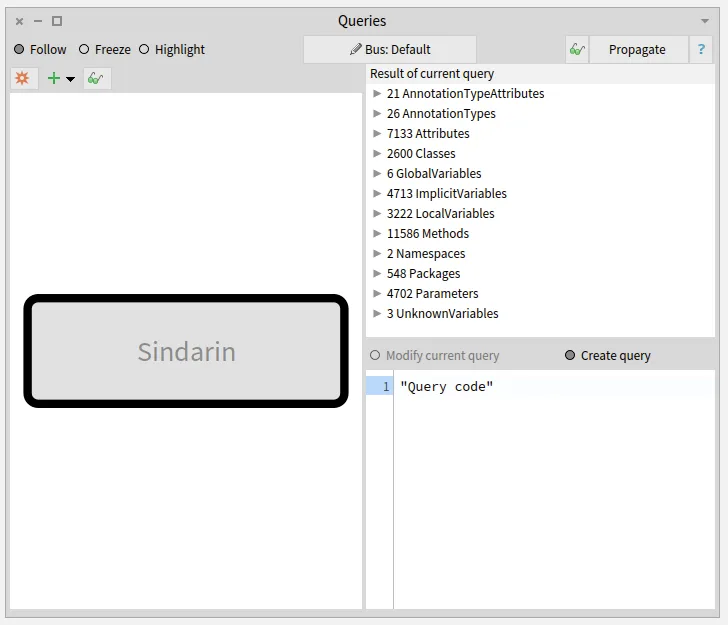
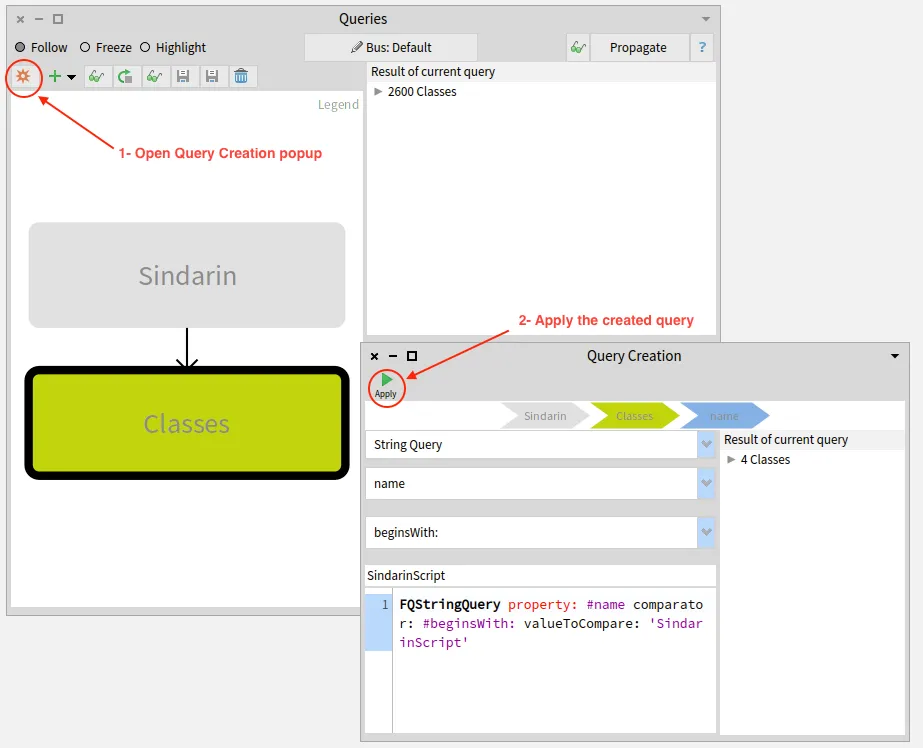
Querying the model to select key elements from the model
The purpose of this browser is to query a model or a group of entities.
It can filter entities according to their type or the value of their properties.
It can also use MooseQuery to navigate associations (inheritances, invocations, accesses, and references) and scopes (containment).
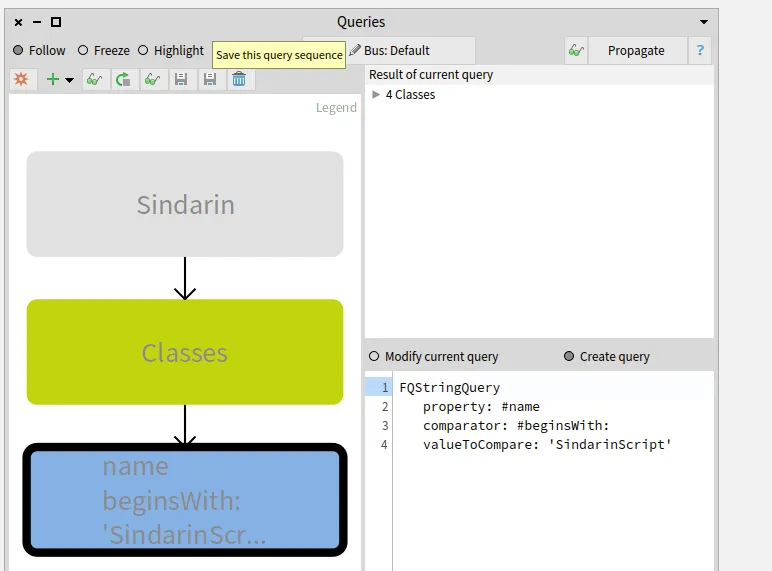
The left pane of the browser is a visualization of the queries that were made.
On the image above, no queries were made yet. The left pane only shows the model on which queries will apply.
The right pane of the browser shows the result of the selected query and the code used to build it.
We added a navigation query to obtain methods that were called in the script. We then narrowed this result by selecting methods from Sindarin or from the debugging kernel.
To find which methods are called in the users scripts, we queried outgoing invocations from the scripts classes.
We obtained a group of 331 candidate methods whose signatures match messages sent in the scripts:
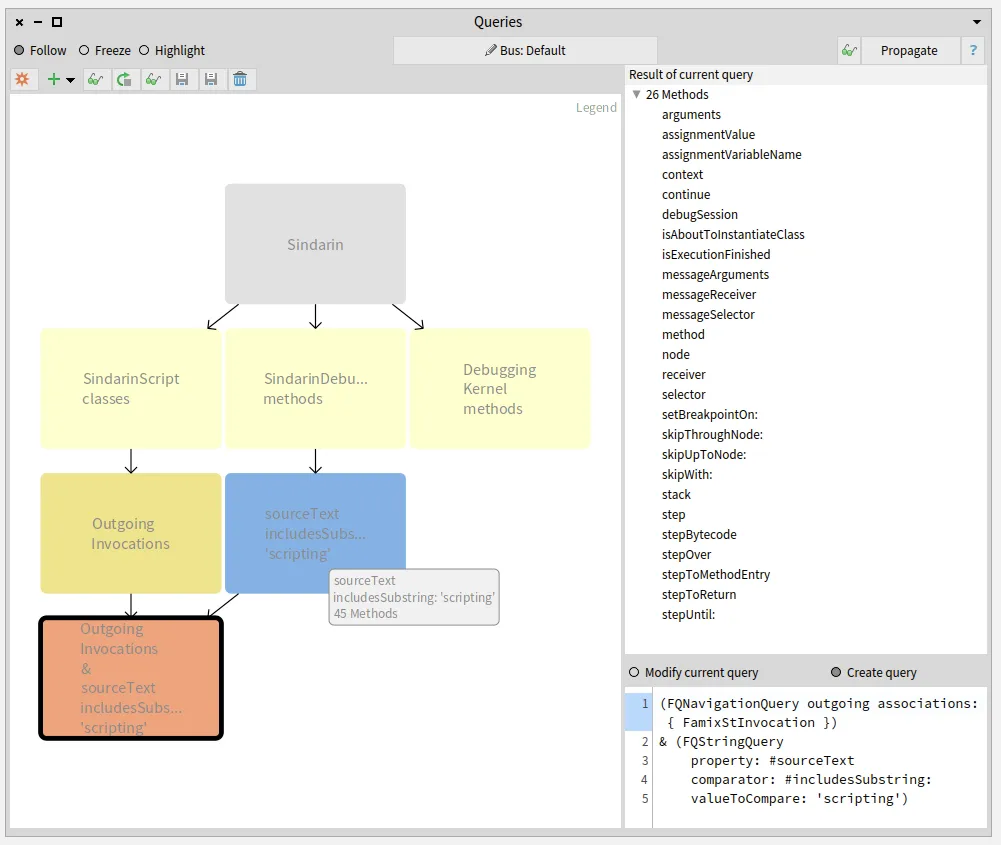
The next step was to compare this group of candidates with the methods from Sindarin scripting API.
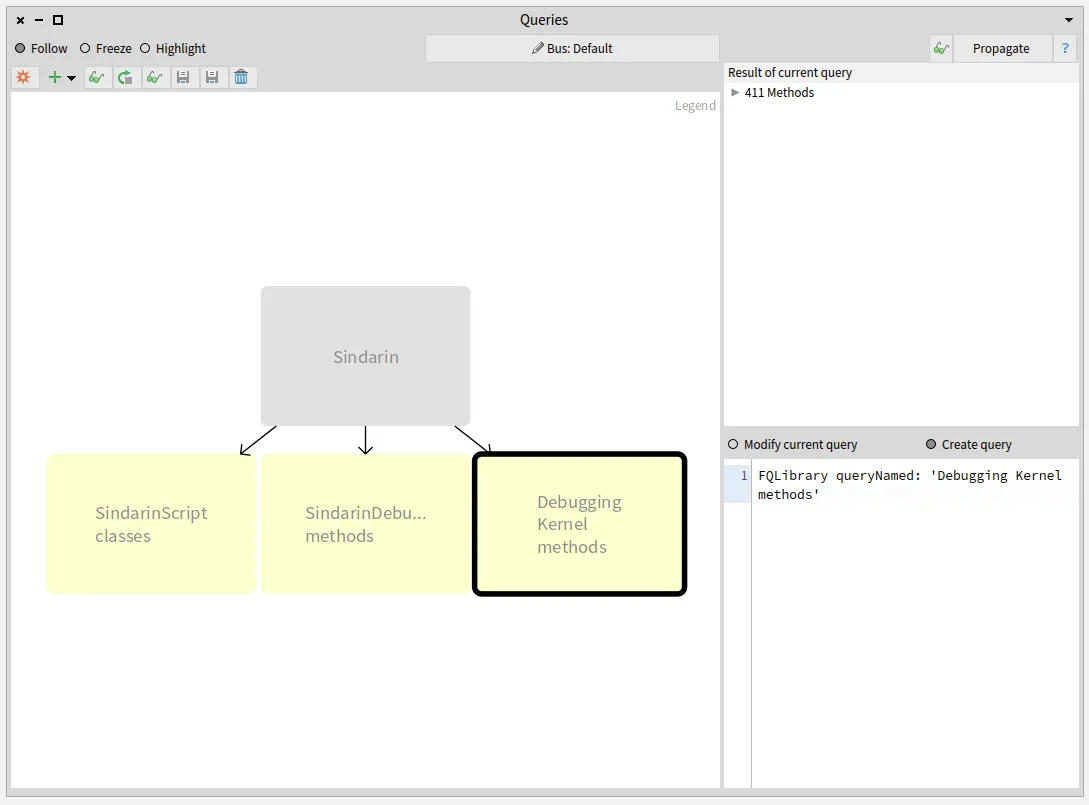
We established with the debugging team that scripting methods should have "scripting" as comment.
This convention allowed us to get them with a property query (blue query in the figure below).
We queried for the intersection between the scripting API and the group of candidates invoked from the users scripts (salmon query at the bottom left in the figure below).
This gave us 26 methods that are called from the scripts, out of 45 in the Sindarin scripting API:
These 26 mehtods, result of the last query performed, are listed in the top right pane of the Query browser.
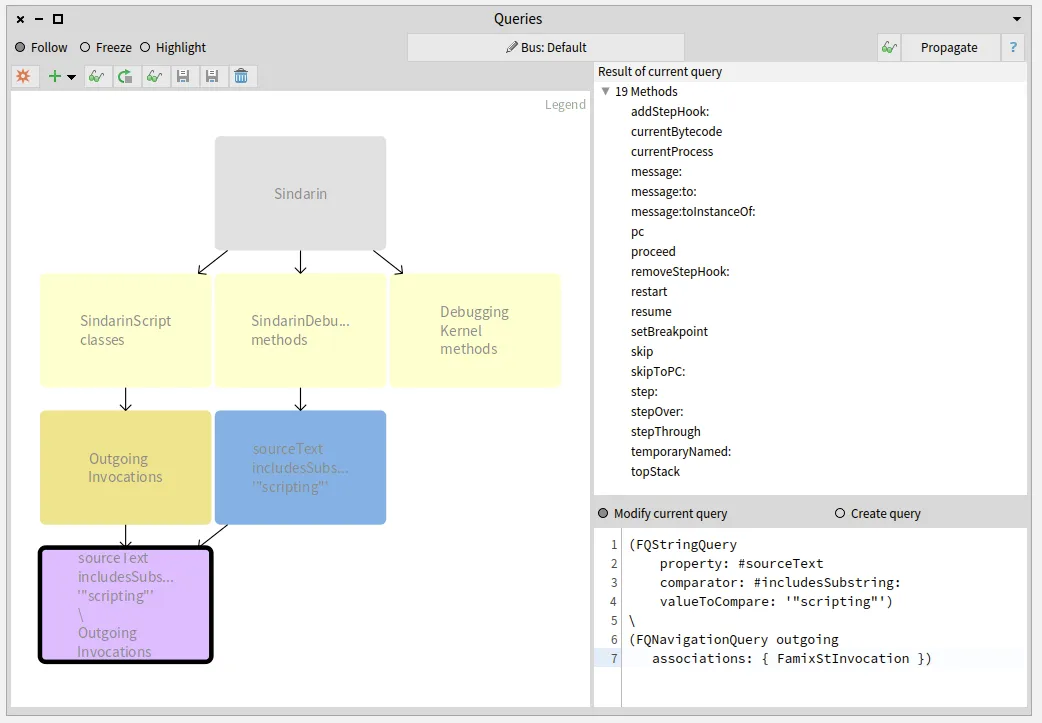
It was important for the debugging team to know the other 19 scripting API methods that are not called from the scripts.
We obtained them by querying the difference between Sindarin methods and the group of candidates (purple query at the bottom left in the figure below):
Again the 19 resulting methods are listed in the “Result” pane.
The debugging team now knows which methods from their scripting API have been useful for users and, most importantly, which methods have not.
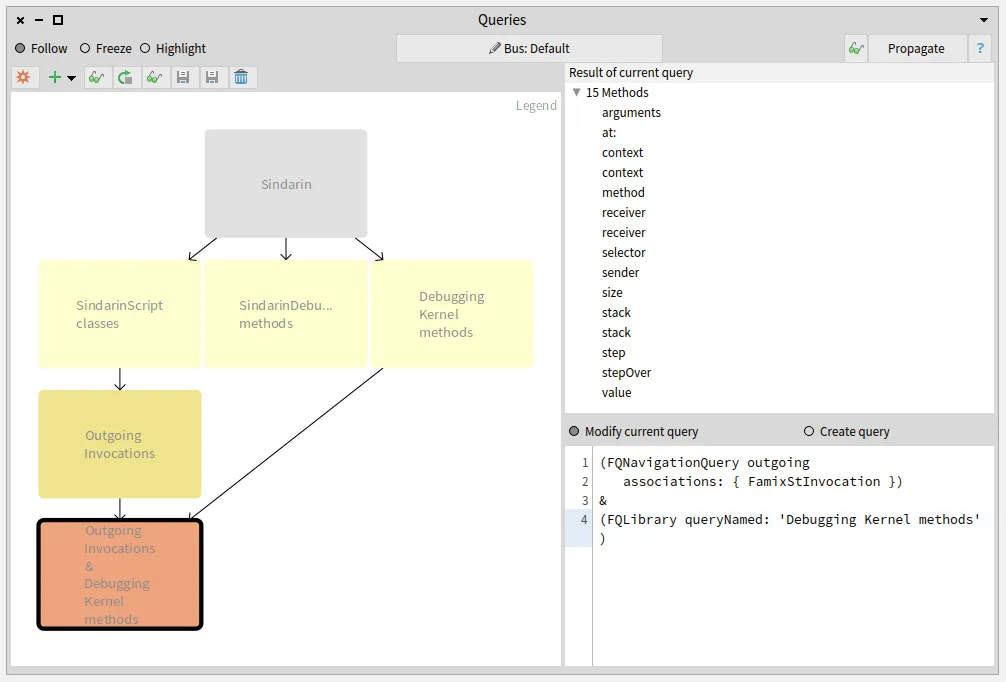
We also compared the group of candidates invoked from the users scripts with the methods of the debugging kernel and obtained 15 methods. These methods are used directly in the users scripts without using Sindarin:
Identifying the scripts that use the debugging kernel:
Let’s get back to the fact that outgoing invocations gave us a group of candidates methods.
When several methods share the same signature, we cannot know for certain which method is called.
For example: Sindarin defines #arguments, which is also defined in Context.
Sindarin defines:
arguments
^self context arguments
that should be used as follows:
sindarin := SindarinDebugger new.
"some steps"
(sindarin arguments at: 1) doSomething.
We wanted to detect cases where the users did not use Sindarin, like in the following:
sindarin := SindarinDebugger new.
"some steps"
(sindarin context arguments at: 1) doSomething.
This is a simple example or wrong practice.
In more complex cases, interacting directly with the kernel would force the user to write verbose scripts and increase the risk of bugs. Why not benefit from a tested API when you can ?
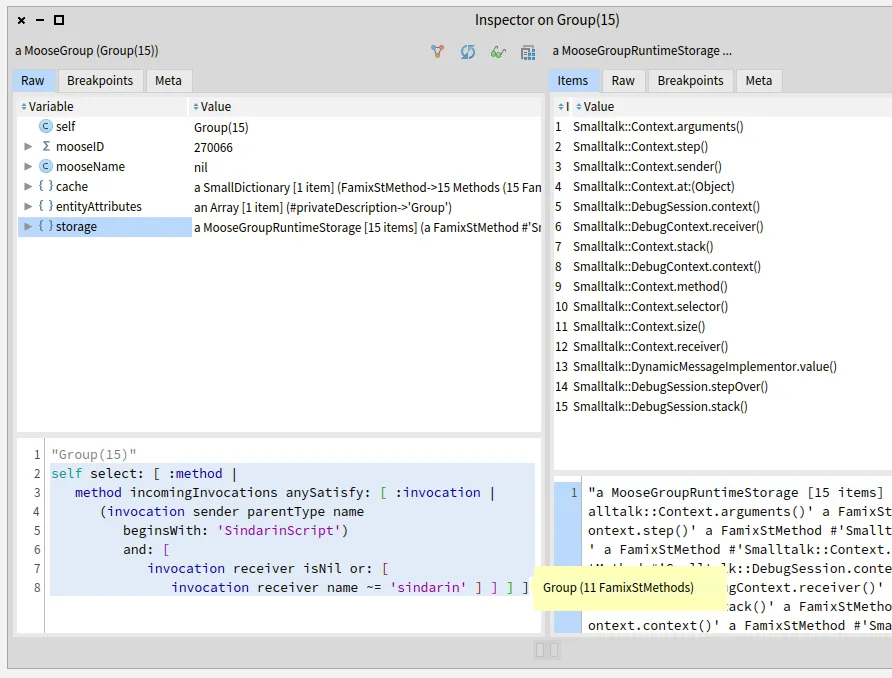
To detect these cases, we used a convention of the users scripts: each time a call to Sindarin API is made, the receiver is a variable named sindarin.
This means that invocations which receiver is not sindarin are probably cases where the user bypassed Sindarin API, calling the debugging kernel directly.
We inspected the 15 debugging kernel methods that may be used directly in the scripts and selected the ones that are sent from the scripts to a receiver other than sindarin.
This was done in Pharo (not the Query browser), using MooseQuery:
(invocation sender parentType name beginsWith: 'SindarinScript')
and: [ invocation receiver isNil
or: [ invocation receiver name ~='sindarin' ] ] ] ]
We narrowed it down to 11 methods of the debugging kernel that are called from the scripts:
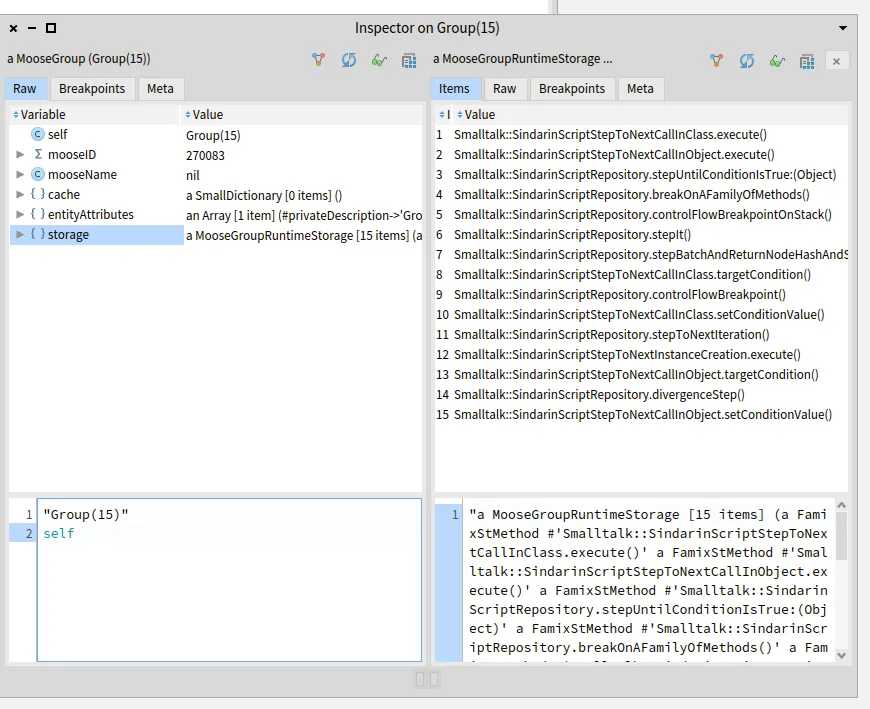
We then collected the scripts where these methods are called:
self flatCollectAsSet: [ :method|
method incomingInvocations
select: [ :invocation|
(invocation sender parentType name beginsWith: 'SindarinScript')
and: [ invocation receiver isNil
or: [ invocation receiver name ~='sindarin' ] ] ]
thenCollect: #sender ]
We obtain 15 user script methods that need to be investigated manually. Moose cannot determine which object will receive a message when the script is executed. The debugging team will analyze in the scripts the statements where the probable kernel methods are invoked. They will run the debugging scripts to identify at runtime which objects are the receivers.
Exploring these 15 scripts will help the debugging team to understand whether:
Users did not use Sindarin correctly: they interacted directly with the debugging Kernel, even though Sindarin methods are available,
Sindarin API is incomplete: users had no choice but to interact with the debugging kernel because Sindarin does not provide the necessary methods,
There are other reasons why the API is not used correctly?
With this experiment, we were able to provide valuable information to the debugging team.
In return, we got suggestions of improvements to be implemented in modular Moose tools.
To know how many times a method is called, we need the number of invocations of this method.
That is querying the size of a query result.
The query browser does not allow it yet, and it should.
To get the 15 users scripts that need to be explored, we had to inspect a group of methods and run a selection manually (Pharo code).
This should be possible directly in the queries browser: users should be able to build a query that executes a query script.
This experiment will help Pharo debugging team to improve Sindarin.
They will be able to make it more complete and documented, so users continue to develop debugging scripts.
In the meantime, we will improve modular Moose to widen the queries possibilities.
Then, we will challenge these new features: we will use them to analyze the upgraded Sindarin API to document its evolution.
Recently, I’ve been using a Moose utility (MooseEasyUtility) to ease the creation and loading of a Moose Model.
In turn, this utility uses the LibC to send various commands to the operating system for example to call the VerveineJ parser.
However, when using this library, I encountered a problem on my Windows machine.
The problem was caused by an encoding issue between the Java Parser (VerveineJ) and the file reader in Pharo.
This is Windows specific as there was no issue when running my program on a Linux-based machine.
Sometimes you have to use the Windows OS like me, or you want to build an interoperable application that runs on multiple applications.
Your Pharo program may eventually run on a Windows or Linux-based OS; however, you may not be familiar with Windows.
Luckily, Microsoft has finally opened up its system to introduce the Windows Subsystem Linux (WSL).
WSL is a compatibility layer for running Linux binary executables (in ELF format) natively on Windows 10.
Furthermore, in 2019, Microsoft introduced WSL 2, which included important changes such as a real Linux kernel, through a subset of Hyper-V features.
The important thing to remember is that it allows us to use bash commands on Windows 10.
There are two ways to install WSL on your machine. The simplified installation requires that you join the Windows Insider Program and run the command wsl --install. The manual installation is a bit more complicated but the steps are detailed on docs-microsoft.
Once installed you may access WSL by either launching WSL through the search bar or by running your favorite terminal and using the command wsl.
You can also type wsl in your terminal to access the WSL directly.
The next step after installing WSL on your machine is to launch your favorite image of Pharo. From there you can use the class LibC to run some commands:
LibC resultOfCommand: 'ls'.
LibC resultOfCommand: 'wsl ls'.
As you will see, when the first command is sent, the terminal returns an error as Windows does not recognize the ls command.
However, when you execute ls with the wsl command, it can now successfully display the list of files in the current directory.
Let’s come back to our problem with Moose-Easy. Moose-Easy is a library to facilitate access to Moose, e.g. to generate MSE files from a source code.
Originally, I wanted to use Moose-Easy to parse and generate a model of the Java project I was working on.
In my project, I passed the path to the source code, the parser, and any project dependencies I wanted to analyze.
generate
"Generates this model importer's model from its origin into its configured model path, using its parser"
This method uses MooseEasyUtility to generate the model as a MSE file which would be later imported.
Then, the import method from my project imports the MSE as a Moose Model.
import
"Imports this model importer's model from its configured model path"
An important feature of the Moose Model is the ability to access/visualize the source code of an entity.
To enable this, during the generation of the MSE, the parser (here VerveineJ) creates a SourceAnchor which writes the start position and end position of the entity within a specific file.
However, when manipulating the model, I noticed that the sourceAnchors’ start/end positions were shifted.
This resulted in accessing the wrong portions of the source code for each entity. After investigating this shift, it became clear it was due to an encoding issue with the carriage return.
When the parser accessed the file it read it the carriage returns differently than when it was being accessed by the Moose library.
To fix this issue without modifying the parser, I used WSL commands to run my parser.
More precisely, I replaced the direct call to the parser executable with a call to wsl to run the parser.
The following instruction of MooseEasyUtility was changed from:
Notice that instead of calling the JavaToFamixCommand (i.e. VerveineJ) directly, it is now called through wsl (end of first line).
This allowed me to generate a MSE file that contained the correct start/end positions.
Additionaly, it is important to remember that if an absolute path is passed to wsl, it must be formatted according to Linux and WSL conventions. On Windows, the path to a file may look like this C:\Users\Pascal.ZARAGOZA\eclipse-workspace. While the WSL absolute path will look like this /mnt/c/Users/Pascal.ZARAGOZA/eclipse-workspace. This is why I recommend to use relative paths whenever possible when using a mix of WSL and Windows commands.
If you are interested in analyzing your java project with Moose 8, there is a detailed blog post by Christopher Fuhrman on the subject.
It covers the whole process of using MooseEasyUtility to clone, parse, and load the corresponding model of a java project.
It also demonstrates how to both visualize and analyze the moose model.
Building metamodels for Fame and Famix is currently done through a generator.
The generator consists in various special methods that need to be implemented, eg, one that will create all metaclasses, another that will create all attributes for each metaclass,…
The metamodel’s artifact are created programmatically using pure Smalltalk syntax extended with specific operators to easily express relationships and cardinalities (<>-, *-*, <>-*, …).
For more details, please refer to the article about “Coaster”, written by Benoit Verhaeghe.
In this blogpost, I will show you how to use existing metamodeling diagraming tools to design your metamodel, and then to use the designed meta-model to generate your meta-model code for Fame in Moose.
In another blogpost, I will show you how to use this same generator to use graphical modeling tools to generate code for Famix.
The generator concept provided for Fame/Famix in Moose is practical, but can be intimidating in the first place.
Moreover, discovering an existing metamodel, or modifying an existing one can be hard as it requires to switch between various methods.
Some projects exist, as PlantUMLPharoGizmo, to automatically build a graphical representation of an existing metamodel.
This approach considers the code of the meta-model as the main artifact and builds the diagram out of it.
In this post, we will consider the opposite: putting the diagram as the main artifact, then using the diagram as the basis for generating the code of the Fame/Famix generator.
Despite its possible complexity to describe a generator for a full huge metamodel, the syntax for building the generator is easy to deal with and easy to generate.
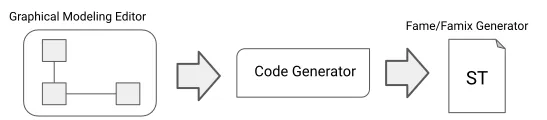
The general process is sketched in Figure 1.
From the graphical modeling editor, the produced meta-model is given to a
dedicated code generator that will produce the Fame/Famix Generator.
Here is an interesting fact.
Building a graphical modeling editor from scratch is hard.
It can look easy in the first place, basically, it’s only links and boxes, but it turns out that creating an editor that allows you to create a model, enforcings rules defined by a metamodel, is a complex task (without speaking about all graphical rules that need to be injected in the editor).
Consequently, we will reuse existing graphical modeling tools that already allow model metamodels.
Currently, there is no pure metamodeling editors for Pharo/Moose.
The only existing project is the OpenPonk project which gives the ability to create UML models with XMI support, but UML proposes a lot of concepts that could lead to wrong design in the end (using wrong concepts).
On the other end, on the MDE community, Ecore is an implementation of the EMOF and various desktop or web-based graphical editors exists.
Following then the flow we described earlier, the Graphical Modeling Editor will be one of the various graphical Ecore modeling editor.
The designed meta-model will be serialized in XMI (default output for those kind of editors), given to a code generator that will produce the Fame/Famix code generator.
The output of the code generator will follow the tonel format so it can be easily imported by Moose/Pharo.
As Fame, Ecore is a meta-meta-model that is used to create meta-models.
Various graphical tools exist for it, so we have a little bit of choice.
The entry point of our chain is an Ecore meta-model in a XMI format and the destination a Smalltalk class in a tonel format, but, the generated class will describe a generator for a Fame meta-model, not an Ecore one.
Consequently, we need to align Ecore concepts with Fame concepts.
This blogpost does not go into details about the full alignment between Ecore and Fame, but gives some keys that are used.
Fame proposes two main concepts: FM3Class (metaclasses) and FM3Traits (traits).
On the contrary, Ecore only provides the concept of EClass to represent metaclasses, which is aligned with the metaclass concept of Fame.
Also, Ecore let users mark a metaclass as interface, which is a concept that comes close to the trait concept in Fame.
Thus, the alignment that we will keep here is:
Attributes in Fame are modeled by the concept of FM3Property.
Attributes represent a property of a metaclass/trait and are usually bound to objects outside of the Fame “ecosystem” (as String that comes from Pharo for example).
The same concept can be found in Ecore with the EAttribute concept.
On the contrary of attributes in Fame, EAttribute in Ecore can own default values (and a set of other attributes that we will not consider here).
Consequently, we can directly align simple EAttribute to Fame attribute, ignoring the default value if one is set.
In this condition, the alignment is:
References in Fame are also modeled by the concept of FM3Property.
They can own a set of properties and can be marked as “containement”, and they own a cardinality.
References represent relationships between metaclasses.
In Ecore, the EReference concept is the equivalent to FM3Property, that’s then the one we use to model relationships.
The alignment is:
Ecore proposes more concepts that are not directly aligned with Fame, e.g.: EEnumeration, EGenericType,…
Thus, those concepts are not handled by the generator.
Now that we know how we will represent Fame concepts with Ecore, we can use a graphical modeling tool to design Ecore meta-model to design Fame metamodels.
For this blogpost, three tools have been tested, two web-based one and a desktop one:
They all work well and have their pros and cons.
As example/illustration of this section I used GenMyModel (I worked there for some years, I know well the tool), but the design process is the same whatever the used tool.
When you design your meta-model for Fame using a graphical Ecore editor, you just focus on the concepts you want to represent.
The meta-model we are going to design is the one presented by Benoit in his article about “Coaster”.
The designed Ecore meta-model can be found at this address and it looks like this:
In addition, we also set two specific properties of the base EPackage: nsURI and nsPrefix.
While the nsURI is more internal/maintenance related (it can be used to propose a unique identifier towards this version of the metamodel), nsPrefix is really important as it will set the prefix that will be used later for the generation of the generator.
I thus set the two values to:
nsURI = https://coaster/1.0
nsPrefix = Ct
With this, we are ready to generate the code of our generator.
The code generator is coded in Python using the PyEcore library to be able to decode/resolve Ecore files.
The generator goes across the full meta-model at least once to perform model validation, tries to correct some issues (like spaces at the beginning or end or names), and raises an error if it cannot generate the code for some reasons.
Once the meta-model is validated, it generates the Fame generator code using Mako, a template engine.
The generator installation is pretty simple if you have the right tools.
You can find the code on GitHub at this address.
You can install all the dependencies manually on your system, but the proper way of dealing with the dependencies would be to use a virtual environment (a virtualenv).
Virtualenvs creation and activation can be somehow complicated if you are not used to it.
To ease this step, the repository contains a Pipfile to be used with pipenv.
If you don’t have pipenv installed on your machine, feel free to install it, it helps you creating virtualenvs from Pipfile with all the required dependencies and ease also their activation.
In our case, with pipenv, the installation is pretty forward:
And you’re good to go, pipenv creates a virtualenv and installs all the dependencies isolated in your virtualenv.
Now, each time you want to use the created virtualenv, you can just enter in the directory where the code of the generator is installed and just activate the virtualenv:
If you did your meta-model online, there are two options for you.
Either you can download the .ecore on your machine and generate the code from there, or you can give to the generator a valid URL where the XMI of your ecore meta-model is located.
Whatever option you’ll choose, you can generate the code of your generator this way:
Terminal window
$pythonfamegen.py<URL_OR_FILE>-omymeta.class.st
This will generate the code of your generator in a tonel format in the file mymeta.class.st.
If you don’t use the option -o, the generated code is displayed on standard output.
Here is the line used to generate the generator of the Coaster meta-model:
We find back all the information we put in our design, relationships, names, metaclasses, …
This file can be directly imported in Moose and used to generate the meta-model code:
That’s all folks for this post.
Next time, we will discuss about how to generate a dedicated meta-model for Famix instead of only Fame.
The exact same code generator will be used, but this time, we will have to deal with the desktop Ecore diagram tool for technical reasons.
I’m a coasters collector.
I’m not a huge collector but I want to inventory them in one place.
For sure, I can create a PostgreSQL database.
But, at the same time, it appears that I can also design my collection using Moose.
So, you’re going to use a complete system analysis software to manage your coasters collection?
As for every software system, the first step is to design the model.
In my case, I want to represent a collection of coasters.
Let’s say a coaster is an entity.
It can belong to a brewery or not (for example event coasters).
A coaster also has a form.
It can be round, squared, oval, or others.
A Coaster can also be specific to a country.
Because it is a collection, I can register coaster I own and other I do not.
Finally, each coaster can have an associated image.
From this description of the problem, I designed my UML schema:
The most complicated part is done.
We just need to implement the meta-model in Moose now 😄.
Ok! Let’s create a generator that will generate for us the meta-model.
We only need to describe the meta-model in the generator.
We will name this generator CoasterCollectorMetamodelGenerator.
A meta-model is composed of entities.
In our case, it corresponds to the entities identified in the UML.
We use the method #defineClasses to define the entities of our meta-model.
As we have defined the classes, we defined the properties of the entities using the #defineProperties method.
defineProperties
super defineProperties.
creator property: #name type: #String.
country property: #name type: #String.
coaster property: #image type: #String.
coaster property: #owned type: #Boolean
In this example, we did not use Trait already created in Moose.
However, it is possible to use the Trait TNamedEntity to define that countries and creators have a name instead of using properties.
I have created my meta-model.
Now I need to fill my collection.
First of all, I will create a collection of coasters.
To do so, I instantiate a model with: model := CCModel new.
And now I can add the entities of my real collection in my model and I can explore it in Moose.
For example, to add a new brewery I execute: model add: (CCBrewery new name: 'Badetitou'; yourself).