Recently, I needed to implement a feature in FAST-Python requiring a visitor for my metamodel. People knowing me knows that I if I can automatize a task to save time and to keep the code coherant with the model, I’ll go for it. Nicolas Anquetil and Clotilde Toullec recently started to implement a visitor generator, so I tried it. Since it was a POC, I encountered some problems.
I’ll explain in this blog post how to use this visitor generator, what problems I encountered and the solutions I proposed.
Once my changes will be integrated, using the visitor generator is as simple as adding one method on the class side of your generator. For example, in FAST-Python:
The first one I encountered is that FAST-Python is depending on FAST that is depending on Famix that is depending on MooseQuery.
In order to have the FAST-Python visitor working, all dependencies needed to have a visitor themselves which was not the case. So I had to generate a FAST visitor for example. I could do it since I am part of the moosetechnology organization, but this is a hassle.
The solution I found was to generate standalone visitors. Instead of using the visitors of the sub metamodels, now we generate a visitor containing the visit of all entities of the model and the visit of the remote trait used in the model.
This can seems like a lot of useless code at first, but it has two advantages:
Visitors and now standalone
This allow to customize the visit of remote traits for the language we are currently working on. This will be important for one of the other problems I encountered.
The second problem I faced was that the generated visitor had infinit loops while I tried to use it. The reason is simple, when visiting an entity, we were visiting all its relations, but Moose is a cyclic graph since we have relations to the contained entities and relations to the containers of the entity.
Since most analysis that we are doing are “top down” (meaning that we start by the top level entities of our project and we visit their children) and we do not often need a “bottom up” visitor (for this we can just iterate on parents), I decided to exclude the visit of parent entities from the visit.
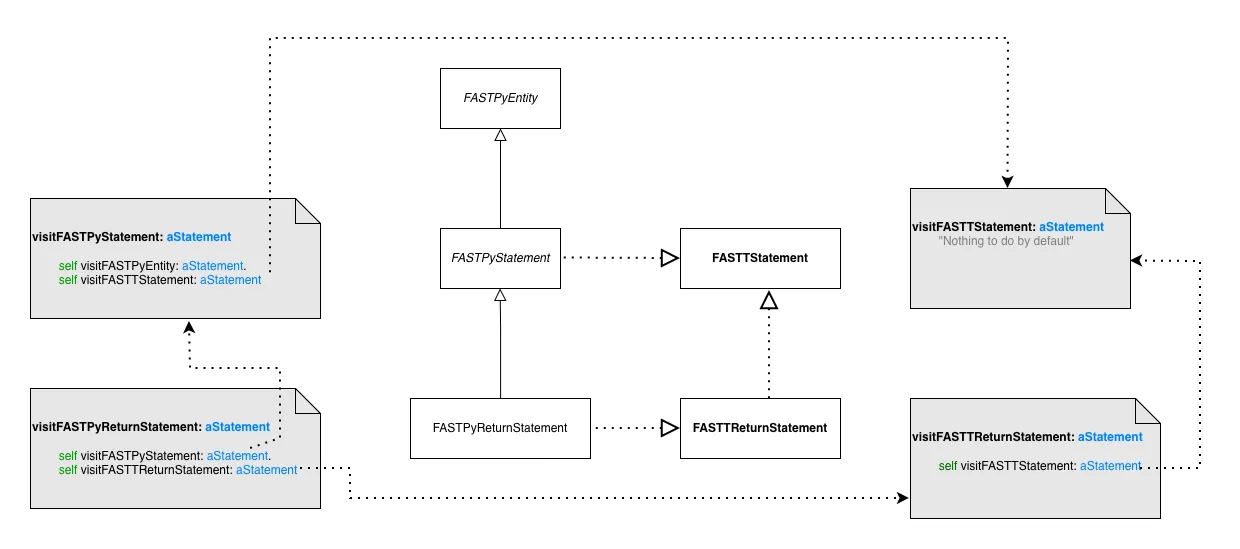
In some cases I noticed the we visited two times the same nodes. This is due to the fact that Famix model mix the usage of superclasses and traits. Here is a simple case to understant what is happening:
Here we see that a FASTPyReturnStatement inherits from FASTPyStatement. This class is using FASTTStatement. FASTPyReturnStatement also uses the trait FASTPyReturnStatement, but this trait also uses FASTTStatement.
Now when we visit FASTPyReturnStatement, we end up visiting two times FASTTStatement. Once via its superclass and once via its trait composition.
The solution I proposed is that when we visit a trait composition, we check the users of the trait and if some of them already visit the trait in their superclasses, we skip the visit of this relation.
With this, #visitFASTPyReturnStatement in the context of FAST-Python become:
visitFASTTReturnStatement: aTReturnStatement
  <generated>  "We should visit FASTTStatement but all its users in this language already visit it in their superclasses so we skip the call here.".
  self visitEntity: aTReturnStatement expression
In some cases, we need to skip the visit for some entities, but not all of them. For example, with conditional statements. In that case we generate a method like this:
"We do not visit all behaviorals because some classes already visit it in their superclasses in this language implementation. Visiting them here also would cause a double visit of this trait."
With those changes I’m hoping it will be easier to generate and use visitors with Famix. The big advantage is that if we do not need to touch the visitor by hand, it will follow all the evolutions of the metamodel.
In order to be able to work with Moose there is a prerequisite we cannot avoid: we need a model to analyze. This can be archieved in 2 principal ways:
Importing an existing JSON/MSE file containing a model
Importing a model via a Moose importer such as the Pharo importer or Python importer
While doing this, we create a lot of entities and set a lot of relations. But this can take some time. I found out that this time was even bigger than I anticipated while profiling a JSON import.
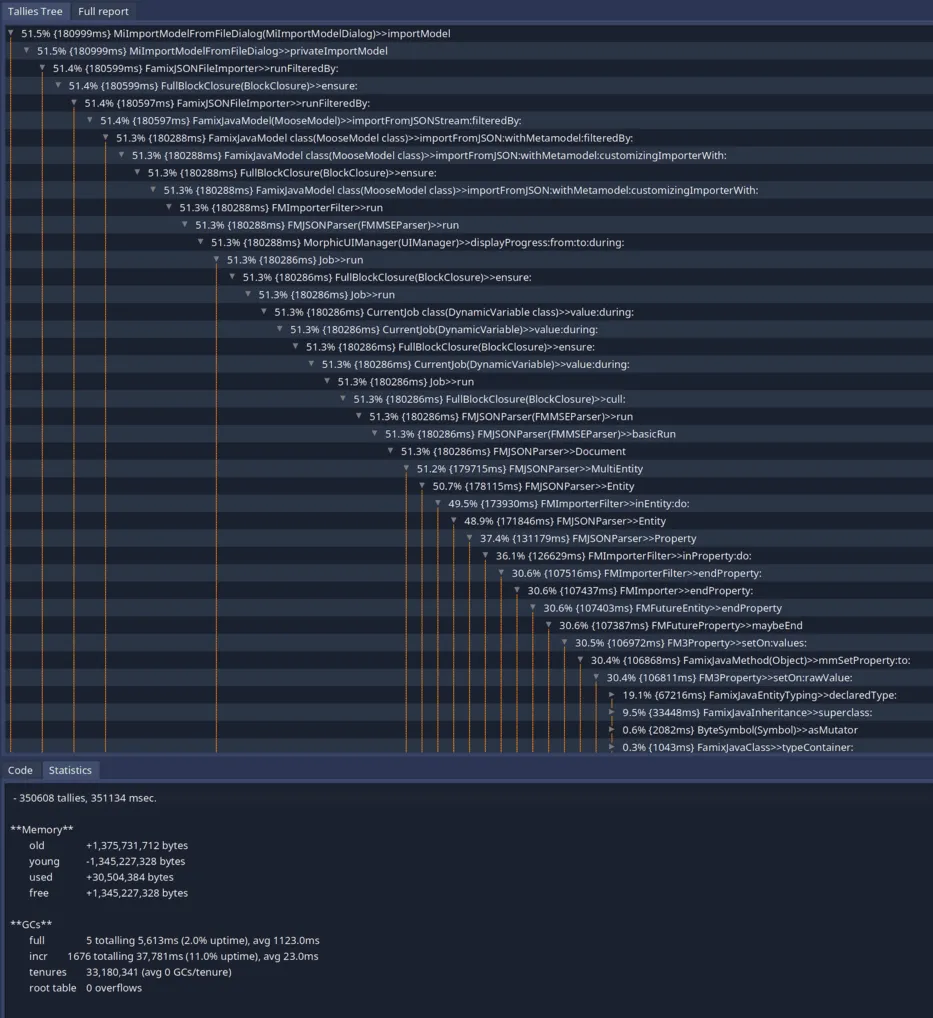
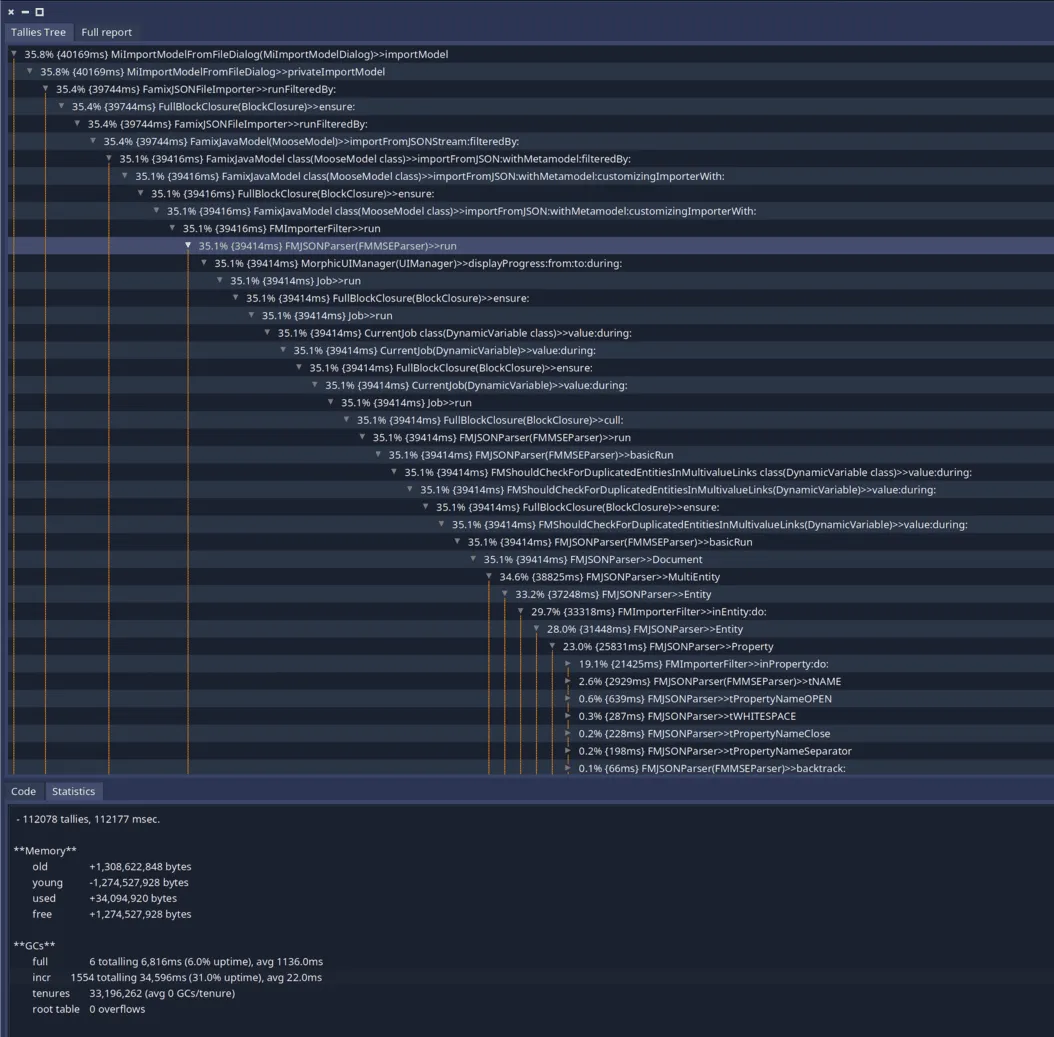
Here is the result of the profiling of a JSON of 330MB on a Macbook pro M1 from 2023:
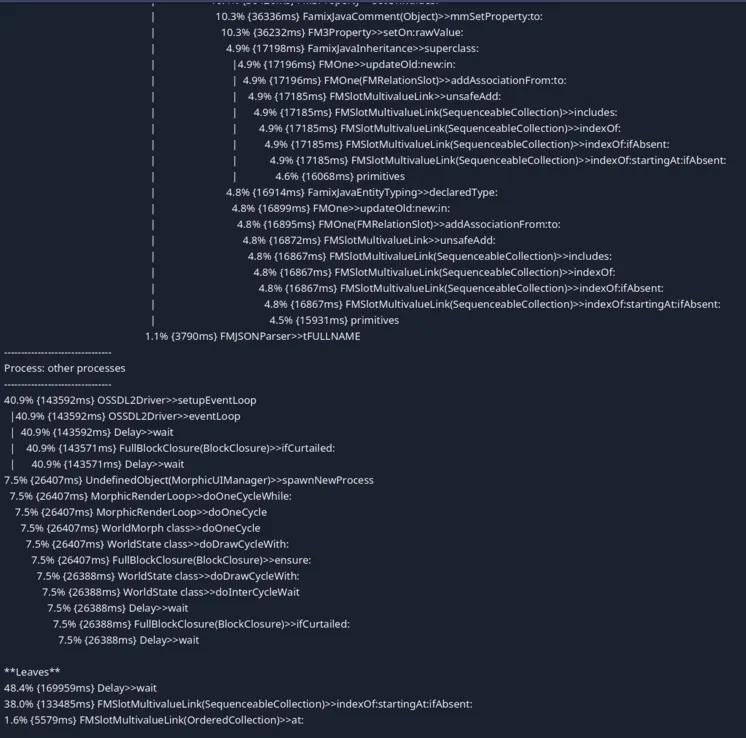
Form this profiling we can see that we spend 351sec for this import. We can find more information in this report:
On this screenshot we can see some noise due to the fact that the profiler was not adapted to the new event listening loop of Pharo. But in the leaves we can also see that most of the time is spent in FMSlotMultivaluedLink>>#indexOf:startingAt:ifAbsent:.
This is used by a mecanism of all instance variables that are FMMany because those we do not want duplicated elements. Thus, we check if the collection contains the element before adding it.
But during the import of a JSON file, we should have no duplicates making this check useless. This also explains why we spend so much time in this method: we always are in the worst case scenario: there is no element matching.
In order to optimize the creation of a model when we know we will not create any duplicates, we can disable the check.
For this, we can use a dynamic variable declaring that we should check for duplicated elements by default, but allowing to disable the check during the execution of some code.
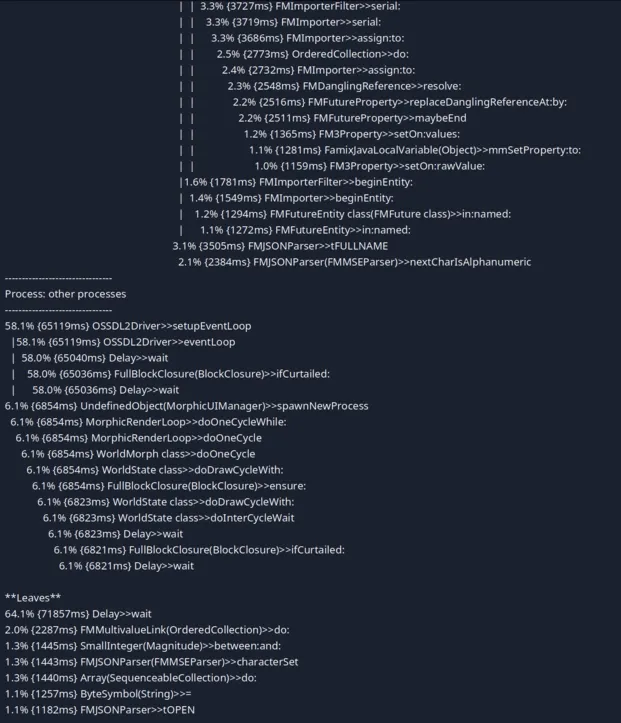
Now let’s try to import the same JSON file with the optiwization enabled:
We can see that the import time went from 351sec to 113sec!
We can also notice that we do not have one bottleneck in our parsing. This means that it will be harder to optimize more this task (even if some people still have some ideas on how to do that).
This optimization has been made for the import of JSON but it can be used in other contexts.
For example, in the Moose Python importer, the implementation is sure to never produce a duplicate. Thus, we could use the same trick this way:
FamixPythonImporter >> import
FMShouldCheckForDuplicatedEntitiesInMultivalueLinks value: false during: [ super import ]
When developping algorithm on top of the Moose platform, we can easily hurt a wall during testing.
To do functional (and sometimes unit) testing, we need to work on a Moose model. Most of the time we are getting this model in two ways:
We produce a model and save the .json to recreate this model in the tests
We create a model by hand
But those 2 solutions have drawbacks:
Keeping a JSON will not follow the evolutions of Famix and the model produce will not be representative of the last version of Famix
Creating a model by hand has the drawback of taking the risk that this model will not be representative of what we could manipulate in reality. For example, we might not think about setting the stubs or the source anchors
In order to avoid those drawbacks I will describe my way of managing such testing cases in this article. In order to do this, I will explain how I set up the tests of a project to build CallGraph of Java projects.
The idea I had for testing callgraphs is to implement real java projects in a resources folder in the git of the project. Then, we can parse them when launching the tests and manipulate the produced model. This would ensure that we always have a model up to date with the latest version of Famix. If tests breaks, this means that our famix model evolved and that our project does not work anymore for this language.
Now that we have the dependency running, we can use this project. We will explain the minimal steps here but you can find the full documantation here.
The usage of GitBridge begins with the definition of our FamixCallGraphBridge:
GitBridge <<#FamixCallGraphBridge
slots: {};
package: 'Famix-CallGraph-Tests'
Now that this class exists we can access our git folder using FamixCallGraphBridge current root.
Let’s add some syntactic suggar:
FamixCallGraphBridge class>>#resources
^self root /'resources'
FamixCallGraphBridge class>>#sources
^self resources /'sources'
We can now access our java projects doing FamixCallGraphBridge current sources.
This step is almost done, but in order for our tests to work in a github action (for example), we need two little tweaks.
In our smalltalk.ston file, we need to register our project in Iceberg (because GitBridge uses Iceberg to access the root folder).
SmalltalkCISpec {
#loading : [
SCIMetacelloLoadSpec {
#baseline : 'FamixCallGraph',
#directory : 'src',
#registerInIceberg : true"<== This line"
}
]
}
Also, in our github action we need to be sure that the checkout action will get enough info for git bridge to run and not the minimal ammount (which is the default) adding a fetch-depth: option.
I am using this technic to tests multiple projects such as parsers or call graph builders. In those projects I do touch my model and the setup can take time. So I optimize this setup in order to build a model only once for all the test case using a TestResource.
In order to do this we can remove the slots we added to FamixAbstractJavaCallGraphBuilderTestCase and create a test resource that will hold them
It is possible to do the same thing for other languages than java but maybe not exactly in the same way than in this blogpost for the section “Parse and import your model”. But this article is meant to be an inspiration!
I hope this helps improve the robustness of our projects :)
Analyzing source code starts with parsing and for this you need semantic understanding of how symbols in the code relate to each other.
In this post, we’ll walk through how to build a C code importer using the TreeSitterFamixIntegration framework.
The TreeSitterFamixIntegration stack provides tools to ease the development of Famix importers using tree-sitter.
This package offers some great features for parsing such as (but not limited to):
Useful methods for source management (getting source text, positions, setting sourceAnchor of a famix entity).
Error handling to help catch and report parsing issues
a better TreeSitter node inspector (which is very helpful when debugging)
Utility to efficiently import and attach single-line and multi-line comments to their corresponding entities.
Context tracking for symbol scope (no more context push and pop 😁)
There is a detailed documentation you can check that explain every features.
First, we need to load the C metamodel. This metamodel provides the Famix classes that represent C entities such as functions, structs, variables, etc.
The FamixCimporter class is the entry point for our importer. It will handle the parsing of C files into Abstract Syntax Trees (AST).
This class will inherit from FamixTSAbstractImporter (defined in the TreeSitterFamixIntegration project), which provides the necessary methods for importing and parsing C files using Tree-sitter.
FamixTSAbstractImporter <<#FamixCImporter
slots: {};
package: 'Famix-C-Importer'
Now, let’s override some methods to set up our importer:
"Should return a TreeSitter language such as TSLanguage python"
^ TSLanguage cLang
This method returns the Tree-sitter language we want to use for parsing. In this case, we are using the C language. You can find the available languages in the Pharo-Tree-Sitter package.
This method calls importFile: on all C files recursively found in a directory.
We will add more logic to this method later but for now, it serves as a starting point for our importer.
The isCFile: method checks if the file has a .c or .h extension.
FamixCImporter >> isCFile: aFileReferencemon
^#( 'c''h' ) includes: aFileReference extension
The importFile: method is defined in the FamixTSAbstractImporter class (provided by the TreeSitter-Famix-Integration project).
It parses the file content to create an AST and then passes the visitor (the FamixCVisitor that we previously defined) to walk through the AST.
The FamixCVisitor class is responsible for walking through the parsed AST and creating Famix entities. It will inherit from FamixTSAbstractVisitor, which provides the necessary methods for visiting Tree-sitter nodes.
FamixTSAbstractVisitor <<#FamixCVisitor
slots: {};
package: 'Famix-C-Importer'
For this class, we will just need to override one method:
It returns the Famix metamodel class that will be used to create Famix entities. In this case, we are using FamixCModel which is in the Famix-Cpp package.
Now that we have our importer and visitor classes set up, we can already test it.
To test our importer, we can create a simple C file and import it using the FamixCImporter class.
test.c
#include<stdio.h>
int aGlobalVar =1;
intmain() {
int aLocalVar;
aLocalVar = aGlobalVar +2;
}
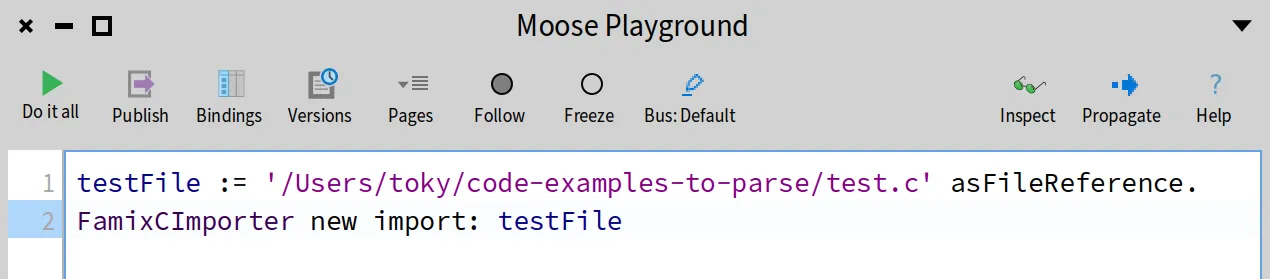
To import this file, we can use the following code in the Playground (cmd + O + P to open it):
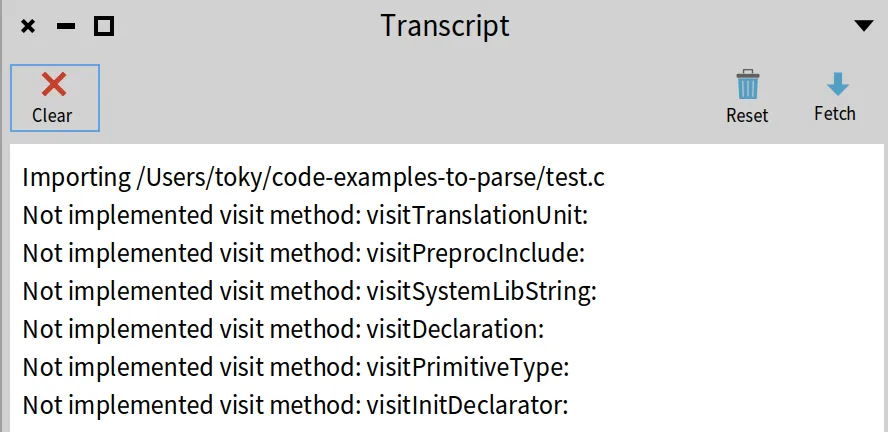
Before running the above code, open the Transcript to see the logs (cmd + O + T to open it).
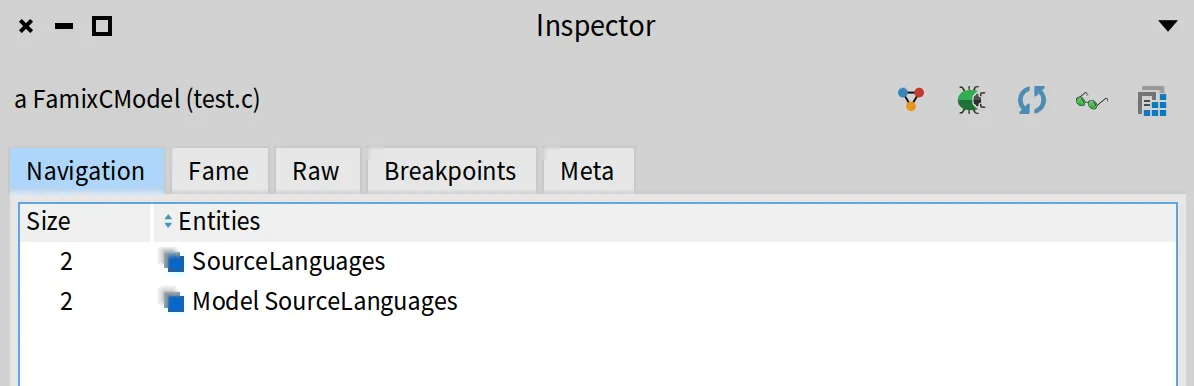
Then select all the code and run it by inspecting it (cmd + I or click the “Inspect” button). You will get something similar to this.
The above screenshot shows what is inside our model. We can see that there is pretty much nothing there yet apart from the SourceLanguages which is added by default by TreeSitterFamixIntegration.
Now if we look at the Transcript, we can see that the importer has imported the file but we didn’t implement the visitor methods yet for every node in the AST, so no Famix entities were created.
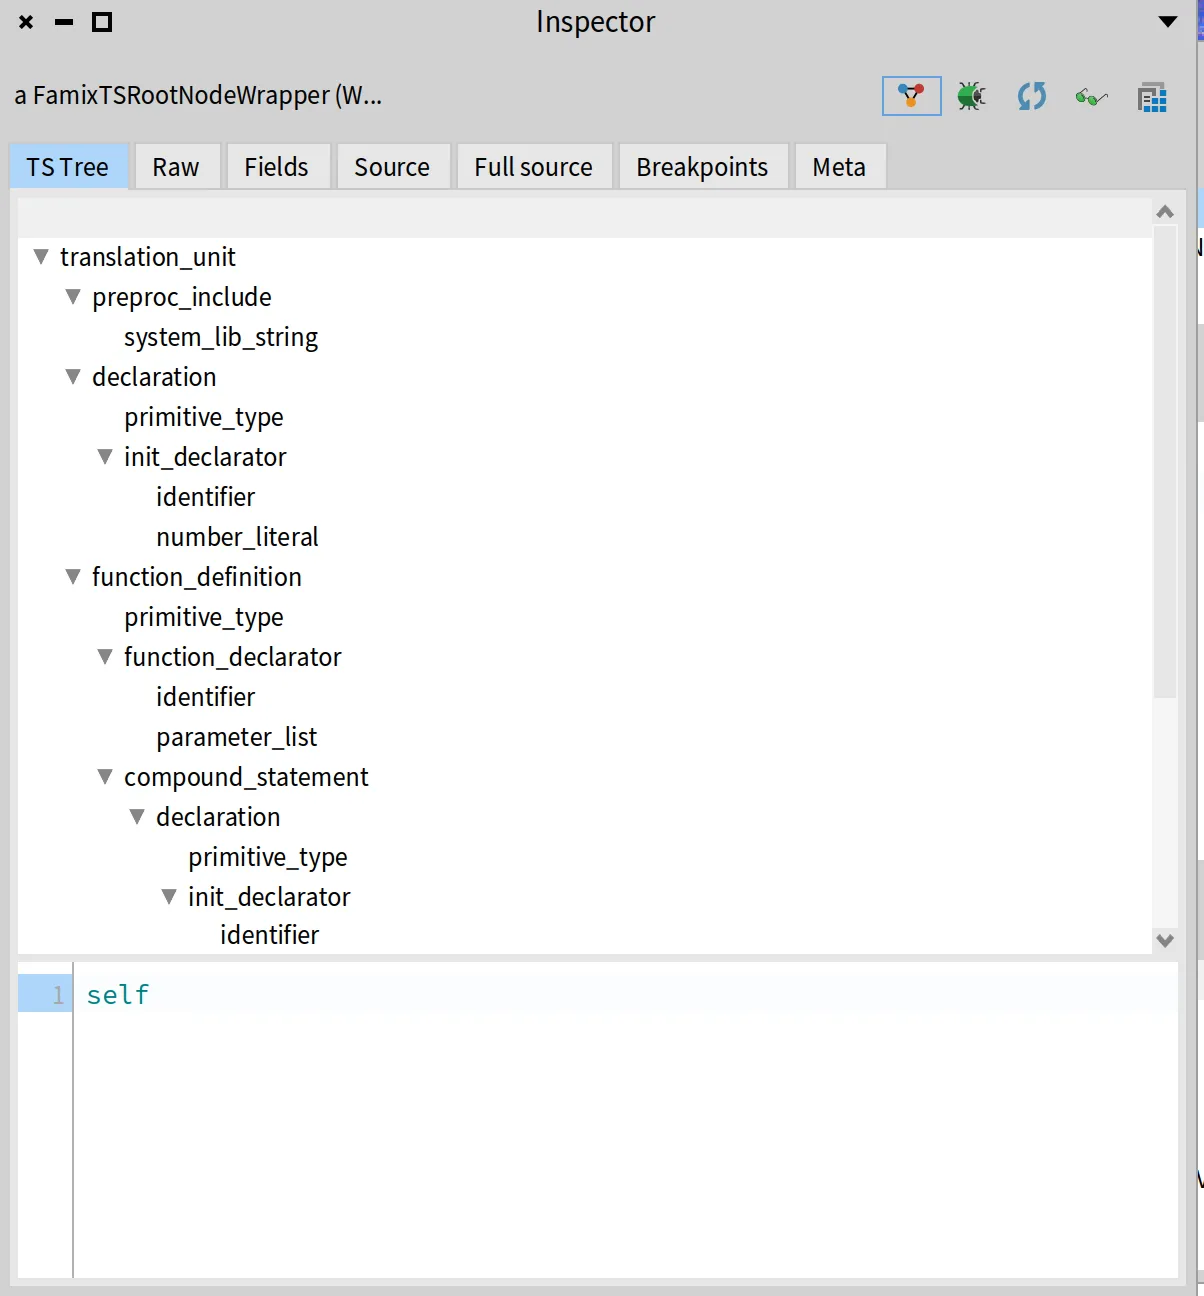
If you want to inspect the corresponding AST of our test file, you can do something similar to what is in this other blog post on tree-sitter.
Let’s go back to our FamixCImporter class and from there we will create a CompilationUnit and HeaderFile entities. We need to do that there because we have to check if the file is a header file or a source file.
visitor model newCompilationUnitNamed: aFileReference basename.
]
ifFalse: [
visitor model newHeaderFileNamed: aFileReference basename.
].
visitor
useCurrentEntity: fileEntity
during: [ self importFile: aFileReference ] ]
ifFalse: [
aFileReference children do: [ :each|
self importFileReference: each
].
^self ]
We use the useCurrentEntity:during: to provide a context for the visitor. This is same as pushing the fileEntity to a context, visit children and then popping it from the context. And it will set the current entity to the fileEntity.
Now try importing a whole directory containing C files. You should see that the importer creates a FamixCHeaderFile for each header file and a FamixCCompilationUnit for each source file.
To set the source anchor for any Famix entity, we can use the setSourceAnchor: aFamixEntity from: aTSNode method provided by the FamixTSAbstractVisitor class. This method takes a Famix entity and a Tree-sitter node.
We can use it to set the source anchor for our fileEntity . Go to visitTranslationUnit: in the FamixCVisitor class and add the following code:
Next, we will create FamixCFunction entities for each function declaration in the C file. We will do this in the visitFunctionDefinition: method of the FamixCVisitor class.
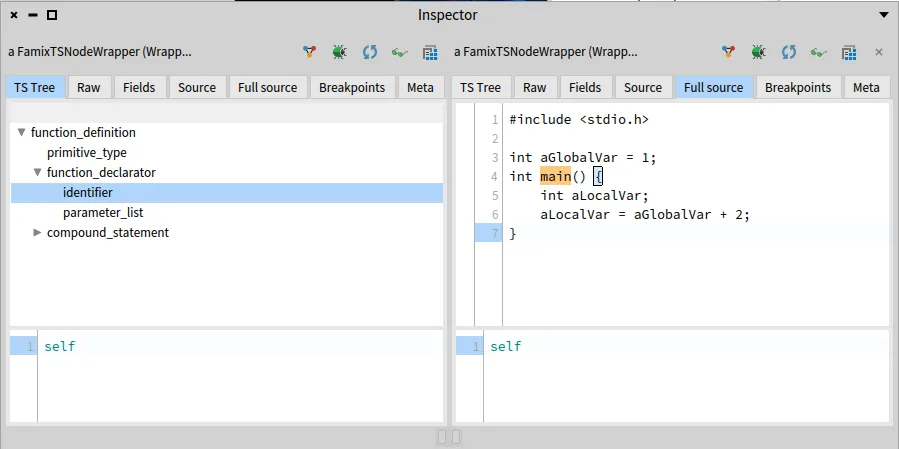
But first we need to know where the function name is located to create the FamixCFunction entity. Create the method and put a halt there to inspect the node.
visitFunctionDefinition: aNode
self halt.
self visitChildren: aNode.
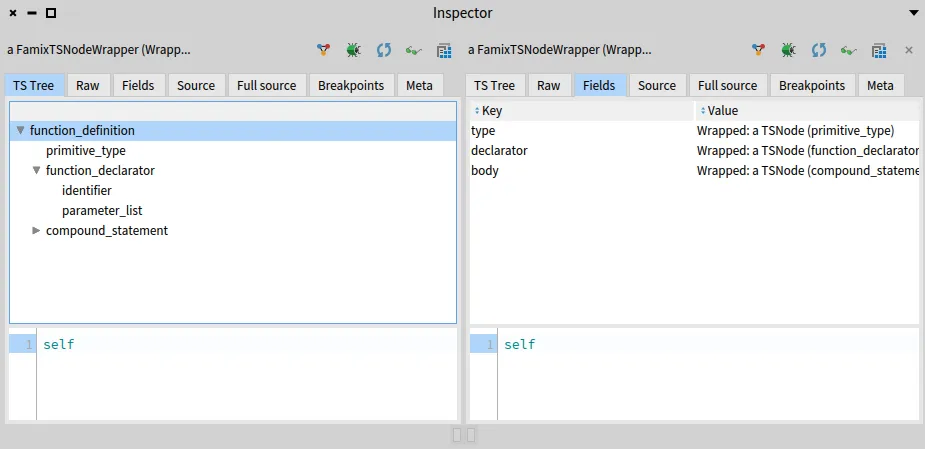
If we look at the function definition node, we can see that the function name is in the identifier node, which is a child of the function declarator node.
To get that name, there are two ways:
visit the function_declarator until the identifier returns its name using self visit: aNode
get it by child field name using aNode _fieldName that returns the child node with the given field name. And you don’t need to implement the _fieldName method because it is already handled by the framework.
For simplicity, and to show other available features in the framework, we will use the second way.
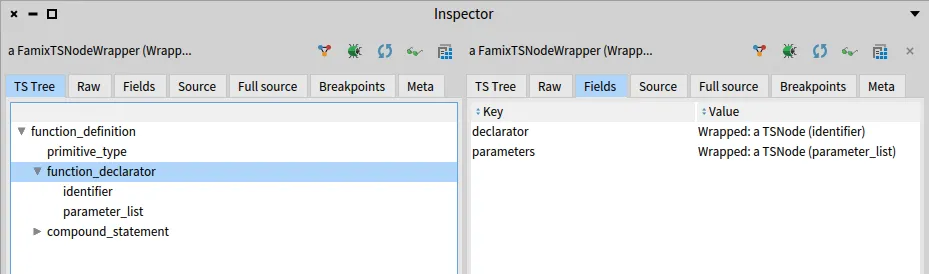
Let’s inspect the function definition node to see what fields it has.
So if we do aNode _declarator it will return the function declarator node
And if we do aNode _declarator from the function_declarator it will give us the identifier that we want.
Now we can create the function entity and set its name and source anchor.
The self currentEntity returns the compilation unit entity which is the parent of the function entity.
And before visiting the children, we set the current entity to the newly created function entity using useCurrentEntity:during:. This will allow us to create other entities that are related to this function, such as parameters and local variables.
The difference between local and global variables is that local variables are declared inside a function, while global variables are declared outside any function.
To create the variable entities, we will create the visitDeclaration: method in the FamixCVisitor class. This method is called for each variable declaration in the C file.
FamixCVisitor >> visitDeclaration: aNode
"fields: type - declarator"
| varNameentity |
self visit: aNode _type.
varName :=self visit: aNode _declarator.
entity :=self currentEntity isFunction
ifTrue: [
(model newLocalVariableNamed: varName)
parentBehaviouralEntity: self currentEntity;
yourself ]
ifFalse: [
(model newGlobalVariableNamed: varName)
parentScope: self currentEntity;
yourself ].
self setSourceAnchor: entity from: aNode.
The visitDeclaration: method does the following:
Visits the variable’s type. This will allow us to parse its type information.
Retrieves the variable name by visiting the declarator field. If the variable is initialized, this will be an init_declarator node; otherwise, it will be an identifier. We should implement visit methods for both cases to extract the name correctly.
FamixCVisitor >> visitInitDeclarator: aNode
"fields: declarator - value"
self visit: aNode _value.
^self visit: aNode _declarator "variable name is in the declarator node"
FamixCVisitor >> visitIdentifier: aNode
    ^ aNode sourceText "returns the name of the variable"
Creates a variable entity, either a local variable or a global variable, depending on whether the current entity is a function or not.
Sets the source anchor for the variable entity using the setSourceAnchor:from: method.
In this section, we will implement the symbol resolution for our C importer. This will allow us to resolve references to variables and functions in our C code.
As an example, we will resolve the reference to the local variable aLocalVar in the main function, which will be represented as a famix write access entity.
To create the write access entity, we will implement the visitAssignmentExpression: method in the FamixCVisitor class. This method is called for each assignment expression.
visitAssignmentExpression: aNode
"fields: left - right"
| accessleftVarName |
leftVarName :=self visit: aNode _left.
access := model newAccess accessor: self currentEntity;
The resolve: aResolvable foundAction: aBlockClosure method is provided by the FamixTSAbstractVisitor class.
It takes two arguments:
aResolvable: an instance of SRIdentifierResolvable. This resolvable is created with the identifier (the variable name) and the expected kinds of entities (in this case, either a local variable or a global variable). The identifier: method sets the identifier to resolve, and the expectedKind: method sets the expected kinds of entities that can be resolved.
aBlockClosure: a block that will be executed when the resolvable is resolved (we found the variable). In this case we set the variable of the access entity to the resolved variable.
The SRIdentifierResolvable is a generic resolver that can be used to resolve identifiers. However, in some cases, we may need to create a custom resolver to handle specific cases. In that case, we can create a class that inherits from SRResolvable and override the resolveInScope:currentEntity: method to implement our custom resolution logic.
For more information about the symbol resolver, you can check the documentation.
The TreeSitterFamixIntegration package provides a utility to parse comments and attach them to the corresponding Famix entities. This is done using the FamixCCommentVisitor class.
To parse comments, we will create the FamixCCommentVisitor class that will inherit from FamixTSAbstractCommentVisitor. And we just need to override the visitNode: method.
We use the addMultilineCommentNode: and addSingleLineCommentNode: methods provided by the FamixTSAbstractCommentVisitor class to add the comment to the model.
For a detailed explanation of how to use the comment visitor, you can check the documentation.
Last thing to do is to use the comment visitor somewhere in our importer. We can do that everytime we finish visiting every children of translation unit node.
In this blog post, we have seen how to build a Famix importer for C code using the TreeSitterFamixIntegration framework. We have covered the following topics:
Setting up the environment and creating the importer and visitor classes.
Creating Famix entities for compilation units, functions, and variables.
Implementing symbol resolution for local and global variables.
Parsing comments and attaching them to the corresponding Famix entities.
This is just a starting point for building an importer with this stack. You have to implement more tests and methods to handle other entities. The TreeSitterFamixIntegration framework provides a lot of other utilities we didn’t cover to help you with that.
In this blog-post, we see some tricks to create a visitor for an alien AST.
This visitor can allow, for example, to generate a Famix model from an external AST.
In a previous blog-post, we saw how to create a parser from a tree-sitter grammar.
This parser gives us an AST (Abstract Syntax Tree) which is a tree of nodes representing any given program that the parser can understand.
But the structure is decided by the external tool and might not be what we want.
For example it will not be a Famix model.
Let see some tricks to help convert this alien grammar into something that better fits our needs.
Let’s first look at what a “Visitor” is.
If you already know, you can skip this part.
When dealing with ASTs or Famix models, visitors are very convenient tools to walk through the entire tree/model and perform some actions.
The Visitor is a design pattern that allows to perform some actions on a set of interconnected objects, presumably all from a family of classes.
Typically, the classes all belong to the same inheritance hierarchy.
In our case, the objects will all be nodes in an AST.
For Famix, the objects would be entities from a Famix meta-model.
In the Visitor pattern, all the classes have an #accept: method.
Each #accept: in each class will call a visiting method of the visitor that is specific to it.
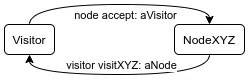
For example the classes NodeA and NodeB will respectively define:
NodeA >> accept: aVisitor  aVisitor visitNodeA: self.
NodeB >> accept: aVisitor  aVisitor visitNodeB: self.
Each visiting method in the visitor will with the element it receives, knowing what is its class: in #visitNodeA: the visitor knows how to deal with a NodeA instance and similarly for #visitNodeB:.
The visitor pattern is a kind of ping-pong between the visiting and #accept: methods:
Typically, all the node are interconnected in a tree or a graph.
To walk through the entire structure, it is expected that each visiting method take care of visiting the sub-objects of the current object.
For example we could say that NodeA has a property child containing another node:
NodeVisitor >> visitNodeA: aNodeA
"do some stuff"
aNodeA child accept: self
It is easy to see that if child contains a NodeB, this will trigger the visiting method visitNodeB: on it.
If it’s a instance of some other class, similarly it will trigger the appropriate visiting method.
To visit the entire structure one simply calls accept: on the root of the tree/graph passing it the visitor.
Visitors are very useful with ASTs or graphs because once all the accept: methods are implemented, we can define very different visitors that will "do some stuff" (see above) on all the object in the tree/graph.
Several of the “Famix-tools” blog-posts are based on visitors.
In a preceding blog-post we saw how to create an AST from a Perl program using the Tree-Sitter Perl grammar.
We will use this as an example to see how to create a visitor on this external AST.
Here “external” means it was created by an external tool and we don’t have control on the structure of the AST.
If we want to create a Famix-Perl model from a Tree-Sitter AST, we will need to convert the nodes in the Tree-Sitter AST into Famix entities.
(Note: In Perl, “package” is used to create classes. Therefore in our example, “new”, “setFirstName”, and “getFirstName” are some kind of Perl methods.)
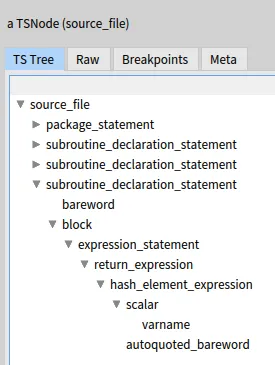
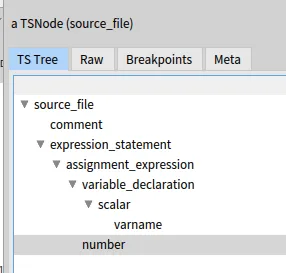
Following the instructions in the previous post, you should be able to get a Tree-Sitter AST like this one:
To have a visitor for this AST, we first need to have an accept: method in all the classes of the AST’s nodes.
Fortunately this is all taken care of by the Pharo Tree-Sitter project.
In TSNode one finds:
accept: aTSVisitor
^ aTSVisitor visitNode: self
And a class TSVisitor defines:
visitNode: aTSNode
aTSNode collectNamedChild do: [ :child|
child accept: self ]
Which is a method ensuring that all children of a TSNode will be visited.
Thanks guys!
But less fortunately, there are very few different nodes in a Tree-Sitter AST.
Actually, all the nodes are instances of TSNode.
So the “subroutine_declaration_statement”, “block”, “expression_statement”, “return_expression”,… of our example are all of the same class, which is not very useful for a visitor.
This happens quite often.
For example a parser dumping an AST in XML format will contain mostly XMLElements.
If it is in JSON, they are all “objects” without any native class specification in the format. 😒
Fortunately, people building ASTs usually put inside a property with an indication of the type of each node.
For Tree-Sitter, this is the “type” property.
Every TSnode has a type which is what is displayed in the screenshot above.
How can we use this to help visiting the AST in a meaningfull way (from a visitor point a view)?
We have no control on the accept: method in TSNode, it will always call visitNode:.
But we can add an extra indirection to call different visiting methods according to the type of the node.
So, our visitor will inherit from TSVisitor but it will override the visitNode: method.
The new method will take the type of the node, build a visiting method name from it, and call the method on the node.
Let’s decide that all our visiting methods will be called “visitPerl<some-type>”.
For example for a “block”, the method will be visitPerlBlock:, for a “return_expression” it will be `visitPerlReturn_expression:”.
This is very easily done in Pharo with this method:
visitNode: aTSNode
| selector |
selector :='visitPerl', aTSNode type capitalized ,':'.
^self perform: selector asSymbol with: aTSNode
This method builds the new method name in a temporary variable selector and then calls it using perform:with:.
Note that the type name is capitalized to match the Pharo convention for method names.
We could have removed all the underscores (_) but it would have required a little bit of extra work.
This is not difficult with string manipulation methods.
You could try it… (or you can continue reading and find the solution further down.)
With this simple extra indirection in #visitNode:, we can now define separate visiting method for each type of TSNode.
For example to convert the AST to a Famix model, visitPerlPackage: would create a FamixPerlClass, and visitPerlSubroutine_declaration_statement: will create a FamixPerlMethod.
(Of course it is a bit more complex than that, but you got the idea, right?)
Our visitor is progressing but not done yet.
If we call astRootNode accept: TreeSitterPerlVisitor new with the root node of the Tree-Sitter AST, it will immediately halt on a DoesNotUnderstand error because the method visitPerlSource_file: does not exist in the visitor.
We can create it that way:
visitPerlSource_file: aTSNode  ^self visitPerlAbstractNode: aTSNode.

visitPerlAbstractNode: aTSNode  ^super visitNode: aTSNode
Here we introduce a visitPerlAbstractNode: that is meant to be called by all visiting methods.
From the point of view of the visitor, we are kind of creating a virtual inheritance hierarchy where each specific TSNode will “inherit” from that “PerlAbstractNode”.
This will be useful in the future when we create sub-classes of our visitor.
By calling super visitNode:, in visitPerlAbstractNode: we ensure that the children of the “source_file” will be visited.
And… we instantly get a new halt with DoesNotUnderstand: visitPerlPackage_statement:.
Again we define it:
visitPerlPackage_statement: aTSNode
^self visitPerlAbstractNode: aTSNode
This is rapidly becoming repetitive and tedious. There are a lot of methods to define (25 for our example) and they are all the same.
Let’s improve that.
We will use the Pharo DoesNotUnderstand mechanism to automate everything.
When a message is sent that an object that does not understand it, then the message doesNotUnderstand: is sent to this object with the original message (not understood) as parameter.
The default behavior is to raise an exception, but we can change that.
We will change doesNotUnderstand: so that it creates the required message automatically for us.
This is easy all we need to do is create a string:
visitPerl<some-name>: aTSNode
^self visitPerlAbstractNode: aTSNode
We will then ask Pharo to compile this method in the Visitor class and to execute it.
et voila!
Building the string is simple because the selector is the one that was not understood originally by the visitor.
We can get it from the argument of doesNotUnderstand:.
So we define the method like that:
doesNotUnderstand: aMessage
| code |
code := aMessage selector ,' aTSNode
^super visitNode: aTSNode'.
selfclass compile: code classified: #visiting.
self perform: aMessage selector with: aMessage arguments first
First we generate the source code of the method in the code variable.
Then we compile it in the visitor’s class.
Last we call the new method that was just created.
Here to call it, we use perform:with: again, knowing that our method has only one argument (so only one “with:” in the call).
For more security, it can be useful to add the following guard statement at the beginning of our doesNotUnderstand: method:
(aMessage selector beginsWith: 'visitPerl')
ifFalse: [ super doesNotUnderstand: aMessage ].
This ensures that we only create methods that begins with “visitPerl”, if for any reason, some other message is not understood, it will raise an exception as usual.
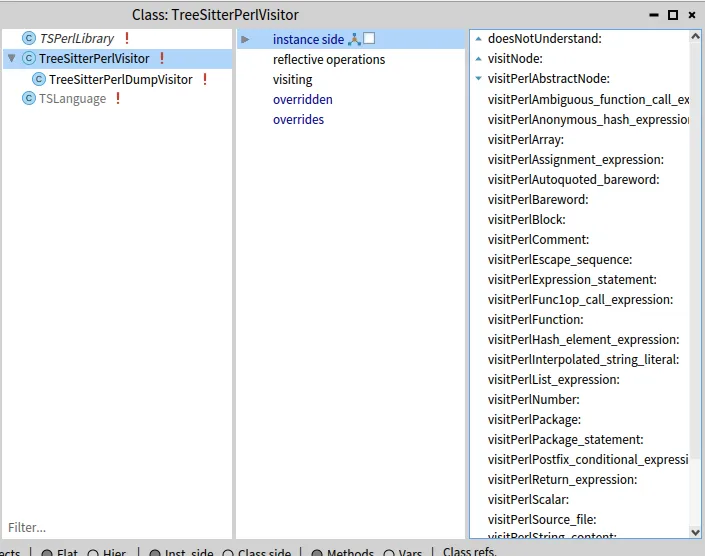
Now visiting the AST from our example creates all the visiting methods automatically:
Of course this visitor does not do anything but walking through the entire AST.
Let’s say it is already a good start and we can create specific visitors from it.
For example we see in the screen shot above that there is a TreeSitterPerlDumpVisitor.
It just dumps on the Transcript the list of node visited.
For this, it only needs to define:
visitPerlAbstractNode: aTSNode
('visiting a ', aTSNode type) traceCr.
super visitPerlAbstractNode: aTSNode.
Et voila! (number 2)
Note: Redefining doesNotUnderstand: is a nice trick to quickly create all the visiting methods, but it is recommended that you remove it once the visitor is stable, to make sure you catch all unexpected errors in the future.
This is all well and good, but the visiting methods have one drawback:
They visit the children of a node in an unspecified order.
For example, an “assignment_expression” has two children, the variable assigned and the expression assigned to it.
We must rely on Tree-Sitter to visit them in the right order so that the first child is always the variable assigned and the second child is always the right-hand-side expression.
It would be better to have a name for these children so as to make sure that we know what we are visiting at any time.
In this case, Tree-Sitter helps us with the collectFieldNameOfNamedChild method of TSNode.
This method returns an OrderedDictionary where the children are associated to a (usually) meaningful key.
In the case of “assignment_expression” the dictionary has two keys: “left” and “right” each associated to the correct child.
It would be better to call them instead of blindly visit all the children.
So we will change our visitor for this.
The visitNode: method will now call the visiting method with the dictionnary of keys/children as second parameter, the dictionnary of fields.
This departs a bit from the traditional visitor pattern where the visiting methods usually have only one argument, the node being visited.
But the extra information will help make the visiting methods simpler:
visitNode: aTSNode
| selector |
selector := String streamContents: [ :st|
st <<'visitPerl'.
($_ split: aTSNode type) do: [ :word| st << word capitalized ].
st <<':withFields:'
].
^self
perform: selector asSymbol
with: aTSNode
with: aTSNode collectFieldNameOfNamedChild
It looks significantly more complex, but we also removed the underscores (_) in the visiting method selector (first part of the #visitNode: method).
So for “assignment_expression”, the visiting method will now be: visitPerleAssignmentExpression:withFields:.
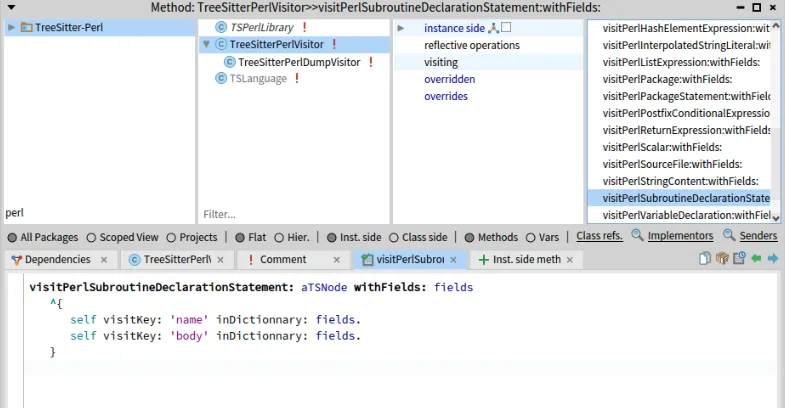
From this, we could have the following template for our visiting methods:
Again, it may look a bit complex, but this is only building a string with the needed source code. Go back to the listing of #visitPerlAssignmentExpression: above to see that:
we first build the selector of the new visiting method with its parameter;
then we put a return and start a dynamic array;
after that we create a call to #visitKey:inDictionnary for each field;
and finally, we close the dynamic array.
Et voila! (number 3).
This is it.
If we call again this visitor on an AST from Tree-Sitter, it will generate all the new visiting methods with explicit field visiting.
For example:
The implementation of all this can be found in the https://github.com/moosetechnology/Famix-Perl repository on github.
All that’s left to do is create a sub-class of this visitor and override the visiting methods to do something useful with each node type.
In this post, we will be looking at how to use a Tree-Sitter grammar to help build a parser for a language.
We will use the Perl language example for this.
Note: Creating a parser for a language is a large endehavour that can easily take 3 to 6 months of work.
Tree-Sitter, or any other grammar tool, will help in that, but it remains a long task.
do make (note: it gave me some error, but the library file was generated all the same)
(on Linux) it creates a libtree-sitter-perl.so dynamic library file.
This must be moved in some standard library path (I chose /usr/lib/x86_64-linux-gnu/ because this is where the libtree-sitter.so file was).
Pharo uses FFI to link to the grammar library, that’s why it’s a good idea to put it in a standard directory.
You can also put this library file in the same directory as your Pharo image, or in the directory where the Pharo launcher puts the virtual machines.
The subclasses of FFILibraryFinder can tell you what are the standard directories on your installation.
For example on Linux, FFIUnix64LibraryFinder new paths returns a list of paths that includes '/usr/lib/x86_64-linux-gnu/' where we did put our grammar.so file.
We use the Pharo-Tree-Sitter project (https://github.com/Evref-BL/Pharo-Tree-Sitter) of Berger-Levrault, created by Benoit Verhaeghe, a regular contributor to Moose and this blog.
You can import this project in a Moose image following the README instructions.
Notice that we gave the name of the dynamic library file created above (libtree-sitter-perl.so).
If this file is in a standard library directory, FFI will find it.
We can now experiment “our” parser on a small example:
parser := TSParser new.
tsLanguage := TSLanguage perl.
parser language: tsLanguage.
string :='# this is a comment
my $var = 5;
'.
tree := parser parseString: string.
tree rootNode
This gives you the following window:
That looks like a very good start!
But we are still a long way from home.
Let’s look at a node of the tree for fun.
node := tree rootNode firstNamedChild will give you the first node in the AST (the comment).
If we inspect it, we see that it is a TSNode
we can get its type: node type returns the string 'comment'
node nextSibling returns the next TSNode, the “expression-statement”
node startPoint and node endPoint tell you where in the source code this node is located.
It returns instances of TSPoint:
node startPoint row = 0 (0 indexed)
node startPoint column = 0
node endPoint row = 0
node endPoint column = 19
That is to say the node is on the first row, extending from column 0 to 19.
With this, one could get the text associated to the node from the original source code.
That’s it for today.
In a following post we will look at doing something with this AST using the Visitor design pattern.
But sometimes, testing is hard, because you do not know how to start (often because it was hard to start with TDD or better XtremTDD 😄).
One challenging situation is the creation of mocks to represent real cases and use them as test resources.
This situation is common when dealing with code modeling and meta-modeling.
Writing a model manually to test features on it is hard.
Today, I’ll show you how to use GitHub Actions as well as GitLab CI to create tests for the Moose platform based on real resources.
First of all, let’s describe a simple process when working on modeling and meta-modeling.
When analyzing a software system using MDE, everything starts with parsing the source code of the application to produce a model.
This model can then be stored in a file.
Then, we import the file into our analysis environment, and we use the concrete model.
All these steps are performed before using the model.
However, when we create tests for the Use step, we do not perform all the steps before.
We likely just create a mock model.
Even if this situation is acceptable, it is troublesome because it disconnects the test from the tools (which can have bugs) that create the model.
One solution is thus not to create a mock model, but to create mock source code files.
Using mock source code files, we can reproduce the process for each test (or better, a group of tests 😉)
In the following, I describe the implementation and set-up of the approach for analyzing Java code, using Pharo with Moose.
It consists of the following steps:
Create mock resources
Create a bridge from your Pharo image to your resources using PharoBridge
To set up our CI files, we first create in the ci folder of our repository a pretesting.st file that will execute Pharo code.
(IceRepositoryCreator new
location: '.' asFileReference;
subdirectory: 'src';
createRepository) register
This code will be run by the CI and register the Pharo project inside the Iceberg tool of Pharo.
This registration is then used by GitBridge to retrieve the location of the test resources folder.
Then, we have to update the .smalltalk.ston file (used by every Smalltalk CI process) and add a reference to our pretesting.st file.
The last step for GitLab is the creation of the .gitlab-ci.yml file.
This CI can include several steps.
We now present the steps dedicated to testing the Java model, but the same steps apply to other programming languages.
The last step for GitLab is the creation of the .github/workflows/test.yml file.
In addition to a common smalltalk-ci workflow, we have to configure differently the checkout step, and add a step that parses the code.
For the checkout step, GitBridge (and more specifically Iceberg) needs the history of commits.
Thus, we need to configure the checkout actions to fetch the all history.
- uses: actions/checkout@v3
with:
fetch-depth: '0'
Then, we can add a step that runs VerveineJ using its docker version.
The last step is to adapt your tests to use the model produced from the mock source.
To do so, it is possible to remove the creation of the mock model by loading the model.
You can now test your code on a model generated as a real-world model!
It is clear that this solution slows down tests performance, however. But it ensures that your mock model is well created, because it is created by the parser tool (importer).
A good test practice is thus a mix of both solutions, classic tests in the analysis code, and full scenario tests based on real resources.
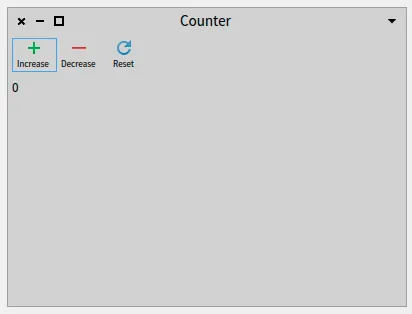
Let’s build a simple presenter showing a counter. To manage this counter, we will build a toolbar which buttons increase, decrease or reset the value of this counter.
Our presenter is implemented in CounterPresenter, a subclass of SpPresenter. It will define 3 methods to manage the counter value: #increaseCounter, #decreaseCounter and #resetCounter.
We will not consider the building of the presenter itself but we will focus on the toolbar.
Spec provides an API to build toolbars and add dedicated buttons in it.
We will use it in the presenter initialization method: #initializePresenters, overriden from SpPresenter, to instantiate a toolbar:
toolbar :=self newToolbar
Then, we manually build toolbar buttons and add them into the toolbar:
We also need to add the toolbar to the presenter layout. Since Pharo 10, we can do this instance side:
intializeLayout
self layout: SpBoxLayout newTopToBottom
add: toolbar height: selfclass toolbarHeight;
"... other widgets ...";
yourself
This version works perfectly. However, the definition of the buttons, their actions, labels and icons are only defined locally and are not easy to reuse. We will extract this behavior to Commands and use them to build our toolbar.
We use Commander, the implementation of the Command pattern in Pharo.
Let’s create 3 subclasses of CmCommand, one for each of our buttons. These classses define an instance variable #context. In this case, it will be our presenter.
Each class should define the #execute method according to its expected behavior:
execute
    self context increaseCounter
Our commands should also implement the class methods #defaultTitle, and #defaultIconName.
To be used in Spec, our commands are decorated as SpCommands via the method #asSpecCommand.
We override this method to correctly use the icon name, as follows:
SpCommand provides an API to be converted as buttons in spec.
A first way to do it is to directly add them in the toolbar. Here is a second version of the #initializePresenters method:
Spec presenters can define commands groups to be used in toolbars and menus via the class method #buildCommandsGroupWith:forRoot:.
We implement it in our presenter, on class side:
To get this command group, SpPresenter implements #rootCommandsGroup. This method collects the commands defined in #buildCommandsGroupWith:forRoot: and set the current presenter as their context. We call it in the #initializePresenters method.
toolbar fillWith: self rootCommandsGroup.
⚠️ Be careful, #fillWith: will remove all items already present in the toolbar. In this code snippet, aButton will not be in the toolbar:
Instead of defining a toolbar as a subpresenter, it is a good practice to define the toolbar in the window directly.
We remove the toolbar instance variable and all the related code in #initializePresenters and #initializeLayout.
We then override #initializeWindow: from SpPresenter.
initializeWindow: aMiWindowPresenter
    super initializeWindow: aMiWindowPresenter.    aMiWindowPresenter toolbar:        (SpToolbarPresenter new fillWith: self rootCommandsGroup)
Building toolbars in Spec can be done manually. However, by using commands, we separate responsibilities and we can re-use, extend and test these commands. The commands our presenter builds can be used not only in toolbars, but also in menus in a similar manner.
To create a new Moose Tool, you must create a child class of MiAbstractBrowser. This abstract class contains the basic infrastructure to all Moose browsers. It provides a toolbar with: buttons to inspect and propagate the current selection; Radio buttons to choose a reception mode; and a help button that shows the class comment for each browser.
Also, it provides the logic to connect the browser to the Moose bus.
So, let us get started. We will create a “Moose Inspector”. It would be like the Pharo’s inspector but as a Moose browser. Firstly, we create the subclass as following:
MiAbstractBrowser subclass: #MiInspectorBrowser
instanceVariableNames: 'stInspector'
classVariableNames: ''
package: 'Moose-Core-Inspector'
As one can see, it has one instance variable which will hold an instance of Pharo’s inspector: StInspector.
Now, we must implement some basic methods. First let us implement initializePresenters method:
initializePresenters
super initializePresenters.
stInspector :=self instantiate: StInspector.
stInspector model: self model
We instantiate stInspector variable an instance of Pharo’s inspector. Then we set the inspector model to be the same as the browser model.
Now we are going to implement canReceiveEntity: method. This method returns a Boolean which tells us if the entities received on the bus are usable in this browser. As we are building an inspector all entities can be accepted. So, we are going to return true always.
canReceiveEntity: anEntity
^true
Then, we must implement followEntity: method. This method is called when new entities are received from the bus. In this case, we only need update the inspector model with the new entity. This method has the responsibility of defining the behaviour of the browser when new entities arrives from the bus. This is part of the bus mechanism of MiAbstractBrowser. This method is called if canReceiveEntity: anEntity returns true.
followEntity: anEntity
    self model: anEntity.    stInspector model: self model
Next, the miSelectedItem method tells the bus what to propagate (when the user hits the “Propagate” button). In this case we want to propagate the object selected in the last inspector page.
miSelectedItem
    | lastInspectorPage |    lastInspectorPage := stInspector millerList pages last.    ^ lastInspectorPage model inspectedObject
Now we have all the logic and we can define the layout of this new browser. Now in Spec, the framework used to buld GUi in Pharo, we can implement dynamic layouts. So, we create a initializeLayout method. In that method, we take the layout of the super class, which is the toolbar, and we will add the other presenter.
initializeLayout
self layout: (SpBoxLayout newTopToBottom
add: selfclass defaultSpec expand: false;
add: stInspector;
yourself)
And do not forget to call this at the end of initializePresenters.
initializePresenters
super initializePresenters.
stInspector :=self instantiate: StInspector.
stInspector model: self model.
self initializeLayout
Finally, we can define which will be the default model on which the browser will open. This is in case the bus does not have any entities. We want the Moose models, so create on class side:
newModel
    ^ MooseModel root entities
Optionally, we can override class side methods title and windowSize.
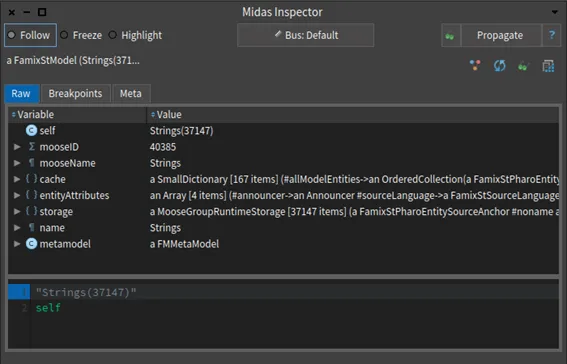
We are ready to go. All we must do now is to run MiInspectorBrowser open on a Playground. This will open our new browser.
How to add new tabs in the Moose Inspector Browser
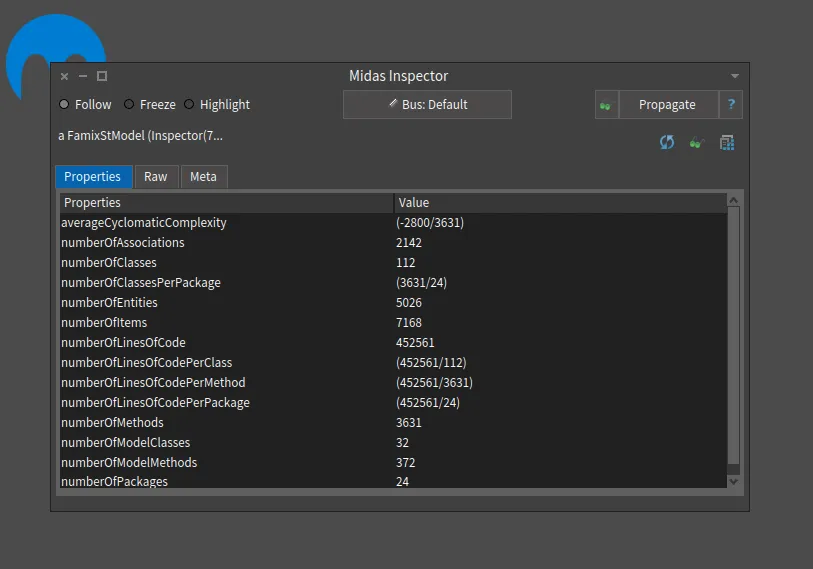
The new browser is not effective yet. We want to add some custom tabs to inspect the entities in a more visual way. To do so we can add some custom inspector tabs. When it displays an object, the inspector looks for methods of that object that have the <inspectorPresentationOrder:title:> pragma. The method should return a spec presenter that will be included in the inspector’s tab.
We will migrate the old “Properties” tab that is found in MooseFinder. The code is in MooseObject>>#mooseFinderPropertiesIn: We only have to rewrite it using Spec framework and use the pragma <inspectorPresentationOrder:title:>. We will create a method in MooseObject called inspectorPropertiesIn.
Recently, I’ve been using a Moose utility (MooseEasyUtility) to ease the creation and loading of a Moose Model.
In turn, this utility uses the LibC to send various commands to the operating system for example to call the VerveineJ parser.
However, when using this library, I encountered a problem on my Windows machine.
The problem was caused by an encoding issue between the Java Parser (VerveineJ) and the file reader in Pharo.
This is Windows specific as there was no issue when running my program on a Linux-based machine.
Sometimes you have to use the Windows OS like me, or you want to build an interoperable application that runs on multiple applications.
Your Pharo program may eventually run on a Windows or Linux-based OS; however, you may not be familiar with Windows.
Luckily, Microsoft has finally opened up its system to introduce the Windows Subsystem Linux (WSL).
WSL is a compatibility layer for running Linux binary executables (in ELF format) natively on Windows 10.
Furthermore, in 2019, Microsoft introduced WSL 2, which included important changes such as a real Linux kernel, through a subset of Hyper-V features.
The important thing to remember is that it allows us to use bash commands on Windows 10.
There are two ways to install WSL on your machine. The simplified installation requires that you join the Windows Insider Program and run the command wsl --install. The manual installation is a bit more complicated but the steps are detailed on docs-microsoft.
Once installed you may access WSL by either launching WSL through the search bar or by running your favorite terminal and using the command wsl.
You can also type wsl in your terminal to access the WSL directly.
The next step after installing WSL on your machine is to launch your favorite image of Pharo. From there you can use the class LibC to run some commands:
LibC resultOfCommand: 'ls'.
LibC resultOfCommand: 'wsl ls'.
As you will see, when the first command is sent, the terminal returns an error as Windows does not recognize the ls command.
However, when you execute ls with the wsl command, it can now successfully display the list of files in the current directory.
Let’s come back to our problem with Moose-Easy. Moose-Easy is a library to facilitate access to Moose, e.g. to generate MSE files from a source code.
Originally, I wanted to use Moose-Easy to parse and generate a model of the Java project I was working on.
In my project, I passed the path to the source code, the parser, and any project dependencies I wanted to analyze.
generate
"Generates this model importer's model from its origin into its configured model path, using its parser"
This method uses MooseEasyUtility to generate the model as a MSE file which would be later imported.
Then, the import method from my project imports the MSE as a Moose Model.
import
"Imports this model importer's model from its configured model path"
An important feature of the Moose Model is the ability to access/visualize the source code of an entity.
To enable this, during the generation of the MSE, the parser (here VerveineJ) creates a SourceAnchor which writes the start position and end position of the entity within a specific file.
However, when manipulating the model, I noticed that the sourceAnchors’ start/end positions were shifted.
This resulted in accessing the wrong portions of the source code for each entity. After investigating this shift, it became clear it was due to an encoding issue with the carriage return.
When the parser accessed the file it read it the carriage returns differently than when it was being accessed by the Moose library.
To fix this issue without modifying the parser, I used WSL commands to run my parser.
More precisely, I replaced the direct call to the parser executable with a call to wsl to run the parser.
The following instruction of MooseEasyUtility was changed from:
Notice that instead of calling the JavaToFamixCommand (i.e. VerveineJ) directly, it is now called through wsl (end of first line).
This allowed me to generate a MSE file that contained the correct start/end positions.
Additionaly, it is important to remember that if an absolute path is passed to wsl, it must be formatted according to Linux and WSL conventions. On Windows, the path to a file may look like this C:\Users\Pascal.ZARAGOZA\eclipse-workspace. While the WSL absolute path will look like this /mnt/c/Users/Pascal.ZARAGOZA/eclipse-workspace. This is why I recommend to use relative paths whenever possible when using a mix of WSL and Windows commands.
If you are interested in analyzing your java project with Moose 8, there is a detailed blog post by Christopher Fuhrman on the subject.
It covers the whole process of using MooseEasyUtility to clone, parse, and load the corresponding model of a java project.
It also demonstrates how to both visualize and analyze the moose model.
Building metamodels for Fame and Famix is currently done through a generator.
The generator consists in various special methods that need to be implemented, eg, one that will create all metaclasses, another that will create all attributes for each metaclass,…
The metamodel’s artifact are created programmatically using pure Smalltalk syntax extended with specific operators to easily express relationships and cardinalities (<>-, *-*, <>-*, …).
For more details, please refer to the article about “Coaster”, written by Benoit Verhaeghe.
In this blogpost, I will show you how to use existing metamodeling diagraming tools to design your metamodel, and then to use the designed meta-model to generate your meta-model code for Fame in Moose.
In another blogpost, I will show you how to use this same generator to use graphical modeling tools to generate code for Famix.
The generator concept provided for Fame/Famix in Moose is practical, but can be intimidating in the first place.
Moreover, discovering an existing metamodel, or modifying an existing one can be hard as it requires to switch between various methods.
Some projects exist, as PlantUMLPharoGizmo, to automatically build a graphical representation of an existing metamodel.
This approach considers the code of the meta-model as the main artifact and builds the diagram out of it.
In this post, we will consider the opposite: putting the diagram as the main artifact, then using the diagram as the basis for generating the code of the Fame/Famix generator.
Despite its possible complexity to describe a generator for a full huge metamodel, the syntax for building the generator is easy to deal with and easy to generate.
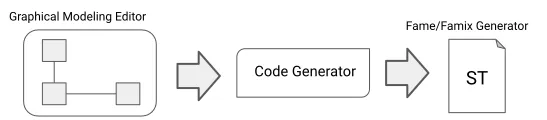
The general process is sketched in Figure 1.
From the graphical modeling editor, the produced meta-model is given to a
dedicated code generator that will produce the Fame/Famix Generator.
Here is an interesting fact.
Building a graphical modeling editor from scratch is hard.
It can look easy in the first place, basically, it’s only links and boxes, but it turns out that creating an editor that allows you to create a model, enforcings rules defined by a metamodel, is a complex task (without speaking about all graphical rules that need to be injected in the editor).
Consequently, we will reuse existing graphical modeling tools that already allow model metamodels.
Currently, there is no pure metamodeling editors for Pharo/Moose.
The only existing project is the OpenPonk project which gives the ability to create UML models with XMI support, but UML proposes a lot of concepts that could lead to wrong design in the end (using wrong concepts).
On the other end, on the MDE community, Ecore is an implementation of the EMOF and various desktop or web-based graphical editors exists.
Following then the flow we described earlier, the Graphical Modeling Editor will be one of the various graphical Ecore modeling editor.
The designed meta-model will be serialized in XMI (default output for those kind of editors), given to a code generator that will produce the Fame/Famix code generator.
The output of the code generator will follow the tonel format so it can be easily imported by Moose/Pharo.
As Fame, Ecore is a meta-meta-model that is used to create meta-models.
Various graphical tools exist for it, so we have a little bit of choice.
The entry point of our chain is an Ecore meta-model in a XMI format and the destination a Smalltalk class in a tonel format, but, the generated class will describe a generator for a Fame meta-model, not an Ecore one.
Consequently, we need to align Ecore concepts with Fame concepts.
This blogpost does not go into details about the full alignment between Ecore and Fame, but gives some keys that are used.
Fame proposes two main concepts: FM3Class (metaclasses) and FM3Traits (traits).
On the contrary, Ecore only provides the concept of EClass to represent metaclasses, which is aligned with the metaclass concept of Fame.
Also, Ecore let users mark a metaclass as interface, which is a concept that comes close to the trait concept in Fame.
Thus, the alignment that we will keep here is:
Attributes in Fame are modeled by the concept of FM3Property.
Attributes represent a property of a metaclass/trait and are usually bound to objects outside of the Fame “ecosystem” (as String that comes from Pharo for example).
The same concept can be found in Ecore with the EAttribute concept.
On the contrary of attributes in Fame, EAttribute in Ecore can own default values (and a set of other attributes that we will not consider here).
Consequently, we can directly align simple EAttribute to Fame attribute, ignoring the default value if one is set.
In this condition, the alignment is:
References in Fame are also modeled by the concept of FM3Property.
They can own a set of properties and can be marked as “containement”, and they own a cardinality.
References represent relationships between metaclasses.
In Ecore, the EReference concept is the equivalent to FM3Property, that’s then the one we use to model relationships.
The alignment is:
Ecore proposes more concepts that are not directly aligned with Fame, e.g.: EEnumeration, EGenericType,…
Thus, those concepts are not handled by the generator.
Now that we know how we will represent Fame concepts with Ecore, we can use a graphical modeling tool to design Ecore meta-model to design Fame metamodels.
For this blogpost, three tools have been tested, two web-based one and a desktop one:
They all work well and have their pros and cons.
As example/illustration of this section I used GenMyModel (I worked there for some years, I know well the tool), but the design process is the same whatever the used tool.
When you design your meta-model for Fame using a graphical Ecore editor, you just focus on the concepts you want to represent.
The meta-model we are going to design is the one presented by Benoit in his article about “Coaster”.
The designed Ecore meta-model can be found at this address and it looks like this:
In addition, we also set two specific properties of the base EPackage: nsURI and nsPrefix.
While the nsURI is more internal/maintenance related (it can be used to propose a unique identifier towards this version of the metamodel), nsPrefix is really important as it will set the prefix that will be used later for the generation of the generator.
I thus set the two values to:
nsURI = https://coaster/1.0
nsPrefix = Ct
With this, we are ready to generate the code of our generator.
The code generator is coded in Python using the PyEcore library to be able to decode/resolve Ecore files.
The generator goes across the full meta-model at least once to perform model validation, tries to correct some issues (like spaces at the beginning or end or names), and raises an error if it cannot generate the code for some reasons.
Once the meta-model is validated, it generates the Fame generator code using Mako, a template engine.
The generator installation is pretty simple if you have the right tools.
You can find the code on GitHub at this address.
You can install all the dependencies manually on your system, but the proper way of dealing with the dependencies would be to use a virtual environment (a virtualenv).
Virtualenvs creation and activation can be somehow complicated if you are not used to it.
To ease this step, the repository contains a Pipfile to be used with pipenv.
If you don’t have pipenv installed on your machine, feel free to install it, it helps you creating virtualenvs from Pipfile with all the required dependencies and ease also their activation.
In our case, with pipenv, the installation is pretty forward:
And you’re good to go, pipenv creates a virtualenv and installs all the dependencies isolated in your virtualenv.
Now, each time you want to use the created virtualenv, you can just enter in the directory where the code of the generator is installed and just activate the virtualenv:
If you did your meta-model online, there are two options for you.
Either you can download the .ecore on your machine and generate the code from there, or you can give to the generator a valid URL where the XMI of your ecore meta-model is located.
Whatever option you’ll choose, you can generate the code of your generator this way:
Terminal window
$pythonfamegen.py<URL_OR_FILE>-omymeta.class.st
This will generate the code of your generator in a tonel format in the file mymeta.class.st.
If you don’t use the option -o, the generated code is displayed on standard output.
Here is the line used to generate the generator of the Coaster meta-model:
We find back all the information we put in our design, relationships, names, metaclasses, …
This file can be directly imported in Moose and used to generate the meta-model code:
That’s all folks for this post.
Next time, we will discuss about how to generate a dedicated meta-model for Famix instead of only Fame.
The exact same code generator will be used, but this time, we will have to deal with the desktop Ecore diagram tool for technical reasons.
For Moose, I had to design a number of parsers for various languages (Java,
Ada,
C/C++,
PowerBuilder).
If you have already done that, you will know that the Visitor pattern is a faithful ally.
To help me in this, I came with the concept of “micro visitor” allowing to modularize visitors.
Parsing source code starts with a grammar of the programming language and an actual parser that creates an Abstract syntax Tree (AST) of the program.
For many programming languages, the AST can contain tens of different nodes.
The way to master this complexity is to use visitors.
A visitor is a class with one method (traditionaly visitXYZ(XYZ node)) for each possible type of node in the AST.
Each method treats the current node and delegates to other methods treating the nodes below it.
For a parser like VerveineJ (Java to MSE importer) the visitor class reached 2000 lines of code and became difficult to maintain as there are also interactions between visiting methods because the treatment of a node down in the AST may depend on what are its parent nodes.
For example, in Java, ThisExpression node may be found in different situations:
Return the instance running the current method: this.attribute
Return the enclosing object of the current instance: AClass.this
Invoke current class constructor: this(...)
Therefore the treatment in visitThisExpression( ThisExpression node) may depend on which method called it.
This makes it more complex to develop and maintain all the “visitXYZ” methods.
On the other hand, a visitor typically has a small state:
the name of the file being parsed;
a context stack of the visit (eg visiting a method, inside a class, inside a file);
a model of the result being built by the visitor (eg a Moose model).
As a result, I came up with the notion of micro-visitors specialized for a single task.
For example, for VerveineJ, I have 10 (concrete) micro-visitors, 4 to create entities and 6 to create dependencies between them:
VisitorPackageDef, creating Famix packages;
VisitorClassMethodDef, creating Famix classes and methods;
VisitorVarsDef, creating Famix attribute, parameter, local variable definition;
VisitorComments, creating comments in all Famix entities;
VisitorInheritanceRef, creating inheritances between classes
VisitorTypeRefRef, creating reference to declared types;
VisitorAccessRef, creating accesses to variables;
VisitorInvocRef, creating invocation dependencies between methods;
VisitorAnnotationRef, handling annotations on entities;
The resulting visitors are much smaller (around 600 lines of code for the three more complex: VisitorInvocRef, VisitorClassMethodDef, VisitorAccessRef ; less than 150 lines of code for VisitorPackageDef and VisitorExceptionRef) and thus easier to define and maintain.
Also, because the visitor is specialized, there are less dependencies between the methods: VisitorInvocRef only treats ThisExpression when it is a constructor invocation.
The overhead on the execution is small as each visitor is specialized and does not need to go through all the AST (eg a visitor for function declaration in C would not have to visit the body of these functions since they cannot contain other function declarations).
Micro-visitors can be used independantly one of the other (in sequence) as in VerveineJ where each visitor is called one after the other (by the FamixRequestor class) to visit the full AST.
The “orchestrator” object owns the state and pass it to each visitor in turn.
Micro-visitors can also call one another (in delegation).
For example for PowerBuilder, there is one main visitor (PowerBuilder-Parser-Visitor.PWBCompilationUnitVisitor, visiting the AST for a source file) and 7 (concrete) micro-visitors:
PWBTypeDeclarationVisitor, visiting type declarations;
PWBVariableDeclarationVisitor, visiting declarations of all kind of variables;
PWBTypeReferenceToIdentifierVisitor, visiting references to type names (for example in variable declarations);
PWBStatementsVisitor, visiting statements in the body of behaviourals;
PWBExpressionsVisitor, visiting expressions in statements;
PWBBehaviouralInvocationVisitor, visiting the invocation of behavioural in expressions.
In this case, the main visitor (PWBCompilationUnitVisitor) owns the state and its auxiliary visitors get this state from their respective parent visitor:
PWBCompilationUnitVisitor spawns a PWBBehaviouralDeclarationVisitor when it encounters a function definition, this one spawns a PWBStatementsVisitor to visit the body of the function, PWBStatementsVisitor spawns a PWBExpressionsVisitor to visit expressions found in the statements.
if the PWBExpressionsVisitor needs to access the context stack, it asks to its parent PWBStatementsVisitor, that asks to its parent PWBBehaviouralDeclarationVisitor, that asks to the PWBCompilationUnitVisitor.
 And if we do