Skip to content

Sebastian Jordan

2 posts by Sebastian Jordan

Introducing the new Queries Browser

Let’s say that you want to know which classes of your Moose model are stub. That means: which classes are not defined in your Moose model but are used by some of your defined classes. Those classes are part of your model, although they are not part of your code. Checking those stub classes is easy. You only have to create a Boolean query (assuming that your model contains only classes) with the property isStub. Like:

FQBooleanQuery property: #isStub

However, creating queries programmatically can be a tedious task. Of course, not all the queries are as frivolous as the one in the example. For queries with lots of children, the code is not easy to understand at first sight.

The new Queries Browser was developed to create queries in a more visual way. This is a Moose tool that allows one to create and manipulate queries without the need of knowing the FamixQueries syntax or how to instantiate them. It has a friendly and intuitive user interface.

"The brand new Queries Browser"

If you want to know:

  1. What are all the classes that are not stub.
  2. What are the entities with incoming references and inheritances.
  3. What are the entities that have more than 50 lines of code.
  4. Finally, what is the intersection of those three queries.

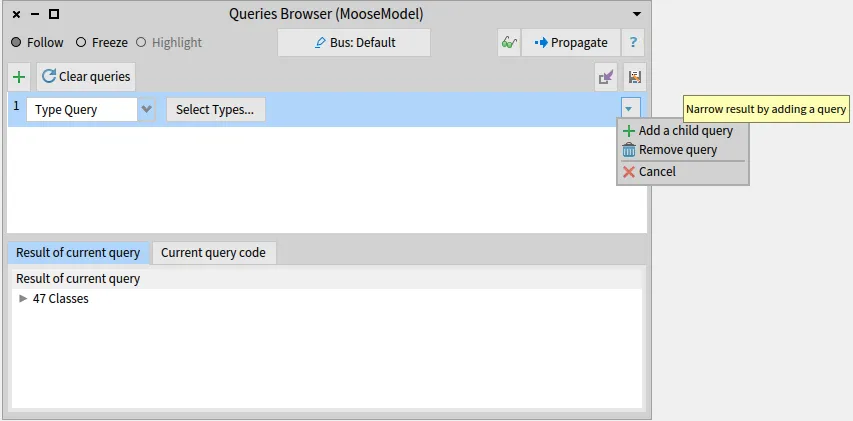
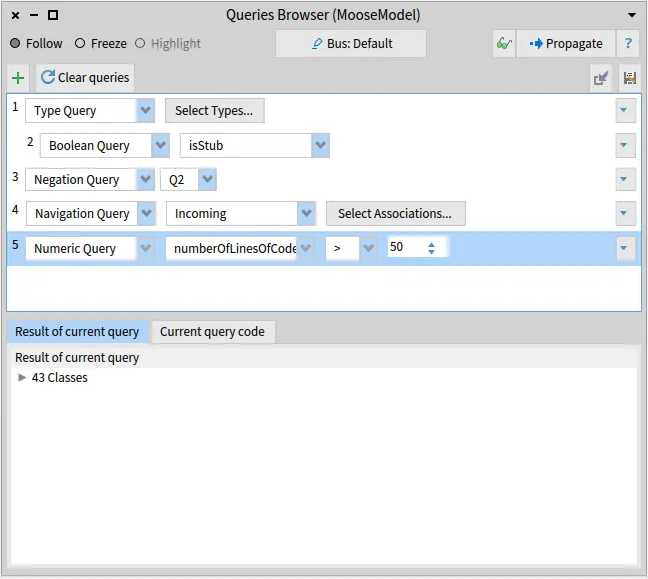
This is an easy task for the Queries Browser. First, we need to create a type query that filters all the entities except the classes. To do that, we select Type Query in the queries browser and then select type “Classes”.

"Type Query"

Then, we create a child query from the Type Query. This child is going to be a Boolean Query that has the property isStub.

"The brand new Queries Browser"

Now, we create a Complement Query, a.k.a Negation Query, and choose the Boolean Query to be the query to be negated.

"The brand new Queries Browser"

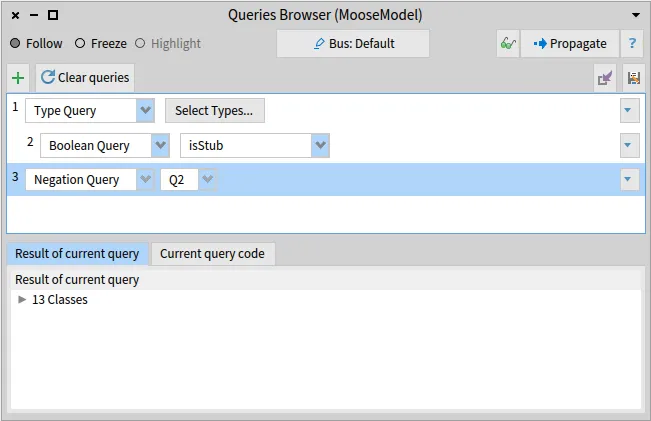
Now we have the first task completed: All the classes that are not stub.

For the second task, we need to create another query, a Navigation Query, select the Incoming direction, and only select the associations Reference and Inheritance.

The third one is also simple. We only need to create a Numeric Query, select the property number of lines of code, the operator >, and put the value 50.

Now, our Queries Browser looks like this:

"The brand new Queries Browser"

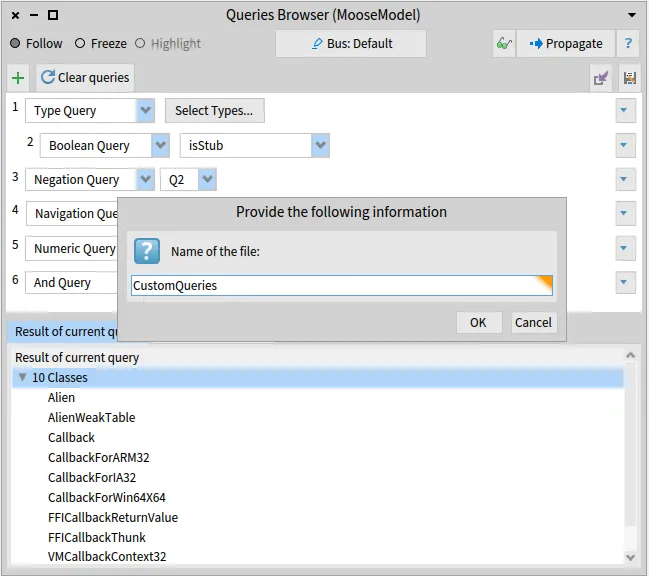
For the final task, we need to create an And Query, a.k.a Intersection Query, click on the ”+” button to add a new query to intersect, and select the three previous queries that we created.

"The brand new Queries Browser"

If we wanted to the the above queries programmatically, the code would have look like this:

(FQComplementQuery queryToNegate:
(FQTypeQuery types: { FamixStClass })
--> (FQBooleanQuery property: #isStub))
& (FQNavigationQuery incoming associations: {
FamixStReference.
FamixStInheritance }) & (FQNumericQuery
property: #numberOfLinesOfCodeWithMoreThanOneCharacter
comparator: #>
valueToCompare: 50)

The code is also shown in the “Current query code tab”: "The brand new Queries Browser"

As you may already noticed, there are two button for saving and loading the queries. The save button saves all queries that are currently present on the queries browser as a STON file. The queries will be saved inside a folder in the same location as the image. The path is determinated in MiSaveQueriesCommand class>>#path.

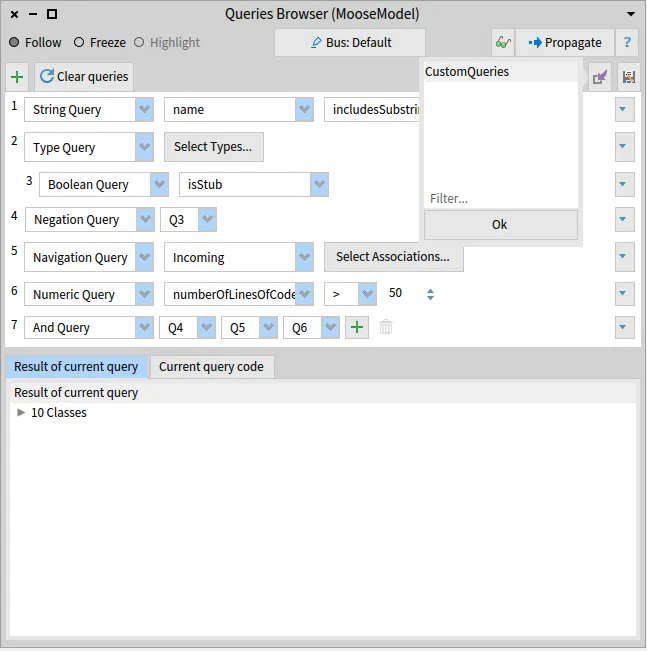
When loading the queries, the saved queries will be put after the queries that are present in the browser, if any. For example, if we save the queries that we have created above.

"Save queries as"

Then, with an empty browser, we create a new query and then loading the file we get:

"Load queries"

The new Queries Browser can simplify how the Famix Queries are created and make it more visual and understandable. Even if the example in this post is not complex, it made our tasks easier. Analyzing models with real-life examples can lead to very nested queries. Create those queries programmatically can be very tedious and error-prone. The Queries Browser is here to help us in those cases. 😄

How to build a new Moose tool: The MooseInspector

How to build a new Moose tool: The MooseInspector

Section titled “How to build a new Moose tool: The MooseInspector”

To create a new Moose Tool, you must create a child class of MiAbstractBrowser. This abstract class contains the basic infrastructure to all Moose browsers. It provides a toolbar with: buttons to inspect and propagate the current selection; Radio buttons to choose a reception mode; and a help button that shows the class comment for each browser.

"MiAbstactBrowser toolbar"

Also, it provides the logic to connect the browser to the Moose bus.

So, let us get started. We will create a “Moose Inspector”. It would be like the Pharo’s inspector but as a Moose browser. Firstly, we create the subclass as following:

MiAbstractBrowser subclass: #MiInspectorBrowser
instanceVariableNames: 'stInspector'
classVariableNames: ''
package: 'Moose-Core-Inspector'

As one can see, it has one instance variable which will hold an instance of Pharo’s inspector: StInspector.

Now, we must implement some basic methods. First let us implement initializePresenters method:

initializePresenters
super initializePresenters.
stInspector := self instantiate: StInspector.
stInspector model: self model

We instantiate stInspector variable an instance of Pharo’s inspector. Then we set the inspector model to be the same as the browser model.

Now we are going to implement canReceiveEntity: method. This method returns a Boolean which tells us if the entities received on the bus are usable in this browser. As we are building an inspector all entities can be accepted. So, we are going to return true always.

canReceiveEntity: anEntity
^ true

Then, we must implement followEntity: method. This method is called when new entities are received from the bus. In this case, we only need update the inspector model with the new entity. This method has the responsibility of defining the behaviour of the browser when new entities arrives from the bus. This is part of the bus mechanism of MiAbstractBrowser. This method is called if canReceiveEntity: anEntity returns true.

followEntity: anEntity
self model: anEntity.
stInspector model: self model

Next, the miSelectedItem method tells the bus what to propagate (when the user hits the “Propagate” button). In this case we want to propagate the object selected in the last inspector page.

miSelectedItem
| lastInspectorPage |
lastInspectorPage := stInspector millerList pages last.
^ lastInspectorPage model inspectedObject

Now we have all the logic and we can define the layout of this new browser. Now in Spec, the framework used to buld GUi in Pharo, we can implement dynamic layouts. So, we create a initializeLayout method. In that method, we take the layout of the super class, which is the toolbar, and we will add the other presenter.

initializeLayout
self layout: (SpBoxLayout newTopToBottom
add: self class defaultSpec expand: false;
add: stInspector;
yourself)

And do not forget to call this at the end of initializePresenters.

initializePresenters
super initializePresenters.
stInspector := self instantiate: StInspector.
stInspector model: self model.
self initializeLayout

Finally, we can define which will be the default model on which the browser will open. This is in case the bus does not have any entities. We want the Moose models, so create on class side:

newModel
^ MooseModel root entities

Optionally, we can override class side methods title and windowSize. We are ready to go. All we must do now is to run MiInspectorBrowser open on a Playground. This will open our new browser.

"Moose Inspector"

How to add new tabs in the Moose Inspector Browser

The new browser is not effective yet. We want to add some custom tabs to inspect the entities in a more visual way. To do so we can add some custom inspector tabs. When it displays an object, the inspector looks for methods of that object that have the <inspectorPresentationOrder:title:> pragma. The method should return a spec presenter that will be included in the inspector’s tab.

We will migrate the old “Properties” tab that is found in MooseFinder. The code is in MooseObject>>#mooseFinderPropertiesIn: We only have to rewrite it using Spec framework and use the pragma <inspectorPresentationOrder:title:>. We will create a method in MooseObject called inspectorPropertiesIn.

inspectorPropertiesIn
<inspectorPresentationOrder: 2 title: 'Properties'>
^ SpTablePresenter new
items: self mooseInterestingEntity mooseDescription allPrimitiveProperties;
sortingBlock: [ :x :y | x name < y name ];
addColumn: (SpStringTableColumn title: 'Properties' evaluated: #name);
addColumn: (SpStringTableColumn title: 'Value' evaluated: [ :each | (self mooseInterestingEntity mmGetProperty: each) asString ]);
yourself

Because the method is defined in MooseObject, any subclass (MooseModel, MooseEntity, …) will have this tab when displayed in the inspector.

That it is! Now we run again: MiInspectorBrowser open and we will se that the new tab now appears.

"Moose Inspector"