Skip to content

Nicolas Anquetil

8 posts by Nicolas Anquetil

Creating an importer for an alien grammar

In this blog-post, we see some tricks to create a visitor for an alien AST. This visitor can allow, for example, to generate a Famix model from an external AST.

In a previous blog-post, we saw how to create a parser from a tree-sitter grammar. This parser gives us an AST (Abstract Syntax Tree) which is a tree of nodes representing any given program that the parser can understand. But the structure is decided by the external tool and might not be what we want. For example it will not be a Famix model.

Let see some tricks to help convert this alien grammar into something that better fits our needs.

Let’s first look at what a “Visitor” is. If you already know, you can skip this part.

When dealing with ASTs or Famix models, visitors are very convenient tools to walk through the entire tree/model and perform some actions.

The Visitor is a design pattern that allows to perform some actions on a set of interconnected objects, presumably all from a family of classes. Typically, the classes all belong to the same inheritance hierarchy. In our case, the objects will all be nodes in an AST. For Famix, the objects would be entities from a Famix meta-model.

In the Visitor pattern, all the classes have an #accept: method. Each #accept: in each class will call a visiting method of the visitor that is specific to it. For example the classes NodeA and NodeB will respectively define:

NodeA >> accept: aVisitor
aVisitor visitNodeA: self.
NodeB >> accept: aVisitor
aVisitor visitNodeB: self.

Each visiting method in the visitor will with the element it receives, knowing what is its class: in #visitNodeA: the visitor knows how to deal with a NodeA instance and similarly for #visitNodeB:.

The visitor pattern is a kind of ping-pong between the visiting and #accept: methods: ping-pong of visiting ans accept methods

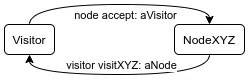
Typically, all the node are interconnected in a tree or a graph. To walk through the entire structure, it is expected that each visiting method take care of visiting the sub-objects of the current object. For example we could say that NodeA has a property child containing another node:

NodeVisitor >> visitNodeA: aNodeA
"do some stuff"
aNodeA child accept: self

It is easy to see that if child contains a NodeB, this will trigger the visiting method visitNodeB: on it. If it’s a instance of some other class, similarly it will trigger the appropriate visiting method. To visit the entire structure one simply calls accept: on the root of the tree/graph passing it the visitor.

Visitors are very useful with ASTs or graphs because once all the accept: methods are implemented, we can define very different visitors that will "do some stuff" (see above) on all the object in the tree/graph.

Several of the “Famix-tools” blog-posts are based on visitors.

In a preceding blog-post we saw how to create an AST from a Perl program using the Tree-Sitter Perl grammar.

We will use this as an example to see how to create a visitor on this external AST. Here “external” means it was created by an external tool and we don’t have control on the structure of the AST. If we want to create a Famix-Perl model from a Tree-Sitter AST, we will need to convert the nodes in the Tree-Sitter AST into Famix entities.

We will use a simple Perl program as example:

package Person;
sub new {
my $class = shift;
my $self = {
_firstName => shift,
_lastName => shift,
_ssn => shift,
};
# Print all the values just for clarification.
print "First Name is $self->{_firstName}\n";
print "Last Name is $self->{_lastName}\n";
print "SSN is $self->{_ssn}\n";
bless $self, $class;
return $self;
}
sub setFirstName {
my ( $self, $firstName ) = @_;
$self->{_firstName} = $firstName if defined($firstName);
return $self->{_firstName};
}
sub getFirstName {
return $self->{_firstName};
}

(Note: In Perl, “package” is used to create classes. Therefore in our example, “new”, “setFirstName”, and “getFirstName” are some kind of Perl methods.)

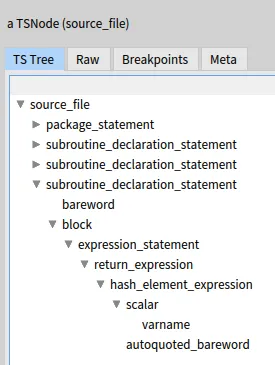
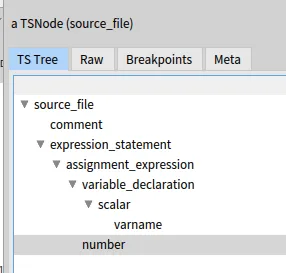
Following the instructions in the previous post, you should be able to get a Tree-Sitter AST like this one:

External AST from Tree-Sitter

To have a visitor for this AST, we first need to have an accept: method in all the classes of the AST’s nodes. Fortunately this is all taken care of by the Pharo Tree-Sitter project. In TSNode one finds:

accept: aTSVisitor
^ aTSVisitor visitNode: self

And a class TSVisitor defines:

visitNode: aTSNode
aTSNode collectNamedChild do: [ :child |
child accept: self ]

Which is a method ensuring that all children of a TSNode will be visited. Thanks guys!

But less fortunately, there are very few different nodes in a Tree-Sitter AST. Actually, all the nodes are instances of TSNode. So the “subroutine_declaration_statement”, “block”, “expression_statement”, “return_expression”,… of our example are all of the same class, which is not very useful for a visitor.

This happens quite often. For example a parser dumping an AST in XML format will contain mostly XMLElements. If it is in JSON, they are all “objects” without any native class specification in the format. 😒

Fortunately, people building ASTs usually put inside a property with an indication of the type of each node. For Tree-Sitter, this is the “type” property. Every TSnode has a type which is what is displayed in the screenshot above.

How can we use this to help visiting the AST in a meaningfull way (from a visitor point a view)? We have no control on the accept: method in TSNode, it will always call visitNode:. But we can add an extra indirection to call different visiting methods according to the type of the node.

So, our visitor will inherit from TSVisitor but it will override the visitNode: method. The new method will take the type of the node, build a visiting method name from it, and call the method on the node.

Let’s decide that all our visiting methods will be called “visitPerl<some-type>”. For example for a “block”, the method will be visitPerlBlock:, for a “return_expression” it will be `visitPerlReturn_expression:”.

This is very easily done in Pharo with this method:

visitNode: aTSNode
| selector |
selector := 'visitPerl' , aTSNode type capitalized , ':'.
^self perform: selector asSymbol with: aTSNode

This method builds the new method name in a temporary variable selector and then calls it using perform:with:.

Note that the type name is capitalized to match the Pharo convention for method names. We could have removed all the underscores (_) but it would have required a little bit of extra work. This is not difficult with string manipulation methods. You could try it… (or you can continue reading and find the solution further down.)

With this simple extra indirection in #visitNode:, we can now define separate visiting method for each type of TSNode. For example to convert the AST to a Famix model, visitPerlPackage: would create a FamixPerlClass, and visitPerlSubroutine_declaration_statement: will create a FamixPerlMethod. (Of course it is a bit more complex than that, but you got the idea, right?)

Our visitor is progressing but not done yet. If we call astRootNode accept: TreeSitterPerlVisitor new with the root node of the Tree-Sitter AST, it will immediately halt on a DoesNotUnderstand error because the method visitPerlSource_file: does not exist in the visitor.

We can create it that way:

visitPerlSource_file: aTSNode
^self visitPerlAbstractNode: aTSNode.
visitPerlAbstractNode: aTSNode
^super visitNode: aTSNode

Here we introduce a visitPerlAbstractNode: that is meant to be called by all visiting methods. From the point of view of the visitor, we are kind of creating a virtual inheritance hierarchy where each specific TSNode will “inherit” from that “PerlAbstractNode”. This will be useful in the future when we create sub-classes of our visitor.

By calling super visitNode:, in visitPerlAbstractNode: we ensure that the children of the “source_file” will be visited. And… we instantly get a new halt with DoesNotUnderstand: visitPerlPackage_statement:. Again we define it:

visitPerlPackage_statement: aTSNode
^self visitPerlAbstractNode: aTSNode

This is rapidly becoming repetitive and tedious. There are a lot of methods to define (25 for our example) and they are all the same.

Let’s improve that. We will use the Pharo DoesNotUnderstand mechanism to automate everything. When a message is sent that an object that does not understand it, then the message doesNotUnderstand: is sent to this object with the original message (not understood) as parameter. The default behavior is to raise an exception, but we can change that. We will change doesNotUnderstand: so that it creates the required message automatically for us. This is easy all we need to do is create a string:

visitPerl<some-name>: aTSNode
^self visitPerlAbstractNode: aTSNode

We will then ask Pharo to compile this method in the Visitor class and to execute it. et voila!

Building the string is simple because the selector is the one that was not understood originally by the visitor. We can get it from the argument of doesNotUnderstand:.

So we define the method like that:

doesNotUnderstand: aMessage
| code |
code := aMessage selector , ' aTSNode
^super visitNode: aTSNode'.
self class compile: code classified: #visiting.
self perform: aMessage selector with: aMessage arguments first

First we generate the source code of the method in the code variable. Then we compile it in the visitor’s class. Last we call the new method that was just created. Here to call it, we use perform:with: again, knowing that our method has only one argument (so only one “with:” in the call).

For more security, it can be useful to add the following guard statement at the beginning of our doesNotUnderstand: method:

(aMessage selector beginsWith: 'visitPerl')
ifFalse: [ super doesNotUnderstand: aMessage ].

This ensures that we only create methods that begins with “visitPerl”, if for any reason, some other message is not understood, it will raise an exception as usual.

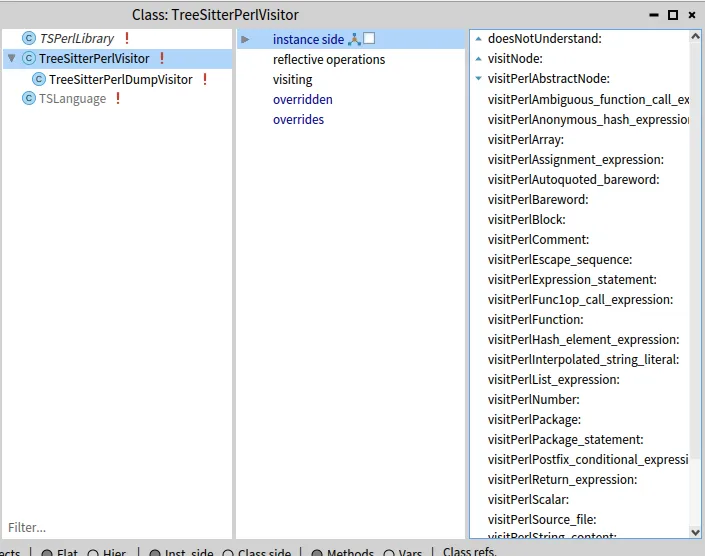
Now visiting the AST from our example creates all the visiting methods automatically: All the visiting method created

Of course this visitor does not do anything but walking through the entire AST. Let’s say it is already a good start and we can create specific visitors from it.

For example we see in the screen shot above that there is a TreeSitterPerlDumpVisitor. It just dumps on the Transcript the list of node visited. For this, it only needs to define:

visitPerlAbstractNode: aTSNode
('visiting a ', aTSNode type) traceCr.
super visitPerlAbstractNode: aTSNode.

Et voila! (number 2)

Note: Redefining doesNotUnderstand: is a nice trick to quickly create all the visiting methods, but it is recommended that you remove it once the visitor is stable, to make sure you catch all unexpected errors in the future.

This is all well and good, but the visiting methods have one drawback: They visit the children of a node in an unspecified order. For example, an “assignment_expression” has two children, the variable assigned and the expression assigned to it. We must rely on Tree-Sitter to visit them in the right order so that the first child is always the variable assigned and the second child is always the right-hand-side expression.

It would be better to have a name for these children so as to make sure that we know what we are visiting at any time.

In this case, Tree-Sitter helps us with the collectFieldNameOfNamedChild method of TSNode. This method returns an OrderedDictionary where the children are associated to a (usually) meaningful key. In the case of “assignment_expression” the dictionary has two keys: “left” and “right” each associated to the correct child. It would be better to call them instead of blindly visit all the children.

So we will change our visitor for this. The visitNode: method will now call the visiting method with the dictionnary of keys/children as second parameter, the dictionnary of fields. This departs a bit from the traditional visitor pattern where the visiting methods usually have only one argument, the node being visited. But the extra information will help make the visiting methods simpler:

visitNode: aTSNode
| selector |
selector := String streamContents: [ :st |
st << 'visitPerl'.
($_ split: aTSNode type) do: [ :word | st << word capitalized ].
st << ':withFields:'
].
^self
perform: selector asSymbol
with: aTSNode
with: aTSNode collectFieldNameOfNamedChild

It looks significantly more complex, but we also removed the underscores (_) in the visiting method selector (first part of the #visitNode: method). So for “assignment_expression”, the visiting method will now be: visitPerleAssignmentExpression:withFields:.

From this, we could have the following template for our visiting methods:

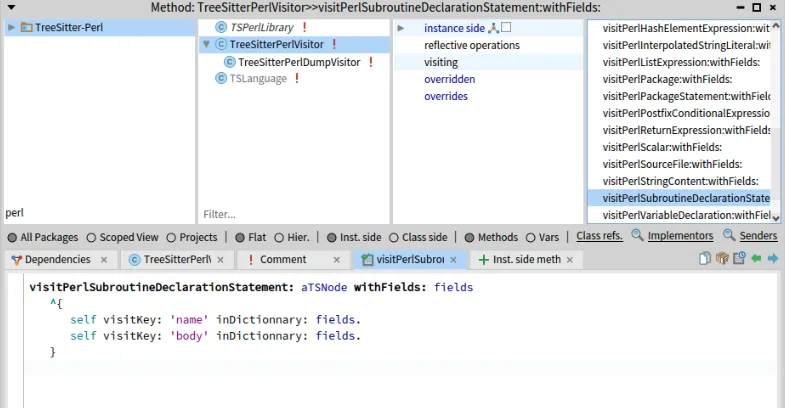
visitPerlAssignmentExpression: aTSNode withFields: fields
^{
self visitKey: 'left' inDictionnary: fields.
self visitKey: 'right' inDictionnary: fields.
}

Where visitKey: inDictionnary: takes care of the fact that several nodes may be associated to the same key. Here it is:

visitKey: aKey inDictionnary: childrenDictionnary
| child |
child := childrenDictionnary at: aKey ifAbsent: [^nil].
^child isCollection
ifTrue: [ child collect: [ :c | c accept: self ] ]
ifFalse: [ child accept: self ]

The doesNotUnderstand: method to generate all this is also more complex because there is more to generate. Here it is:

doesNotUnderstand: aMessage
(aMessage selector beginsWith: 'visitPerl')
ifFalse: [ super doesNotUnderstand: aMessage ].
self class
compile: (self createVisitMethod: aMessage)
classified: #visiting.
self
perform: aMessage selector
with: aMessage arguments first
with: aMessage arguments second

The code generation has been extracted in a separate method for the sake of readability:

createVisitMethod: aMessage
| fields aTSNode |
aTSNode := aMessage arguments first.
fields := aMessage arguments second.
^String streamContents: [ :str |
str
<< 'visitPerl'.
($_ split: aTSNode type) do: [ :word | str << word capitalized ].
str
<< ': aTSNode withFields: fields
^{
'.
fields keysDo: [ :key |
str
<< ' self visitKey: ''' ;
<< key ;
<< ''' inDictionnary: fields.' ;
cr
].
str
<< ' }' ;
cr
]

Again, it may look a bit complex, but this is only building a string with the needed source code. Go back to the listing of #visitPerlAssignmentExpression: above to see that:

  • we first build the selector of the new visiting method with its parameter;
  • then we put a return and start a dynamic array;
  • after that we create a call to #visitKey:inDictionnary for each field;
  • and finally, we close the dynamic array.

Et voila! (number 3).

This is it. If we call again this visitor on an AST from Tree-Sitter, it will generate all the new visiting methods with explicit field visiting. For example: Explicit visiting of a node&#x27;s fields

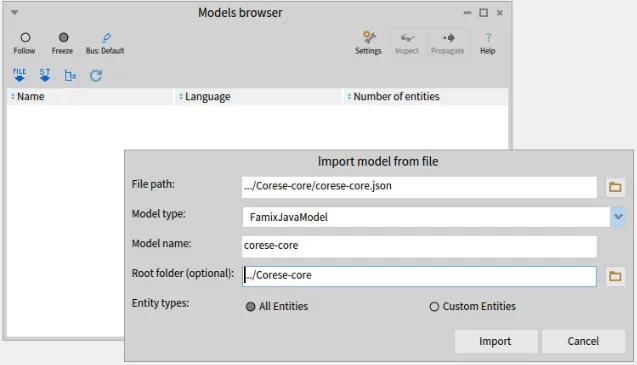
The implementation of all this can be found in the https://github.com/moosetechnology/Famix-Perl repository on github. All that’s left to do is create a sub-class of this visitor and override the visiting methods to do something useful with each node type.

That’s all for today folks.

Creating a Parser based on Tree-Sitter grammar

Moose is a huge consumer of language parsers. Relying on external tools help us with this.

We are always looking into integrating new programming languages into the platform. There are two main requirements for this:

  • create a parser of the language, to “understand” the source code
  • create a meta-model for the language, to be able to represent and manipulate the source code

Creating the meta-model has already been covered in an other blogpost: /blog/2021-02-04-coasters

In this post, we will be looking at how to use a Tree-Sitter grammar to help build a parser for a language. We will use the Perl language example for this.

Note: Creating a parser for a language is a large endehavour that can easily take 3 to 6 months of work. Tree-Sitter, or any other grammar tool, will help in that, but it remains a long task.

We do not explain in detail here how to install tree-sitter or a new Tree-Sitter grammar. I found this page (https://dcreager.net/2021/06/getting-started-with-tree-sitter/) useful in this sense.

For this blog post, we will use the Perl grammar in https://github.com/tree-sitter-perl/tree-sitter-perl.

Do the following:

  • clone the repository on your disk
  • go in the directory
  • do make (note: it gave me some error, but the library file was generated all the same)
  • (on Linux) it creates a libtree-sitter-perl.so dynamic library file. This must be moved in some standard library path (I chose /usr/lib/x86_64-linux-gnu/ because this is where the libtree-sitter.so file was).

Pharo uses FFI to link to the grammar library, that’s why it’s a good idea to put it in a standard directory. You can also put this library file in the same directory as your Pharo image, or in the directory where the Pharo launcher puts the virtual machines.

The subclasses of FFILibraryFinder can tell you what are the standard directories on your installation. For example on Linux, FFIUnix64LibraryFinder new paths returns a list of paths that includes '/usr/lib/x86_64-linux-gnu/' where we did put our grammar.so file.

We use the Pharo-Tree-Sitter project (https://github.com/Evref-BL/Pharo-Tree-Sitter) of Berger-Levrault, created by Benoit Verhaeghe, a regular contributor to Moose and this blog. You can import this project in a Moose image following the README instructions.

Metacello new
baseline: 'TreeSitter';
repository: 'github://Evref-BL/Pharo-Tree-Sitter:main/src';
load.

The README file of Pharo-Tree-Sitter gives an example of how to use it for Python:

parser := TSParser new.
tsLanguage := TSLanguage python.
parser language: tsLanguage.
[...]

We want to have the same thing for Perl, so we will need to define a TSLanguage class >> #perl method. Let’s take a look at how it’s done in Python:

TSLanguage class >> #python
^ TSPythonLibrary uniqueInstance tree_sitter_python

It’s easy to do something similar for perl:

TSLanguage class >> #perl
^ TSPerlLibrary uniqueInstance tree_sitter_perl

But we need to define the TSPerlLibrary class. Again let’s look at how it’s done for Python and copy that:

  • create a TreeSitter-Perl package
  • create a TSPerlLibrary class in it inheriting from FFILibrary
  • define the class method:
    tree_sitter_perl
    ^ self ffiCall: 'TSLanguage * tree_sitter_perl ()'
  • and define the class methods for FFI (here for Linux):
    unix64LibraryName
    ^ FFIUnix64LibraryFinder findAnyLibrary: #( 'libtree-sitter-perl.so' )

Notice that we gave the name of the dynamic library file created above (libtree-sitter-perl.so). If this file is in a standard library directory, FFI will find it.

We can now experiment “our” parser on a small example:

parser := TSParser new.
tsLanguage := TSLanguage perl.
parser language: tsLanguage.
string := '# this is a comment
my $var = 5;
'.
tree := parser parseString: string.
tree rootNode

This gives you the following window:

"A first Tree-Sitter AST for Perl"

That looks like a very good start!

But we are still a long way from home. Let’s look at a node of the tree for fun.

node := tree rootNode firstNamedChild will give you the first node in the AST (the comment). If we inspect it, we see that it is a TSNode

  • we can get its type: node type returns the string 'comment'
  • node nextSibling returns the next TSNode, the “expression-statement”
  • node startPoint and node endPoint tell you where in the source code this node is located. It returns instances of TSPoint:
    • node startPoint row = 0 (0 indexed)
    • node startPoint column = 0
    • node endPoint row = 0
    • node endPoint column = 19 That is to say the node is on the first row, extending from column 0 to 19. With this, one could get the text associated to the node from the original source code.

That’s it for today. In a following post we will look at doing something with this AST using the Visitor design pattern.

See you latter

Control Flow Graph for FAST Fortran

A Control Flow Graph analysis for FAST Fortran

Section titled “A Control Flow Graph analysis for FAST Fortran”

Control Flow Graphs (CFG) are a common tool for static analyzis of a computation unit (eg. a method) and find some errors (unreachable code, infinite loops)

It is based on the concept of Basic Block: a sequence of consecutive statements in which flow of control can only enter at the beginning and leave at the end. Only the last statement of a basic block can be a branch statement and only the first statement of a basic block can be a target of a branch.

There are two distinctive basic blocks:

  • Start Block: The entry block allows the control to enter into the control flow graph. There should be only one start block.
  • Final Block: Control flow leaves through the exit block. There may be several final blocks.

The package FAST-Fortran-Analyses in https://github.com/moosetechnology/FAST-Fortran contains classes to build a CFG of a Fortran program unit (a main program, a function, or a subroutine).

We must first create a FAST model of a Fortran program. For this we need an external parser. We currently use fortran-src-extras from https://github.com/camfort/fortran-src-extras.

To run it on a fortran file you do:

fortran-src-extras serialize -t json -v77l encode <fortran-file.f>

This will produce a json AST of the program that we can turn into a FAST-Fortran AST.

If you have fortran-src-extras installed on your computer, all this is automated in FAST-Fortran

<fortran-file.f> asFileReference
readStreamDo: [ :st |
FortranProjectImporter new getFASTFor: st contents ]

This script will create an array of ASTs from the <fortran-file.f> given fortran file. If there are several program units in the file, there will be several FAST models in this array. In the example below, there is only one program, so the list contains only the AST for this program.

We will use the following Fortran-77 code:

PROGRAM EUCLID
* Find greatest common divisor using the Euclidean algorithm
PRINT *, 'A?'
READ *, NA
IF (NA.LE.0) THEN
PRINT *, 'A must be a positive integer.'
STOP
END IF
PRINT *, 'B?'
READ *, NB
IF (NB.LE.0) THEN
PRINT *, 'B must be a positive integer.'
STOP
END IF
IA = NA
IB = NB
1 IF (IB.NE.0) THEN
ITEMP = IA
IA = IB
IB = MOD(ITEMP, IB)
GOTO 1
END IF
PRINT *, 'The GCD of', NA, ' and', NB, ' is', IA, '.'
STOP
END

From the FAST model above, we will now create a Control-Flow-Graph:

<FAST-model> accept: FASTFortranCFGVisitor new

The class FASTFortranCFGVisitor implements an algorithm to compute basic blocks from https://en.wikipedia.org/wiki/Basic_block.

This visitor goes throught the FAST model and creates a list of basic blocks that can be inspected with the #basicBlocks method.

There is a small hierarchy of basic block classes:

  • FASTFortranAbstractBasicBlock, the root of the hierarchy. It contains #statements (which are FAST statement nodes). It has methods to test its nature: isStart, isFinal, isConditional. It defines an abstract method #nextBlocks that returns a list of basic blocks that this one can directly reach. Typically there are 1 or 2 next blocks, but Fortran can have more due to “arithmetic IF”, “computed GOTO” and “assigned GOTO” statements.
  • FASTFortranBasicBlock, a common basic block with no branch statement. If it is final, its #nextBlocks is empty, otherwise it’s a list of 1 block.
  • FASTFortranConditionalBasicBlock, a conditional basic block. It may reach several #nextBlocks, each one associated with a value, for example true and false. The method #nextBlockForValue: returns the next block associated to a given value. In our version of CFG, a conditional block may only have one statement (a conditional statement).

You may have noticed that our blocks are a bit different from the definition given at the beginning of the blog-post:

  • our “common” blocs cannot have several next, they never end with a conditional statement;
  • our conditional blocks can have only one statement.

For the program above, the CFG has 10 blocks.

  • the first block is a common block and contains 2 statements, the PRINT and the READ;
  • its next bloc is a conditional block for the IF. It has 2 next blocs:
    • true leads to a common block with 2 statements, the PRINT and the STOP. This is a final block (STOP ends the program);
    • false leads to the common block after the IF

As a first analysis tool, we can visualize the CFG. Inspecting the result of the next script will open a Roassal visualization on the CFG contained in the FASTFortranCFGVisitor.

FASTFortranCFGVisualization on: <aFASTFortranCFGVisitor>

For the program above, this gives the visualization below.

  • the dark dot is the starting block (note that it is a block and contains statements);
  • the hollow dots are final blocks;
  • it’s not the case here, but a block may also be start and final (if there are no conditional blocks in the program) and this would be represented by a “target”, a circle with a dot inside;
  • a grey square is a comon block;
  • a blue square is a conditional block;
  • hovering the mouse on a block will bring a pop up with the list of its statements (this relies on the FASTFortranExporterVisitor)

"Viualizing the Control Flow Graph"

One can see that:

  • the start block has 2 associated statements (PRINT and READ);
  • there are several final blocks, due to the STOP statements;
  • there is a loop at the bottom left of the graph where the last blue conditional block is “IF (IB.NE.0)” and the last statement of the grey block (true value of the IF), is a GOTO.

There are little analyses for now on the CFG, but FASTFortranCFGChecker will compute a list of unreachableBlocks that would represent dead code.

Control flow graphs may also be used to do more advanced analyses and possibly refactor code. For example, we mentioned the loop at the end of our program implemented with a IF statement and a GOTO. This could be refactored into a real WHILE loop that would be easier to read.

This is left as an exercise for the interested people 😉

Building a control flow graph is language dependant to identify the conditional statements, where they lead, and the final statements.

But much could be done in FAST core based on FASTTReturnStatement and a (not yet existing at the time of writing) FASTTConditionalStatement.

Inspiration could be taken from FASTFortranCFGVisitor and the process is not overly complicated. It would probably be even easier for modern languages that do not have the various GOTO statements of Fortran.

Once the CFG is computed, the other tools (eg. the visualization) should be completely independant of the language.

All hands on deck!

Some tools on FAST models

The package FAST-Core-Tools in repository https://github.com/moosetechnology/FAST offers some tools or algorithms that are running on FAST models.

These tools may be usable directly on a specific language FAST meta-model, or might require some adjustements by subtyping them. They are not out-of-the-shelf ready to use stuff, but they can provide good inspiration for whatever you need to do.

Writing test for FAST can be pretty tedious because you have to build a FAST model in the test corresponding to your need. It often has a lot of nodes that you need to create in the right order with the right properties.

This is where FASTDumpVisitor can help by visiting an existing AST and “dump” it as a string. The goal is that executing this string in Pharo should recreate exactly the same AST.

Dumping an AST can also be useful to debug an AST and checking that it has the right properties.

To use it, you can just call FASTDumpVisitor visit: <yourAST> and print the result. For example:

FASTDumpVisitor visit:
(FASTJavaUnaryExpression new
operator: '-' ;
expression:
(FASTJavaIntegerLiteral new
primitiveValue: '5'))

will return the string: FASTJavaUnaryExpression new expression:(FASTJavaIntegerLiteral new primitiveValue:'5');operator:'-' which, if evaluated, in Pharo will recreate the same AST as the original.

Note: Because FAST models are actually Famix models (Famix-AST), the tools works also for Famix models. But Famix entities typically have more properties and the result is not so nice:

FASTDumpVisitor visit:
(FamixJavaMethod new
name: 'toto' ;
parameters: {
FamixJavaParameter new name: 'x' .
FamixJavaParameter new name: 'y'} ).

will return the string: FamixJavaMethod new parameters:{FamixJavaParameter new name:'x';isFinal:false;numberOfLinesOfCode:0;isStub:false.FamixJavaParameter new name:'y';isFinal:false;numberOfLinesOfCode:0;isStub:false};isStub:false;isClassSide:false;isFinal:false;numberOfLinesOfCode:-1;isSynchronized:false;numberOfConditionals:-1;isAbstract:false;cyclomaticComplexity:-1;name:'toto'.

By definition an AST (Abstract Syntax Tree) is a tree (!). So the same variable can appear several time in an AST in different nodes (for example if the same variable is accessed several times).

The idea of the class FASTLocalResolverVisitor is to relate all uses of a symbol in the AST to the node where the symbol is defined. This is mostly useful for parameters and local variables inside a method, because the local resover only looks at the AST itself and we do not build ASTs for entire systems.

This local resolver will look at identifier appearing in an AST and try to link them all together when they correspond to the same entity. There is no complex computation in it. It just looks at names defined or used in the AST.

This is dependant on the programming language because the nodes using or defining a variable are not the same in all languages. For Java, there is FASTJavaLocalResolverVisitor, and for Fortran FASTFortranLocalResolverVisitor.

The tool brings an extra level of detail by managing scopes, so that if the same variable name is defined in different loops (for example), then each use of the name will be related to the correct definition.

The resolution process creates:

  • In declaration nodes (eg. FASTJavaVariableDeclarator or FASTJavaParameter),a property #localUses will list all referencing nodes for this variable;
  • In accessing nodes, (eg. FASTJavaVariableExpression), a property #localDeclarations will lists the declaration node corresponding this variable.
  • If the declaration node was not found a FASTNonLocalDeclaration is used as the declaration node.

Note: That this looks a bit like what Carrefour does (see /blog/2022-06-30-carrefour), because both will bind several FAST nodes to the same entity. But the process is very different:

  • Carrefour will bind a FAST node to a corresponding Famix node;
  • The local resolver binds FAST nodes together.

So Carrefour is not local, it look in the entire Famix model to find the entity that matches a FAST node. In Famix, there is only one Famix entity for one software entity and it “knows” all its uses (a FamixVariable has a list of FamixAccess-es). Each FAST declaration node will be related to the Famix entity (the FamixVariable) and the FAST use nodes will be related to the FamixAccess-es.

On the other hand, the local resolver is a much lighter tool. It only needs a FAST model to work on and will only bind FAST nodes between themselves in that FAST model.

For round-trip re-engineering, we need to import a program in a model, modify the model, and re-export it as a (modified) program. A lot can go wrong or be fogotten in all these steps and they are not trivial to validate.

First, unless much extra information is added to the AST, the re-export will not be syntactically equivalent: there are formatting issues, indentation, white spaces, blank lines, comments that could make the re-exported program very different (apparently) from the original one.

The class FASTDifferentialValidator helps checking that the round-trip implementation works well. It focuses on the meaning of the program independently of the formatting issues. The process is the follwing:

  • parse a set of (representative) programs
  • model them in FAST
  • re-export the programs
  • re-import the new programs, and
  • re-create a new model

Hopefully, the two models (2nd and last steps) should be equivalent This is what this tool checks.

Obviously the validation can easily be circumvented. Trivially, if we create an empty model the 1st time, re-export anything, and create an empty model the second time, then the 2 models are equivalent, yet we did not accomplish anything. This tool is an help for developers to pinpoint small mistakes in the process.

Note that even in the best of conditions, there can still be subtle differences between two equivalent ASTs. For example the AST for “a + b + c” will often differ from that of “a + (b + c)”.

The validator is intended to run on a set of source files and check that they are all parsed and re-exported correctly. It will report differences and will allow to fine tune the comparison or ignore some differences.

It goes through all the files in a directory and uses an importer, an exporter, and a comparator. The importer generates a FAST model from some source code (eg. JavaSmaCCProgramNodeImporterVisitor); the exporter generates source code from a model (eg. FASTJavaExportVisitor); the comparator is a companion class to the DifferentialValidator that handle the differences between the ASTs.

The basic implementation (FamixModelComparator) does a strict comparison (no differences allowed), but it has methods for accepting some differences:

  • #ast: node1 acceptableDifferenceTo: node2: If for some reason the difference in the nodes is acceptable, this method must return true and the comparison will restart from the parent of the two nodes as if they were the same.
  • #ast: node1 acceptableDifferenceTo: node2 property: aSymbol. This is for property comparison (eg. the name of an entity), it should return nil if the difference in value is not acceptable and a recovery block if it is acceptable. Instead of resuming from the parent of the nodes, the comparison will resume from an ancestor for which the recovery block evaluates to true.

A real example on using tags

Tags can be a powerful tool to visualize things on legacy software and perform analyses. For example, tags can be used to create virtual entities and see how they “interact” with the real entities of the system analyzed. In the article Decomposing God Classes at Siemens we show how tags can be used to create virtual classes and see their dependencies to real classes.

In this post I will show another use of tags: how they can materialize a concept and show its instantiation in a system.

The scenario is that of analysing Corese, a platform to “create, manipulate, parse, serialize, query, reason and validate RDF data.” Corese is an old software that dates back to the early days of Java. Back then, enums did not exist in Java and a good way to implement them was to use a set of constants:

public static final int MONDAY = 1;
public static final int TUESDAY = 2;
public static final int WEDNESDAY = 3;
public static final int THURSDAY = 4;
public static final int FRIDAY = 5;
public static final int SATURDAY = 6;
public static final int SUNDAY = 7;

Those were the days!

As an effort to restructure and rationalize implementation, the developers of Corese wish to replace these sets of constants by real Java enums. This is not something that can be done in any modern IDE even with the latest refactoring tool.

Let us see how Moose can help in the task.

For an analysis in Moose, we need a model of the system, and this starts with getting the source code (https://github.com/corese-stack/corese-core). The model is created using VerveineJ which can be run using docker:

docker run -rm -v src/main/java/:/src ghcr.io/evref-bl/verveinej:latest -alllocals -o corese-core.json

This will create a file corese-core.json in the directory src/main/java/. The command to create the model as an option -alllocals. This is because VerveineJ by default only tracks the uses of variables with non primitive type (variables containing objects). Here the constants are integers and if we want to know where they are used, we need more details.

Let’s import the model in Moose. This can be done simply by dragging-and-dropping the file in Moose.

"Importing the Corese model"

We will study the use of the constants defined in fr.inria.corese.core.stats.IStats:

public interface IStats {
public static final int NA = 0;
public static final int SUBJECT = 1;
public static final int PREDICATE = 2;
public static final int OBJECT = 3;
public static final int TRIPLE = 4;
[...]

To find where the constants are used, we need to find the representation of the constants in the model. For this, we can inspect the model (“Inspect” button in the Model Browser) and look for all “Model Attributes”. The constants are attributes of the interface/class in which they are defined as shown in the listing above). And they are model attributes because they are defined in the source code analysed, as opposed to System.out which may be used in the code but for which we don’t have the source code.

We can then select all the model attributes named PREDICATE: select: [ :each | each name = 'PREDICATE']. (note, the backslash (\) before the square bracket ([) was added by the publishing tool and is not part of the code)

Moose gives us 8 different definitions of PREDICATE (and 9 for OBJECT, and 10 for SUBJECT). The one we are interested in is the 3rd in the list (IStats.PREDICATE).

"All attributes named PREDICATE"

Having the same constants defined multiple times is not good news for the analysis and for the developers. But this kind of thing is fairly common in old systems which evolved during a long time in the hands of many developers. Not all of them had a complete understanding of the system and each had different skills and programming habits.

Looking at the lists of definitions for the 3 main constants (SUBJECT, PREDICATE, OBJECT), we find that there are at least 5 different definitions of these constants:

  • stats.IStats:
public static final int NA = 0;
public static final int SUBJECT = 1;
public static final int PREDICATE = 2;
public static final int OBJECT = 3;
public static final int TRIPLE = 4;
  • kgram.sorter.core.Const:
public static final int ALL = 0;
public static final int SUBJECT = 1;
public static final int PREDICATE = 2;
public static final int OBJECT = 3;
public static final int TRIPLE = 4;
public static final int NA = -1;
  • compiler.result.XMLResult
private static final int TRIPLE = 9;
private static final int SUBJECT = 10;
private static final int PREDICATE = 11;
private static final int OBJECT = 12;
  • kgram.api.core.ExprType
public static int TRIPLE = 88;
public static int SUBJECT = 89;
public static int PREDICATE = 90;
public static int OBJECT = 91;
  • kgram.core.Exp
public static final int ANY = -1;
public static final int SUBJECT = 0;
public static final int OBJECT = 1;
public static final int PREDICATE = 2;

So now we need to track the uses of all these constants in the system to understand how they can be replaced by one enum.

Note: Don’t close the Inspector window yet, we are going to need it soon.

Moose can help us here with tags. Tags are (as the name implies) just labels that can be attached to any entity in the model. Additionally, tags have a color that will help us distinguish them in visualizations.

So let’s tag our constants. We will define 5 tags, one for each set of constants, that is to say one for each of the 5 classes that implement these constants. You can choose whatever name and color you prefer for your tags, as long as you remember which is which. Here I named the tags from the name of the classes that define each set of constant.

"The tags that represent each set of constant"

Now we want to tag all the constants in a set with the same tag. Let’s see how to do it for constants in IStats, the ones listed in the previous section and that were our initial focus.

We select the “IStats” tag in the Tag Browser and go back to the Inspector where we have a list of all definitions of PREDICATE. If we click on the 3rd of these PREDICATE (“fr::inria::corese::core::stats::IStats.PREDICATE”), a new pane appears on the right, focusing on this attribute. There, we can click on its “parentType”, giving yet another pane. (The following screenshot shows the inspector right before we click on “parentType”).

"The inspector while navigating to the set of attributes of IStats".

The right pane now focuses on the IStats Java interface. We can click on “attributes” to get the list of attributes it defines (including PREDICATE from which we started). There are 5 attributes which are the ones listed in the previous section.

So far so good.

To tag these attributes, we will “propagate” them (toolbar button of the Inspector on the right) to all tools that are in “Follow” mode. Note that if you minimized the Tag Browser at some point, it will be in “Freeze” mode like in the screenshot above. You need to put it back in “Follow” (radio toolbar button on the left) before propagating the list of constants.

Once propagated, the list appears in the center pane of the Tag Browser and you can pass it to the right pane with the ”>>>” button. Doing this will effectively tag the entities with the selected tag.

We now have tagged these 5 constants with the “IStats” tag. Ideally we want to find also the usage of these constants. So we would like to also tag the methods that use these constants.

For this you can open a Query Browser, it will start with the same list of 5 attributes that we just propagated. We can create a “Navigation query” and ask for all the “incoming” “accesses” to these attributes as shown below. The result is a list of 6 methods.

"The methods accessing the 5 attributes propagated"

We can now propagate these 6 methods and they will appear in the Tag Browser. We tag them with the same tag as the attributes themselves.

You can repeat the same operations for the 5 sets of constants listed above and the 5 different tags.

All this tagging was to be able to visualize where each set of constant is defined and, most importantly, used. We now turn to the “Architectural Map” which is a fine tool to visualize tags. for example, we could show all the top level packages of Corese and the Architectural Map will give visual clues on which ones contain tagged entities, and what tags. The Architectural Map allows to expand the content of entities which will allow us to deep dive into each package containing tagged entities to understand where exactly the entities is used or defined.

To select all the top level packages, we go back one last time to the Inspector to the very first pane on the left (you may also “Inspect” again the model to open a new Inspector). We select the “Model packages” and enter this query in the “script” at the bottom: self select: [ :each | each parentPackage isNotNil and: [each parentPackage name = 'core'] ]. (Again, ignore the backslashes)

The result is a list of 23 packages that we can propagate. Finally we open an Architectural Map that will start with the 23 packages that we just propagated.

In the following screenchot, I restricted the Architectural Map to the only 5 packages that do use our tags: “stats”, “kgram”, “util”, “sparql”, and “query”. This makes it easier to see the results here. I also expanded “kgram” that is small and contains different tags.

"The packages using the 5 attributes"

The single-color square, on the right of each package name, shows that it contains entities having one uniq tag (of this color). In our case it means that it contains the constants and methods accessing them, all with the same tag. For example, “core” and “util” packages contain entities tagged with only the green tag (which corresponds to the kgram.core.Exp class as previously shown in the Tag Browser screenshot).

When the square is multicolored, it means it contains entities with different tags. For example, we see that the package “kgram” contains at least the green (“Exp”) and the yellow (“Const”) tags.

Note that in this particular case, I added another tag for class kgram.api.core.Node which has its own definition of the OBJECT constant. I wanted to see where it was used also. This is the reason for the multicolored square of class StatsBasedEstimation, in package “stats”, which uses OBJECT from Node and the other constants from IStats.

In the end, the visualization allows to conclude that each package sticks pretty much to its own definition of the constants which is rather reassuring. It also shows where one would have to look if we were to replace the constant by a real enum.

This is not the end of it however because the constant values used in these methods can be passed off to other methods as argument. Here Famix alone (the meta-model used in Moose by default) can no longer help us to follow the flow of usage of the constants because they are just integer being passed around. For a finer analysis, a complete AST model should be used. This could be done with the FAST meta-model (Famix-AST), but it is another story that falls outside the scope of this blog-post.

See you later.

Generating a visitor infrastructure for a given meta-model

This post is part of a serie dedicated to Famix Tools

Once we have a model of a program in Famix, we often find ourselves wanting to ¨ go through it” to apply some systematic analysis or modification. For example one could want to export the model as source-code https://github.com/moosetechnology/FAMIX2Java.

The Visitor design pattern is well adapted for these tasks. Note that the double-dispatch mechanism, which is an integral part of the visitor pattern, may also be useful to have entity specific actions even if one does not want to visit the entire model.

The Visitor pattern requires:

  • an accept: aVisitor method in every entity of the meta-model (eg.: in FamixJavaClass, FamixJavaMethod, FamixJavaAttribute,…)
  • visitFamixXYZ: aFamixXYZ for all entites to be visited, in the visitor class
  • the accept: methods invoke the correct visitFamixXYZ: method of the visitor depending on the class it is implemented in
  • the visitFamixXYZ: by default recursively visits all the “children” of the entity being visited (eg.: visitFamixJavaClass: should trigger the visit of the attributes and methods of the class)

For large meta-models, this can be cumbersome to implement as there may be many kinds of entities (43 for FamixJava) and the work is very repetitive. The tool FamixVisitorCodeGenerator can do all the work for you, automatically.

Taking advantage of the meta-description of the Famix entities and the reflective nature of Pharo, it generates the accept: and visitFamixXYZ: for all entities of a meta-model.

Usage exmaple:

FamixVisitorCodeGenerator new
package: 'Famix-Java-Entities' visitorClass: FamixJavaVisitor .

or for a FAST meta-model:

FamixVisitorCodeGenerator new
package: 'FAST-Java-Entities' visitorClass: FASTJavaVisitor.

The tool needs an empty visitor class (or trait) created by the user (FamixJavaVisitor in the example above), and a Pharo package containing the Famix classes of a meta-model (Famix-Java-Entities in the example above). From this it will:

  • create an accept: method in all the classes in the given Famix package;
  • the accept: methods are created as extensions made by the package of the visitor;
  • the accept: methods invoke the correct visitFamixXYZ: depending on the class they are implemented in.
  • a setter method allows to skip this part: generateAccepts: false
  • the visitFamixXYZ: methods are created in the visitor class (or trait) for a “maximal visit” (see below).

For a friendlier visitor, it is convenient that the visitor methods reproduce the inheritance hierarchy of the entities. For example, if FamixJavaAttribute and FamixJavaParameter both inherit from FamixJavaVariable entity, it is convenient that visitFamixJavaAttribute: and visitFamixJavaParameter: both call visitFamixJavaVariable: so that a common behaviour for the visit can be implemented only once.

Since Famix heavily relies on traits to compose meta-models, the same idea applies to used traits. For example many entities implements FamixTSourceEntity to get a sourceAnchor. For all these entities, and if we need a generic behavior based on the source anchor, it is convenient that all the visitXYZ: methods call visitTSourceEntity: where the common behavior can be implemented.

Finally it might be convenient that the visitXYZ: methods, visit all the entites related to the one we are visiting. For example when visiting a FamixJavaVariable, it might be interesting to recursively visit its declaredType.

All these conditions defines what we call a “maxium” visit of the meta-model.

As described above, the maximum visitXYZ: methods will trigger a resursive visit of many things (super-class visit method, used traits visit method, all entities related to the one being visited).

One down side of this is that a maximum visit is not a viable one in Famix because all relationships are bi-directionnal, causing infinite loops in the visit. For example, if in a FamixJavaVariable we recursively visit its declaredType, then in the FamixJavaTType we will recursively visit the typedEntities including the one we just came from.

There could be various solution to this problem:

  • implement a memory mechanism in the visitor to remember what entities were already visited and do not go back to them.
  • do not visit all relationships of an entity, but only its “children” relationship
  • let the user handle the problem

For now the tool rely on the third solution. If an actual visitor inherits (or use) the generated visitor, it must take care or redefining the visit methods so that it does not enter in an infinite loop (implementing any of the two other solutions)

In this sense, the maximum visit methods can be viewed as cheat sheets, showing all the things that one could do when visiting an entity.

In the future we might implement the second solution (visit only children) as an option of the visitor. For now it is important to remember that the generated visitor cannot be used as is. Methods must be redefined to get a viable visitor.

The natural action would be to define the visitor as aclass from which all required actual visitors will inherit. However, because visitors are so handy to go through the entire model, we discovered that we needed a lot of them (eg. visitors to create a copy of a model, to re-export a model) and they sometimes need to inherit from some other class.

As such, we rather recommend to create the maximal visitor as a trait that can be used by all actual visitors. This make no difference for the FamixVisitorCodeGenerator and it might prove very useful.

Generate a class diagram visualization for a meta-model

This post is the first in a serie dedicated to Famix Tools

When creating or studying a meta-model, it is often convenient to be able to “see” it as a whole.

UML looks like a natural solution for this.

So in the past we had a tool to create UML diagrams of the meta-models through PlantUML (a small language and a tool to generate UML diagrams). The post Generate a plantUML visualization for a meta-model explained how to use this tool

But the tool had some limitations, one of which was that it was not easy to add a different backend than PlantUML.

Therefore, inspired by the previous tool, we redesigned a new one, FamixUMLDocumentor, with a simpler API and the possibility to add new backends.

We illustrate the use with the same Coaster example already used previously. You can also experiment with FDModel, a small meta-model used for testing.

You can create a PlantUML script for a UML class of your metamodel with:

FamixUMLDocumentor new
model: CCModel ;
generate ;
exportWith: (FamixUMLPlantUMLBackend new).

The result will be a PlantUML script that you can paste into https://plantuml.org/ to get this UML class diagram:

Generated UML class of the Coaster meta-model{: .img-fluid}

The API for the documenter is as follow:

  • model: — adds a meta-model to export. Several meta-models can be exported jointly by adding them one after the other. By default each meta-model is automatically assigned a color in which its entities will be drawn.
  • model:color: — same as previous but manually assign a Color to the meta-model.
  • onlyClasses: — specifies a list of classes to export. It can replace the use of model:.
  • excludeClasses: — specifies a list of classes to exclude from the export. Typically used with model: to remove from the UML some of the meta-model’s classes. Can also be used to exlude “stub” classes (see beWithStubs).
  • beWithStubs — Indicates to also export the super-classes and used traits of exported classes, even if these super-classes/traits or not part of the meta-models. These stubs have an automatically selected color different from the meta-models displayed.
  • beWithoutStubs — opposite of the preceding. This is the default option.
  • generate — creates an internal representation of a UML class diagram according to the configuration created with the preceding messages.
  • exportWith: — exports the internal representation with the “backend” given (for example: FamixUMLPlantUMLBackend in the example above)

The backend is normally called by the FamixUMLDocumentor but can be called manually. For example, the image above can be exported in a PlantUML script with:

documentor := FamixUMLDocumentor new.
documentor
model: CCModel ;
generate.
FamixUMLPlantUMLBackend new export: documentor umlEntities.

(Compare with the example given above)

Backends have only one mandatory method:

  • export: — Exports the collection of umlEntities (internal representation) in the format specific to the backend.

New backends can be created by subclassing FamixUMLAbstractBackend.

There is a FamixUMLRoassalBackend to export the UML diagram in Roassal (visible inside Pharo itself), and a FamixUMLMermaidBackend to export in Mermaid format (similar to PlantUML).

There is a FamixUMLTextBackend that outputs the UML class diagram in a textual form. By default it returns a string but this can be changed:

  • toFile: — Instead of putting the result in a string, will write it to the file whose name is given in argument.
  • outputStream: — specifies a stream on which to write the result of the backend.

FamixUMLPlantUMLBackend and FamixUMLMermaidBackend are subclasses of this FamixUMLTextBackend (therefore they can also export to a file).

Micro-Visitors for Parsing Programming Languages

For Moose, I had to design a number of parsers for various languages (Java, Ada, C/C++, PowerBuilder). If you have already done that, you will know that the Visitor pattern is a faithful ally. To help me in this, I came with the concept of “micro visitor” allowing to modularize visitors.

Parsing source code starts with a grammar of the programming language and an actual parser that creates an Abstract syntax Tree (AST) of the program.

For many programming languages, the AST can contain tens of different nodes. The way to master this complexity is to use visitors. A visitor is a class with one method (traditionaly visitXYZ(XYZ node)) for each possible type of node in the AST. Each method treats the current node and delegates to other methods treating the nodes below it.

For a parser like VerveineJ (Java to MSE importer) the visitor class reached 2000 lines of code and became difficult to maintain as there are also interactions between visiting methods because the treatment of a node down in the AST may depend on what are its parent nodes. For example, in Java, ThisExpression node may be found in different situations:

  • Return the instance running the current method: this.attribute
  • Return the enclosing object of the current instance: AClass.this
  • Invoke current class constructor: this(...)

Therefore the treatment in visitThisExpression( ThisExpression node) may depend on which method called it. This makes it more complex to develop and maintain all the “visitXYZ” methods.

On the other hand, a visitor typically has a small state:

  • the name of the file being parsed;
  • a context stack of the visit (eg visiting a method, inside a class, inside a file);
  • a model of the result being built by the visitor (eg a Moose model).

As a result, I came up with the notion of micro-visitors specialized for a single task. For example, for VerveineJ, I have 10 (concrete) micro-visitors, 4 to create entities and 6 to create dependencies between them:

  • VisitorPackageDef, creating Famix packages;
  • VisitorClassMethodDef, creating Famix classes and methods;
  • VisitorVarsDef, creating Famix attribute, parameter, local variable definition;
  • VisitorComments, creating comments in all Famix entities;
  • VisitorInheritanceRef, creating inheritances between classes
  • VisitorTypeRefRef, creating reference to declared types;
  • VisitorAccessRef, creating accesses to variables;
  • VisitorInvocRef, creating invocation dependencies between methods;
  • VisitorAnnotationRef, handling annotations on entities;
  • VisitorExceptionRef, handling declared/catched/thrown exceptions.

The resulting visitors are much smaller (around 600 lines of code for the three more complex: VisitorInvocRef, VisitorClassMethodDef, VisitorAccessRef ; less than 150 lines of code for VisitorPackageDef and VisitorExceptionRef) and thus easier to define and maintain. Also, because the visitor is specialized, there are less dependencies between the methods: VisitorInvocRef only treats ThisExpression when it is a constructor invocation.

The overhead on the execution is small as each visitor is specialized and does not need to go through all the AST (eg a visitor for function declaration in C would not have to visit the body of these functions since they cannot contain other function declarations).

Micro-visitors can be used independantly one of the other (in sequence) as in VerveineJ where each visitor is called one after the other (by the FamixRequestor class) to visit the full AST. The “orchestrator” object owns the state and pass it to each visitor in turn.

Micro-visitors can also call one another (in delegation). For example for PowerBuilder, there is one main visitor (PowerBuilder-Parser-Visitor.PWBCompilationUnitVisitor, visiting the AST for a source file) and 7 (concrete) micro-visitors:

  • PWBTypeDeclarationVisitor, visiting type declarations;
  • PWBBehaviouralDeclarationVisitor, visiting function/routine definitions;
  • PWBVariableDeclarationVisitor, visiting declarations of all kind of variables;
  • PWBTypeReferenceToIdentifierVisitor, visiting references to type names (for example in variable declarations);
  • PWBStatementsVisitor, visiting statements in the body of behaviourals;
  • PWBExpressionsVisitor, visiting expressions in statements;
  • PWBBehaviouralInvocationVisitor, visiting the invocation of behavioural in expressions.

In this case, the main visitor (PWBCompilationUnitVisitor) owns the state and its auxiliary visitors get this state from their respective parent visitor:

  • PWBCompilationUnitVisitor spawns a PWBBehaviouralDeclarationVisitor when it encounters a function definition, this one spawns a PWBStatementsVisitor to visit the body of the function, PWBStatementsVisitor spawns a PWBExpressionsVisitor to visit expressions found in the statements.
  • if the PWBExpressionsVisitor needs to access the context stack, it asks to its parent PWBStatementsVisitor, that asks to its parent PWBBehaviouralDeclarationVisitor, that asks to the PWBCompilationUnitVisitor.