When you are developing with Moose everyday, you know how to create an excellent visualization of your meta-model. But, we have to open a Pharo image, and it is hard to share it during a presentation. Often, we made one UML of the meta-model, and then… we forget to update it. Then, when sharing with others, you have to say that the UML is not correct but it is ok???.
In my opinion, this is super bad. Thus, I decided to have a look at GitHub Actions to update my UML automatically.
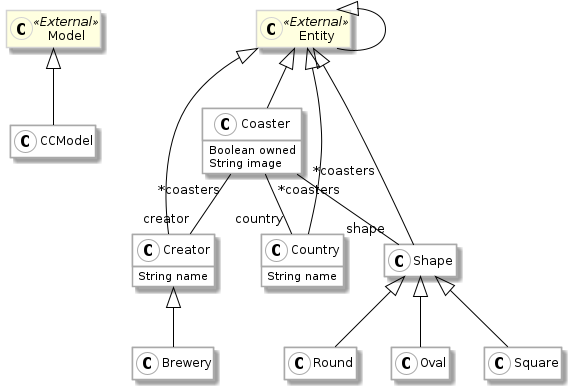
In the following, I present how to update GitHub Actions to add UML auto-generation. I use the Coaster project as an example. Please consider reading the blog post about using GitHub action with Pharo.
Configure SmalltalkCI
The first step is to configure SmalltalkCI for your project. To use it, we need to create two files: .smalltalk.ston, and the GitHub actions: .github/workflows/ci.yml.
The .smalltalk.ston file is used to configure the CI.
It is written in the Ston file format and configures how to load the Pharo project and how to test it.
In our case, the Coaster project does not have tests ![]() , so we set that the CI does not fail even if no tests are ran.
, so we set that the CI does not fail even if no tests are ran.
The final file can be found in the Coaster project.
SmalltalkCISpec {
  #loading : [
    SCIMetacelloLoadSpec {
      #baseline : 'Coaster',
      #directory : 'src',
      #load : [ 'default' ],
      #platforms : [ #pharo ],
      #onConflict : #useIncoming,
      #onUpgrade : #useIncoming
    }
  ],
  #testing : {
    #failOnZeroTests : false
  }
}
The second file, .github/workflows/ci.yml, is used by GitHub when running the CI. We describe in comments the main steps:
# Name of the project in the GitHub action panel
name: CI

# Execute the CI on push on the master branch
on:
  push:
    branches:
      - master

jobs:
  build:
    runs-on: ubuntu-latest
    strategy:
      matrix:
        # Use Moose 9 that includes our visualization tool
        smalltalk: [Moose64-9.0]
    name: $
    steps:
        # checkout the project
      - uses: actions/checkout@v2

        # Prepare the CI - download the correct VM :-)
      - uses: hpi-swa/setup-smalltalkCI@v1
        with:
          smalltalk-image: $

        # Use the CI - always better to run test
      - run: smalltalkci -s $
        shell: bash
        timeout-minutes: 15
Create the UML file
Once the main files are created, we can configure the CI also to create the UML file. To do so, we will use the plantUML visualization tool.
We add a new step in the .github/workflows/ci.yml file as a first step.
It consists of executing the FamixMMUMLDocumentor on the meta-model we want to document.
- name: Build meta-model plantuml image
  run: |
    $SMALLTALK_CI_VM  $SMALLTALK_CI_IMAGE eval "'coaster.puml' asFileReference writeStreamDo: [ :stream | stream nextPutAll:  (FamixMMUMLDocumentor new model: CCModel; beWithStub; generatePlantUMLModel) ]."
This new step creates the coaster.puml file in the $HOME folder of the GitHub action.
Then, we use a new action that creates the coaster.png file.
- name: Generate Coaster PNG Diagrams
  uses: cloudbees/plantuml-github-action@master
  with:
    args: -v -tpng coaster.puml
Nice ![]() , we have the png file generated by the GitHub action.
, we have the png file generated by the GitHub action.
Upload the UML
Finally, you can upload the UML png as an artifact of the Github action or upload it somewhere else. Here, I present how to publish it to a new branch of your repository. Then, we will see how to show it in the Readme of the main branch.
The goal of this step is to automatically update the documentation for end-users.
First, we create a new directory where we put the UML png file.
- name: Move artifact
  run: |
    mkdir doc-uml
    mv *.png doc-uml
Then, we configure this directory as a new git repository.
- name: Init new repo in doc-uml folder and commit generated files
  run: |
    cd doc-uml/
    git init
    git add -A
    git config --local user.email "action@github.com"
    git config --local user.name "GitHub Action"
    git commit -m 'update doc'
This new repository includes only the documentation we generated. The final step is to push this into a new branch of our project.
Because we do not care about the history of our meta-model UML files here, we will force push the repository. But creating more intelligent scripts is possible.
To do so, we use the ad-m/github-push-action GitHub action.
# Careful, this can kill your project
- name: Force push to destination branch
  uses: ad-m/github-push-action@v0.5.0
  with:
    # Token for the repo. Can be passed in using $\
    github_token: $
    force: true
    # Destination branch to push changes
    branch: v1/doc
    # We need to push from the folder where files were generated.
    # Same as where the new repo was initialized in the previous step
    directory: ./doc-uml
BE CAREFUL; if you incorrectly set the
branchargument, you might delete your project.
When used, this action pushes the UML files in the v1/doc branch.
The v1/doc of the Coaster project is created here.
Finally, we add the image of the UML files in the Readme of the main project. For the Coaster project, we modified the Readme and added:
The URL follows the following pattern: https://raw.githubusercontent.com/:owner:/:repo:/:branch:/:file:.
The final .github/workflows/ci.yml file is here.
Conclusion
That’s it ![]() Now, at every commit, the CI will update the png files used in the Readme of the project, and thus, the documentation is always up-to-date.
Now, at every commit, the CI will update the png files used in the Readme of the project, and thus, the documentation is always up-to-date.